Source for this related gaming news is as simple as you click This website and read another one!
Source for this related gaming news is as simple as you click This website and read another one!
Source for this related gaming news is as simple as you click This website and read another one!
Source for this related gaming news is as simple as you click This website and read another one!
Source for this related gaming news is as simple as you click This website and read another one!
Source for this related gaming news is as simple as you click This website and read another one!
Source for this related gaming news is as simple as you click This website and read another one!
Source for this related gaming news is as simple as you click This website and read another one!
Source for this related gaming news is as simple as you click This website and read another one!
Source for this related gaming news is as simple as you click This website and read another one!
Source for this related gaming news is as simple as you click This website and read another one!
Source for this related gaming news is as simple as you click This website and read another one!
Source for this related gaming news is as simple as you click This website and read another one!
Source for this related gaming news is as simple as you click This website and read another one!
Source for this related gaming news is as simple as you click This website and read another one!
Source for this related gaming news is as simple as you click This website and read another one!
Source for this related gaming news is as simple as you click This website and read another one!
Source for this related gaming news is as simple as you click This website and read another one!
Source for this related gaming news is as simple as you click This website and read another one!
Source for this related gaming news is as simple as you click This website and read another one!
Source for this related gaming news is as simple as you click This website and read another one!
Source for this related gaming news is as simple as you click This website and read another one!
Source for this related gaming news is as simple as you click This website and read another one!
Source for this related gaming news is as simple as you click This website and read another one!
Source for this related gaming news is as simple as you click This website and read another one!
Source for this related gaming news is as simple as you click This website and read another one!
Source for this related gaming news is as simple as you click This website and read another one!
Source for this related gaming news is as simple as you click This website and read another one!
Source for this related gaming news is as simple as you click This website and read another one!
Source for this related gaming news is as simple as you click This website and read another one!
Source for this related gaming news is as simple as you click This website and read another one!
Source for this related gaming news is as simple as you click This website and read another one!
Source for this related gaming news is as simple as you click This website and read another one!
Source for this related gaming news is as simple as you click This website and read another one!
Source for this related gaming news is as simple as you click This website and read another one!
Source for this related gaming news is as simple as you click This website and read another one!
Source for this related gaming news is as simple as you click This website and read another one!
Source for this related gaming news is as simple as you click This website and read another one!
Source for this related gaming news is as simple as you click This website and read another one!
Source for this related gaming news is as simple as you click This website and read another one!
Source for this related gaming news is as simple as you click This website and read another one!
Source for this related gaming news is as simple as you click This website and read another one!
Source for this related gaming news is as simple as you click This website and read another one!
Source for this related gaming news is as simple as you click This website and read another one!
Source for this related gaming news is as simple as you click This website and read another one!
Source for this related gaming news is as simple as you click This website and read another one!
Source for this related gaming news is as simple as you click This website and read another one!
Source for this related gaming news is as simple as you click This website and read another one!
Source for this related gaming news is as simple as you click This website and read another one!
Source for this related gaming news is as simple as you click This website and read another one!
Source for this related gaming news is as simple as you click This website and read another one!
Source for this related gaming news is as simple as you click This website and read another one!
Source for this related gaming news is as simple as you click This website and read another one!
Source for this related gaming news is as simple as you click This website and read another one!
Source for this related gaming news is as simple as you click This website and read another one!
Source for this related gaming news is as simple as you click This website and read another one!
Source for this related gaming news is as simple as you click This website and read another one!
Source for this related gaming news is as simple as you click This website and read another one!
Source for this related gaming news is as simple as you click This website and read another one!
Source for this related gaming news is as simple as you click This website and read another one!
Source for this related gaming news is as simple as you click This website and read another one!
Source for this related gaming news is as simple as you click This website and read another one!
Source for this related gaming news is as simple as you click This website and read another one!
Source for this related gaming news is as simple as you click This website and read another one!
Source for this related gaming news is as simple as you click This website and read another one!
Source for this related gaming news is as simple as you click This website and read another one!
Source for this related gaming news is as simple as you click This website and read another one!
Source for this related gaming news is as simple as you click This website and read another one!
Source for this related gaming news is as simple as you click This website and read another one!
Source for this related gaming news is as simple as you click This website and read another one!
Source for this related gaming news is as simple as you click This website and read another one!
Source for this related gaming news is as simple as you click This website and read another one!
Source for this related gaming news is as simple as you click This website and read another one!
Source for this related gaming news is as simple as you click This website and read another one!
Source for this related gaming news is as simple as you click This website and read another one!
Source for this related gaming news is as simple as you click This website and read another one!
Source for this related gaming news is as simple as you click This website and read another one!
Source for this related gaming news is as simple as you click This website and read another one!
Source for this related gaming news is as simple as you click This website and read another one!
Source for this related gaming news is as simple as you click This website and read another one!
Source for this related gaming news is as simple as you click This website and read another one!
Source for this related gaming news is as simple as you click This website and read another one!
Source for this related gaming news is as simple as you click This website and read another one!
Source for this related gaming news is as simple as you click This website and read another one!
Source for this related gaming news is as simple as you click This website and read another one!
Source for this related gaming news is as simple as you click This website and read another one!
Source for this related gaming news is as simple as you click This website and read another one!
Source for this related gaming news is as simple as you click This website and read another one!
Source for this related gaming news is as simple as you click This website and read another one!
Source for this related gaming news is as simple as you click This website and read another one!
Source for this related gaming news is as simple as you click This website and read another one!
Source for this related gaming news is as simple as you click This website and read another one!
Source for this related gaming news is as simple as you click This website and read another one!
Source for this related gaming news is as simple as you click This website and read another one!
Source for this related gaming news is as simple as you click This website and read another one!
Source for this related gaming news is as simple as you click This website and read another one!
Source for this related gaming news is as simple as you click This website and read another one!
Source for this related gaming news is as simple as you click This website and read another one!
Source for this related gaming news is as simple as you click This website and read another one!
Source for this related gaming news is as simple as you click This website and read another one!
Source for this related gaming news is as simple as you click This website and read another one!
Source for this related gaming news is as simple as you click This website and read another one!
Source for this related gaming news is as simple as you click This website and read another one!
Source for this related gaming news is as simple as you click This website and read another one!
Source for this related gaming news is as simple as you click This website and read another one!
Source for this related gaming news is as simple as you click This website and read another one!
Source for this related gaming news is as simple as you click This website and read another one!
Source for this related gaming news is as simple as you click This website and read another one!
Source for this related gaming news is as simple as you click This website and read another one!
Source for this related gaming news is as simple as you click This website and read another one!
Source for this related gaming news is as simple as you click This website and read another one!
Source for this related gaming news is as simple as you click This website and read another one!
Source for this related gaming news is as simple as you click This website and read another one!
Source for this related gaming news is as simple as you click This website and read another one!
Source for this related gaming news is as simple as you click This website and read another one!
Source for this related gaming news is as simple as you click This website and read another one!
Source for this related gaming news is as simple as you click This website and read another one!
Source for this related gaming news is as simple as you click This website and read another one!
Source for this related gaming news is as simple as you click This website and read another one!
Source for this related gaming news is as simple as you click This website and read another one!
Source for this related gaming news is as simple as you click This website and read another one!
Source for this related gaming news is as simple as you click This website and read another one!
Source for this related gaming news is as simple as you click This website and read another one!
Source for this related gaming news is as simple as you click This website and read another one!
Source for this related gaming news is as simple as you click This website and read another one!
Source for this related gaming news is as simple as you click This website and read another one!
Source for this related gaming news is as simple as you click This website and read another one!
Source for this related gaming news is as simple as you click This website and read another one!
Source for this related gaming news is as simple as you click This website and read another one!
Source for this related gaming news is as simple as you click This website and read another one!
Source for this related gaming news is as simple as you click This website and read another one!
Source for this related gaming news is as simple as you click This website and read another one!
Source for this related gaming news is as simple as you click This website and read another one!
Source for this related gaming news is as simple as you click This website and read another one!
Source for this related gaming news is as simple as you click This website and read another one!
Source for this related gaming news is as simple as you click This website and read another one!
Source for this related gaming news is as simple as you click This website and read another one!
Source for this related gaming news is as simple as you click This website and read another one!
Source for this related gaming news is as simple as you click This website and read another one!
Source for this related gaming news is as simple as you click This website and read another one!
Source for this related gaming news is as simple as you click This website and read another one!
Source for this related gaming news is as simple as you click This website and read another one!
Source for this related gaming news is as simple as you click This website and read another one!
Source for this related gaming news is as simple as you click This website and read another one!
Source for this related gaming news is as simple as you click This website and read another one!
Source for this related gaming news is as simple as you click This website and read another one!
Source for this related gaming news is as simple as you click This website and read another one!
Source for this related gaming news is as simple as you click This website and read another one!
Source for this related gaming news is as simple as you click This website and read another one!
Source for this related gaming news is as simple as you click This website and read another one!
Source for this related gaming news is as simple as you click This website and read another one!
Source for this related gaming news is as simple as you click This website and read another one!
Source for this related gaming news is as simple as you click This website and read another one!
Source for this related gaming news is as simple as you click This website and read another one!
Source for this related gaming news is as simple as you click This website and read another one!
Source for this related gaming news is as simple as you click This website and read another one!
Source for this related gaming news is as simple as you click This website and read another one!
Source for this related gaming news is as simple as you click This website and read another one!
Source for this related gaming news is as simple as you click This website and read another one!
Source for this related gaming news is as simple as you click This website and read another one!
Source for this related gaming news is as simple as you click This website and read another one!
Source for this related gaming news is as simple as you click This website and read another one!
Source for this related gaming news is as simple as you click This website and read another one!
Source for this related gaming news is as simple as you click This website and read another one!
Source for this related gaming news is as simple as you click This website and read another one!
Source for this related gaming news is as simple as you click This website and read another one!
Source for this related gaming news is as simple as you click This website and read another one!
Source for this related gaming news is as simple as you click This website and read another one!
Source for this related gaming news is as simple as you click This website and read another one!
Source for this related gaming news is as simple as you click This website and read another one!
Source for this related gaming news is as simple as you click This website and read another one!
Source for this related gaming news is as simple as you click This website and read another one!
Source for this related gaming news is as simple as you click This website and read another one!
Source for this related gaming news is as simple as you click This website and read another one!
Source for this related gaming news is as simple as you click This website and read another one!
Source for this related gaming news is as simple as you click This website and read another one!
Source for this related gaming news is as simple as you click This website and read another one!
Source for this related gaming news is as simple as you click This website and read another one!
Source for this related gaming news is as simple as you click This website and read another one!
Source for this related gaming news is as simple as you click This website and read another one!
Source for this related gaming news is as simple as you click This website and read another one!
Source for this related gaming news is as simple as you click This website and read another one!
Source for this related gaming news is as simple as you click This website and read another one!
Source for this related gaming news is as simple as you click This website and read another one!
Source for this related gaming news is as simple as you click This website and read another one!
Source for this related gaming news is as simple as you click This website and read another one!
Source for this related gaming news is as simple as you click This website and read another one!
Source for this related gaming news is as simple as you click This website and read another one!
Source for this related gaming news is as simple as you click This website and read another one!
Source for this related gaming news is as simple as you click This website and read another one!
Source for this related gaming news is as simple as you click This website and read another one!
Source for this related gaming news is as simple as you click This website and read another one!
Source for this related gaming news is as simple as you click This website and read another one!
Source for this related gaming news is as simple as you click This website and read another one!
Source for this related gaming news is as simple as you click This website and read another one!
Source for this related gaming news is as simple as you click This website and read another one!
Source for this related gaming news is as simple as you click This website and read another one!
Source for this related gaming news is as simple as you click This website and read another one!
Source for this related gaming news is as simple as you click This website and read another one!
Source for this related gaming news is as simple as you click This website and read another one!
Source for this related gaming news is as simple as you click This website and read another one!
Source for this related gaming news is as simple as you click This website and read another one!
Source for this related gaming news is as simple as you click This website and read another one!
Source for this related gaming news is as simple as you click This website and read another one!
Source for this related gaming news is as simple as you click This website and read another one!
Source for this related gaming news is as simple as you click This website and read another one!
Source for this related gaming news is as simple as you click This website and read another one!
Source for this related gaming news is as simple as you click This website and read another one!
Source for this related gaming news is as simple as you click This website and read another one!
Source for this related gaming news is as simple as you click This website and read another one!
Source for this related gaming news is as simple as you click This website and read another one!
Source for this related gaming news is as simple as you click This website and read another one!
Source for this related gaming news is as simple as you click This website and read another one!
Source for this related gaming news is as simple as you click This website and read another one!
Source for this related gaming news is as simple as you click This website and read another one!
Source for this related gaming news is as simple as you click This website and read another one!
Source for this related gaming news is as simple as you click This website and read another one!
Source for this related gaming news is as simple as you click This website and read another one!
Source for this related gaming news is as simple as you click This website and read another one!
Source for this related gaming news is as simple as you click This website and read another one!
Source for this related gaming news is as simple as you click This website and read another one!
Source for this related gaming news is as simple as you click This website and read another one!
Source for this related gaming news is as simple as you click This website and read another one!
Source for this related gaming news is as simple as you click This website and read another one!
Source for this related gaming news is as simple as you click This website and read another one!
Source for this related gaming news is as simple as you click This website and read another one!
Source for this related gaming news is as simple as you click This website and read another one!
Source for this related gaming news is as simple as you click This website and read another one!
Source for this related gaming news is as simple as you click This website and read another one!
Source for this related gaming news is as simple as you click This website and read another one!
Source for this related gaming news is as simple as you click This website and read another one!
Source for this related gaming news is as simple as you click This website and read another one!
Source for this related gaming news is as simple as you click This website and read another one!
Source for this related gaming news is as simple as you click This website and read another one!
Source for this related gaming news is as simple as you click This website and read another one!
Source for this related gaming news is as simple as you click This website and read another one!
Source for this related gaming news is as simple as you click This website and read another one!
Source for this related gaming news is as simple as you click This website and read another one!
Source for this related gaming news is as simple as you click This website and read another one!
Source for this related gaming news is as simple as you click This website and read another one!
Source for this related gaming news is as simple as you click This website and read another one!
Source for this related gaming news is as simple as you click This website and read another one!
Source for this related gaming news is as simple as you click This website and read another one!
Source for this related gaming news is as simple as you click This website and read another one!
Source for this related gaming news is as simple as you click This website and read another one!
Source for this related gaming news is as simple as you click This website and read another one!
Source for this related gaming news is as simple as you click This website and read another one!
Source for this related gaming news is as simple as you click This website and read another one!
Source for this related gaming news is as simple as you click This website and read another one!
Source for this related gaming news is as simple as you click This website and read another one!
Source for this related gaming news is as simple as you click This website and read another one!
Source for this related gaming news is as simple as you click This website and read another one!
Source for this related gaming news is as simple as you click This website and read another one!
Source for this related gaming news is as simple as you click This website and read another one!
Source for this related gaming news is as simple as you click This website and read another one!
Source for this related gaming news is as simple as you click This website and read another one!
Source for this related gaming news is as simple as you click This website and read another one!
Source for this related gaming news is as simple as you click This website and read another one!
Source for this related gaming news is as simple as you click This website and read another one!
Source for this related gaming news is as simple as you click This website and read another one!
Source for this related gaming news is as simple as you click This website and read another one!
Source for this related gaming news is as simple as you click This website and read another one!
Source for this related gaming news is as simple as you click This website and read another one!
Source for this related gaming news is as simple as you click This website and read another one!
Source for this related gaming news is as simple as you click This website and read another one!
Source for this related gaming news is as simple as you click This website and read another one!
Source for this related gaming news is as simple as you click This website and read another one!
Source for this related gaming news is as simple as you click This website and read another one!
Source for this related gaming news is as simple as you click This website and read another one!
Source for this related gaming news is as simple as you click This website and read another one!
Source for this related gaming news is as simple as you click This website and read another one!
Source for this related gaming news is as simple as you click This website and read another one!
Source for this related gaming news is as simple as you click This website and read another one!
Source for this related gaming news is as simple as you click This website and read another one!
Source for this related gaming news is as simple as you click This website and read another one!
Source for this related gaming news is as simple as you click This website and read another one!
Source for this related gaming news is as simple as you click This website and read another one!
Source for this related gaming news is as simple as you click This website and read another one!
Source for this related gaming news is as simple as you click This website and read another one!
Source for this related gaming news is as simple as you click This website and read another one!
Source for this related gaming news is as simple as you click This website and read another one!
Source for this related gaming news is as simple as you click This website and read another one!
Source for this related gaming news is as simple as you click This website and read another one!
Source for this related gaming news is as simple as you click This website and read another one!
Source for this related gaming news is as simple as you click This website and read another one!
Source for this related gaming news is as simple as you click This website and read another one!
Source for this related gaming news is as simple as you click This website and read another one!
Source for this related gaming news is as simple as you click This website and read another one!
Source for this related gaming news is as simple as you click This website and read another one!
Source for this related gaming news is as simple as you click This website and read another one!
Source for this related gaming news is as simple as you click This website and read another one!
Source for this related gaming news is as simple as you click This website and read another one!
Source for this related gaming news is as simple as you click This website and read another one!
Source for this related gaming news is as simple as you click This website and read another one!
Source for this related gaming news is as simple as you click This website and read another one!
Source for this related gaming news is as simple as you click This website and read another one!
Source for this related gaming news is as simple as you click This website and read another one!
Source for this related gaming news is as simple as you click This website and read another one!
Source for this related gaming news is as simple as you click This website and read another one!
Source for this related gaming news is as simple as you click This website and read another one!
Source for this related gaming news is as simple as you click This website and read another one!
Source for this related gaming news is as simple as you click This website and read another one!
Source for this related gaming news is as simple as you click This website and read another one!
Source for this related gaming news is as simple as you click This website and read another one!
Source for this related gaming news is as simple as you click This website and read another one!
Source for this related gaming news is as simple as you click This website and read another one!
Source for this related gaming news is as simple as you click This website and read another one!
Source for this related gaming news is as simple as you click This website and read another one!
Source for this related gaming news is as simple as you click This website and read another one!
Source for this related gaming news is as simple as you click This website and read another one!
Source for this related gaming news is as simple as you click This website and read another one!
Source for this related gaming news is as simple as you click This website and read another one!


This interests me for making gifts. I would like to see pictured the back. Is it open as it looks from the front, or on a fold of fabric?
The back is the same piece of fabric. Let me know if you ave any more questions, best of luck!
LOVING
Drapery material would be good for this.
So true! I’ve found heavier fabrics work better if you want the vest to have better movement.
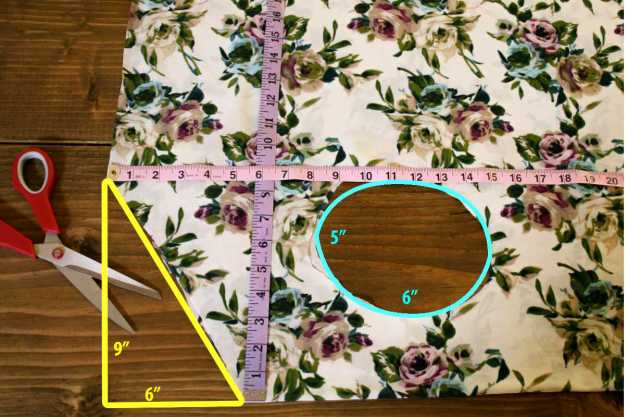
Is the fabric folded in half? Just wondering because I only see one armhole. Where is the placement for the other armhole? Thanks.
Yes it is, the fold is the bottom segment of the diagram.
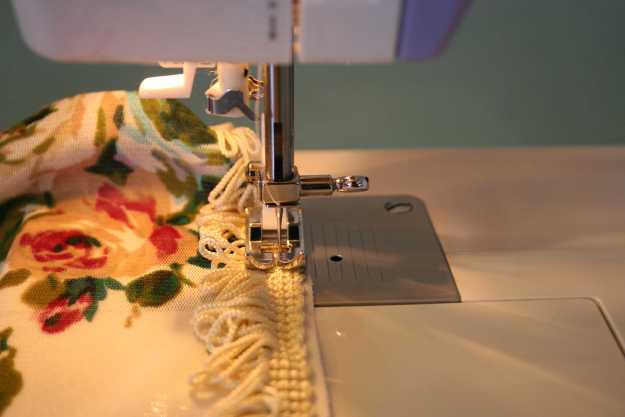
Just to clarify- no sewing the raw edges? I may try with linen- that would be cute with the fringed edges. But most other materials might randomly fray.
Did I miss where you specified the width of the fabric?