


Would you really like to know how to make a still? Read and consider this DIY to purify your water.
RELATED: 37 Insanely Easy DIY Projects For Beginners
How to Make a Still at Home
Cheap Homemade Still
Don’t you just hate it when you find yourself on a desert island with nothing but 20 feet of refrigerator coil, a 5-gallon bucket, and a stove? (And a mason jar with an amazing custom logo on it?) Using only these and a few other simple supplies, however, we will show you how to make your own DIY home still.
Stills can be used to purify salt water into drinking water…as well as turn other stuff into a drinkable concoction we’re not legally allowed to talk about. There are a lot of complicated still designs but this one you can do at home.
Don’t go blind on our account, okay? And, as always, drink (water) responsibly.
Supplies for Making a DIY Still
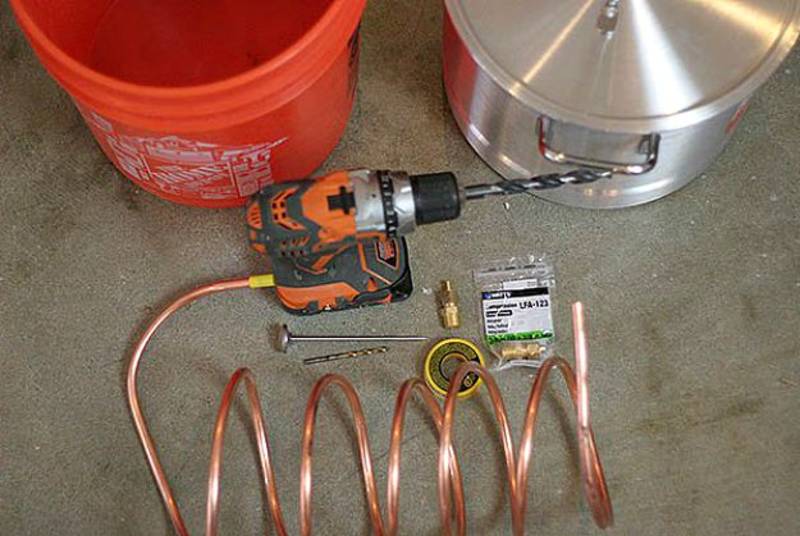
- Aluminum pot with an aluminum lid (we used a tamale steamer from a place that rhymes with Target…Doh!)
- 5 Gallon bucket
- Drill
- 1/8 inch drill bit
- 3/8 inch drill bit
- Cooking Thermometer
- Teflon Tape
- Hot glue gun with high-temperature hot glue sticks
- Metal File
- 3/8-inch to 3/8-inch compression adapter (found in the plumbing section
- 20 ft. Refrigerator coil
- Ice
- A stove or other consistent heat source (when using the still you need to keep whatever you are boiling at a very even temp)
Step 1: Drill a 1/8-inch Hole on the Aluminum Pot
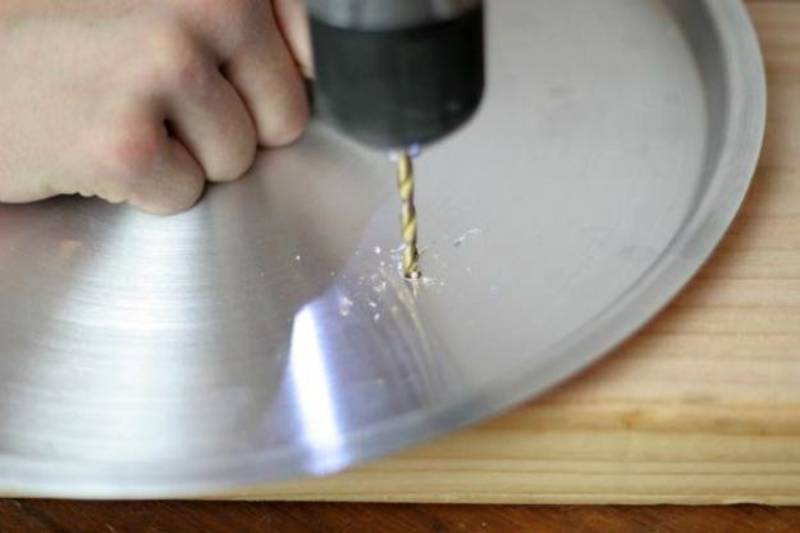
Throw the lid over a piece of scrap wood to make it easier and drill a hole a few inches back from the edge of the lid.
- 【Versatile Thumper Keg】The alcohol still with thumper keg speeds up distillation through...
- 【Premium Stainless Steel】This distillery kit for alcohol features premium stainless steel...
Step 2: Wrap the Thermometer with Teflon Tape
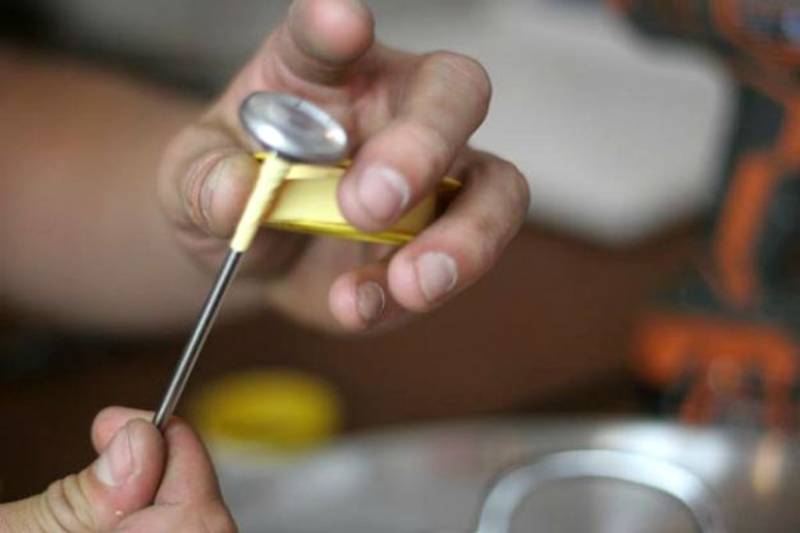
Originally, we were just going to wrap the thermometer with Teflon tape to create an airtight seal but decided we wanted to secure this thing in place even more with some hot glue (rated for high temps). You could probably get away with just using hot glue at the end of the day and ditching the Teflon.
Step 3: Place the Thermometer in the Hole
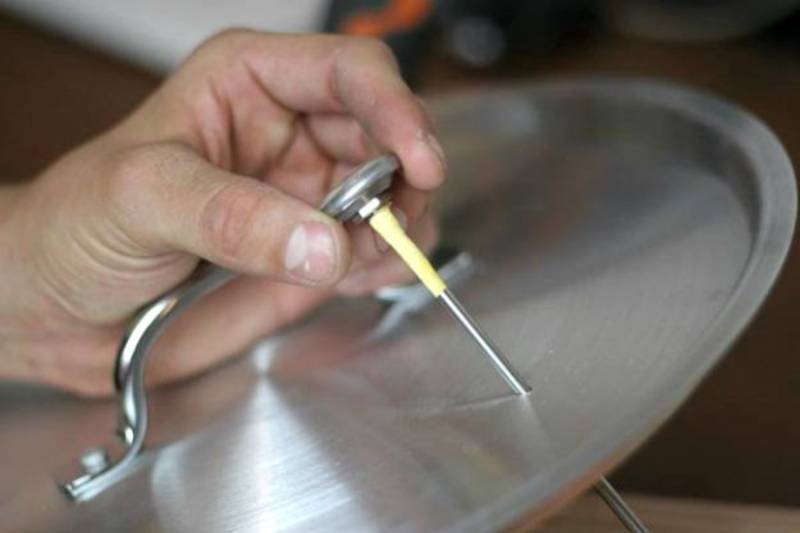
Thread your cooking thermometer through the hole so it sits nice and flush on the top of the lid.
Step 4: Secure the Thermometer with Hot Glue
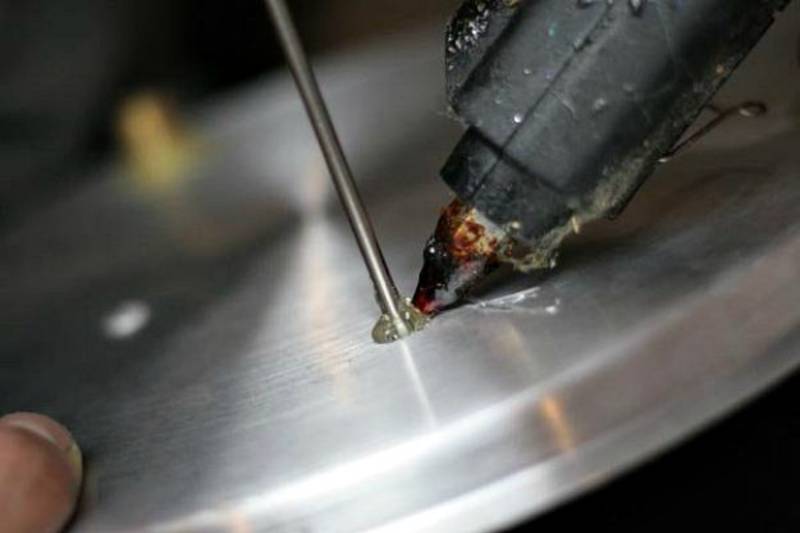
For those concerned that hot glue is a bad choice for this project (since it will be in direct contact with hot steam), it’s important to note that high-temperature hot glue sticks have a melting point well above the melting point of water (212°). This is also true for the melting point of “other liquids” (172.4°).
There are other adhesives you can use, including high temp silicone and even high temp resins. Just make sure whatever you use is rated for heat well beyond what your liquid’s steam will be creating.
Step 5: Drill a 3/8-inch hole in the Pot Lid
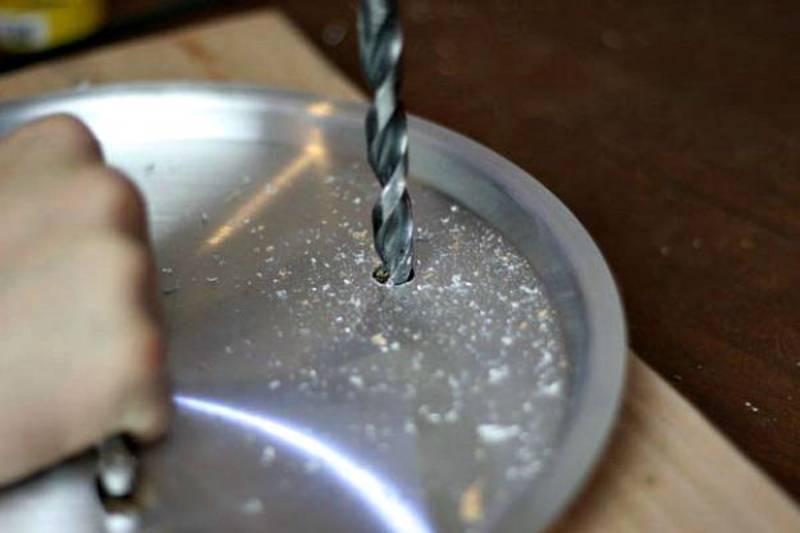
Begin by drilling another 1/8 inch hole in the lid. This will act as a starter hole for the much bigger 3/8 inch drill bit.
Put it roughly opposite from the thermometer across the lid.
Drill a 3/8 inch hole with the 3/8 inch drill bit. The nasty burrs are hard to see but they need to be filed off.
Step 6: File as Needed
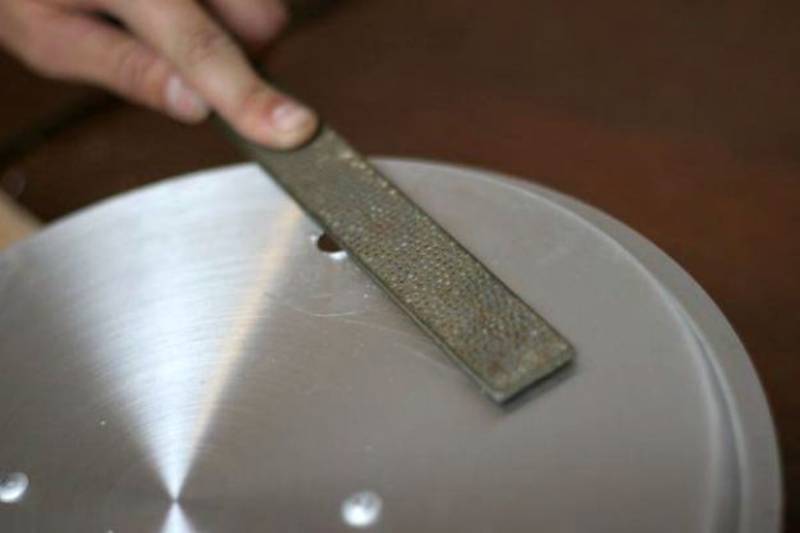
If there are any burrs, this could cause some problems when inserting the compression fitting. Take a file and grind the burrs down until they are gone.
Step 7: Insert a Compression Fitting into the Lid

Insert the male threaded nut of the compression fitting into the hole by twisting it through from the bottom of the lid. The fit won’t be perfect, but don’t worry if it jiggles around a little bit.
RELATED: How To Make A Water Filter
Step 8: Seal the Fitting with Hot Glue
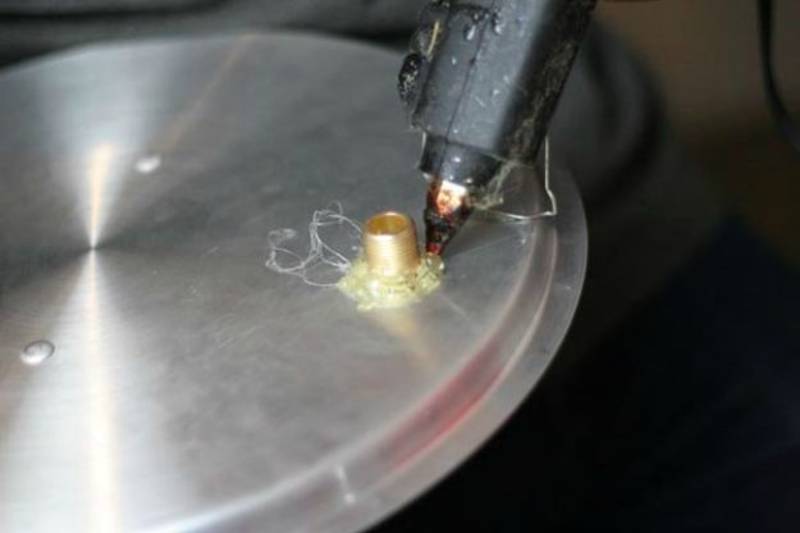
This seal needs to be airtight to prevent steam from leaking through it. It’s time to bust out that trusty glue gun again!
Make sure you put hot glue on the other side as well, working well around the seams.
Step 9: Attach the Copper Coil to the Lid
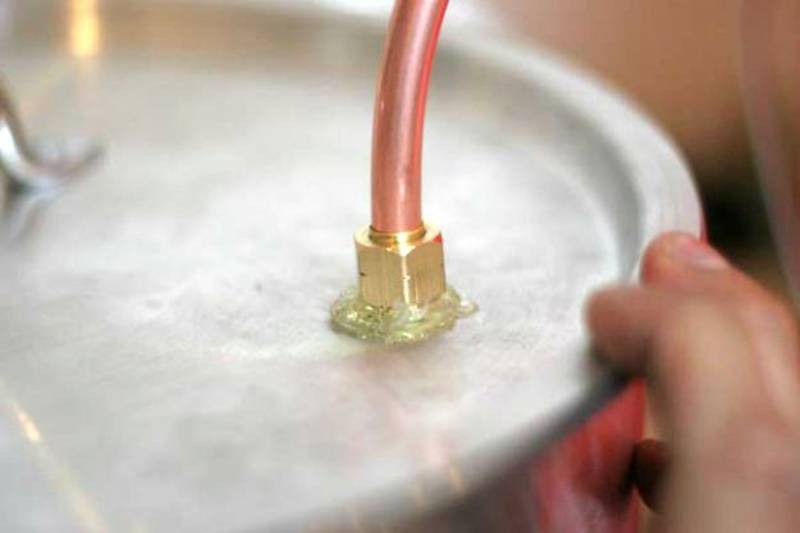
Take the female-threaded nut that came with your compression fitting and place it over one end of the refrigerator coil.
This end of your compression fitting has a part called a “ferrule” that comes with it. It’s a small circular ring that looks kind of like a grommet. The ferrule helps create a tight connection between the female and male ends of your compression nut.
Screw the female-threaded nut onto the male-threaded nut that is protruding from the lid.
Step 10: Drill a 3/8-inch Hole in the Bucket
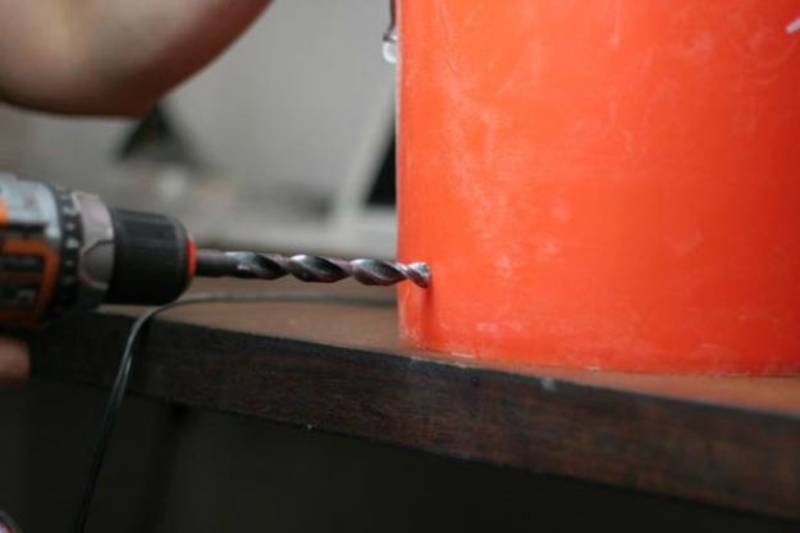
Use a 1/8 inch drill bit to begin a pilot hole in the 5-gallon bucket. Put it about two inches above the base.
With a 3/8 inch drill bit, drill a 3/8 inch hole where the pilot hole is.
Yes, you are supposed to drill a hole in your brand new bucket.

Step 11: Insert Second Compression Fitting into the Bucket
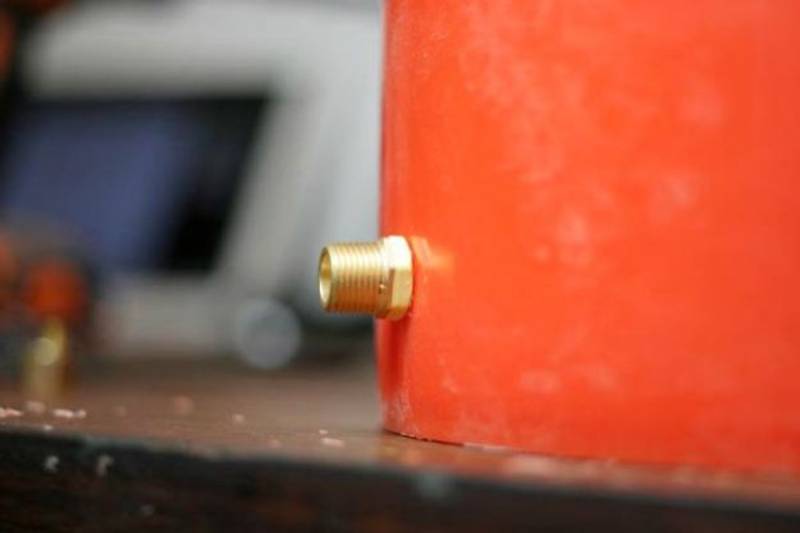
Screw the male-threaded nut of the other compression fitting into the bucket.
Step 12: Make the Seal Watertight with the Hot Glue Gun
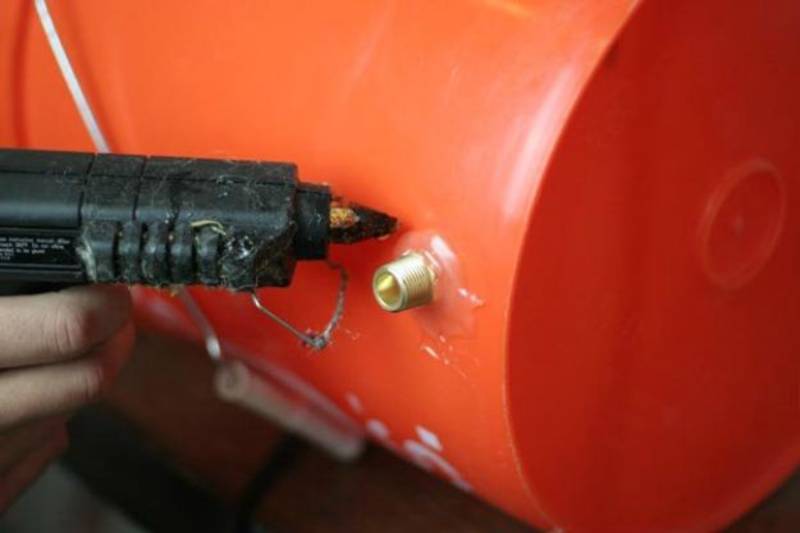
Just like you did with the lid, seal this dude in nice and tight with the glue.
Step 13: Tighten the Refrigerator Coil if Needed
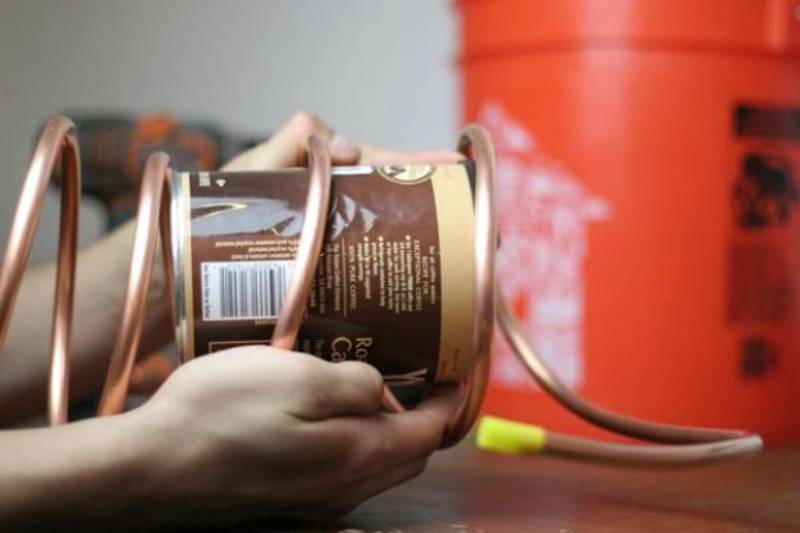
If your coil is currently too big to fit snugly in whatever bucket you are using, you want to close down the coils first. Use something cylindrical to help you reshape it, like this coffee can we grabbed from the kitchen.
Anything with a cylindrical shape will do the trick. Work fairly gently so you don’t ding up your tubing, pressing down on the coil rings to collapse the system to fit.
Step 14: Attach the Coil to the Bucket
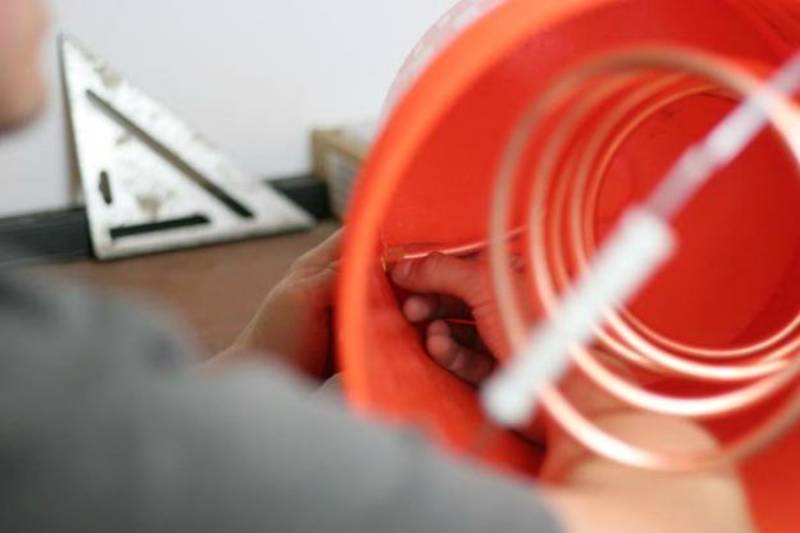
On the other end of the coil, place the second female-threaded nut over the coil and insert a ferrule into it.
Place this end of the coil into the bucket and thread the female nut onto the male nut that is sticking into the bucket from the outside.
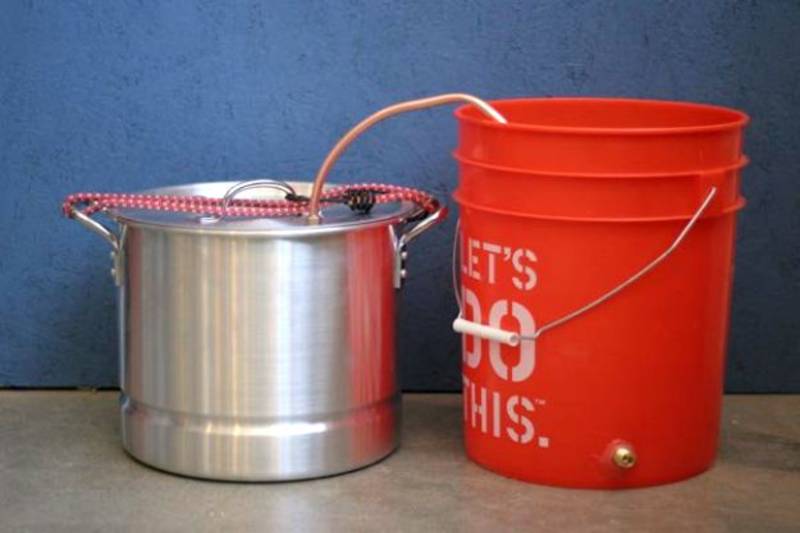
Your simple DIY still is now complete. We threw a bungee cord over the top of ours since the pot we used doesn’t lock down, making it easier to carry.
Don’t worry about getting an actual locking pot, however, as this system will not be building up a lot of pressure when you use it, it’s simply allowing the steam from whatever you are boiling to be captured in our orange bucket.
Note on Use:
Do not distill alcohol with this still. It is illegal to distill alcohol without a permit and is also very dangerous.
Methanol has a lower boiling point than alcohol, and if you are distilling alcohol, the first portion of your distillate will have a high concentration of methanol.
What Is Methanol? A colorless, volatile, and flammable liquid made from wood which is why it’s also called “wood alcohol.”
In small amounts, methanol will make you blind. In larger amounts, it will kill you.
Note on Temperatures:
You need to look up the boiling point of whatever you put in your still before you use it. Water, for example, has a boiling point of 212°, so if you were distilling salt water into drinking water, you would put it in the pot and bring the water to a boil, keeping the heat source at a level that maintains a thermometer reading of 212°.
This will cause the water vapour to turn to gas and travel through the copper tubing.
Step 15: Add Ice
Okay, you don’t need quite this much:
But you are going to need to cool the gases you create in this still so they condense back to liquid. For testing purposes, ice is the easiest way to go, and you only really need a small bag if using a bucket as we did.
Other options are to build a closed system with your bucket so the gas cannot escape, but in the interest of keeping anyone from potentially blowing themselves up with compressed methanol…our lawyers told us to leave that step out.
Enjoy your fresh water!

Try to get more ideas on building your own still. Check out this video by Barley and Hops Brewing:
That’s it for your homemade DIY still! Apparently, there’s quite a lot of materials you need for this project not to mention the drilling and sealing required, but this is so doable and it’s going to be fun!
Besides, this DIY still will make itself useful in real emergency situations and disaster scenarios.
Now you know how to make a still, do you think you can manage to complete it on your own? Share your thoughts with us in the comments section below!
UP NEXT:
- How To Build Two-Tier Backyard Fountains In 8 Easy Steps
- DIY Vacuum Grabber Tool | Robotic Arm Plans | Fun Projects
- How To Make A Macrame Lawn Chair | DIY Projects
Calling all crafting DIYhards, DIY Projects needs YOU! Click here if you want to write for us.
Don’t forget to stay connected with us on Facebook, Twitter, and Instagram!Editor’s Note: This post was originally published on May 9, 2014, and has been updated for quality and relevancy.


