Learn how to make a paracord belt and have a practical fashion item with survival uses, handy!
RELATED: Cool Paracord Projects
In this article:
- Paracord Belt vs Paracord Bracelet
- Supplies You Will Need to Make a Paracord Belt
- Instructions on How to Make a Paracord Belt
- Tips and Tricks on How to Make a Paracord Bracelet
- Deploying Your DIY Survival Belt
How to Make a Paracord Belt Plus Tips and Tricks
Paracord Belt vs Paracord Bracelet
Paracord bracelets can come in handy but only have 8-12 feet of rope, while a paracord belt can have up to 50 feet or more of 550 paracords. A paracord bracelet can be a handful to DIY too since it's a smaller item, while a paracord belt allows you more room to work on.
In extreme survival situations, 50 feet of rope would be a lot more useful for you than 8-12 feet. This paracord belt can give you at least 50 feet of paracord rope and up to 100 ft. of 550 cord depending on your waist size.
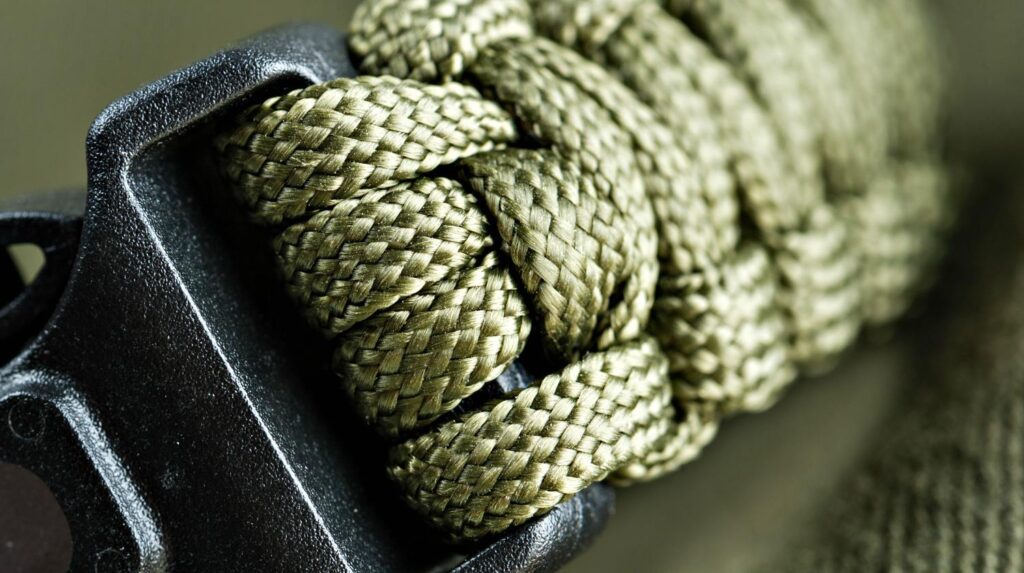
This belt is a quick deploy paracord belt using Slatt's rescue weave. You can unravel, or deploy, the paracord in a matter of seconds.
With this step-by-step guide on how to make a paracord belt, let's get this easy paracord belt started now!
Supplies You Will Need to Make a Paracord Belt
|
For best results, we recommend you use high quality 550 Paracord. If you are indeed intending on ever possibly using your paracord belt for survival purposes, you will want it to be the most durable for your needs.
- 550 Paracord
Uncle Judd's Type III Commercial Paracord (Black, 550-Pound/100-Feet)
- Belt Buckle (Options:)
Gould & Goodrich 125-G Pants Belt Buckle Place On 1-3/4-Inch Belt (Nickel)
5 – 1 Inch Aluminum Side Release Buckles
- Scissors
- Matches/lighter
- Wooden Skewer (not shown)
Instructions on How to Make a Paracord Belt
Step 1. Measure the Length of Your DIY Paracord Belt

How much cord do you need for a paracord belt? The length of rope your paracord belt will contain is determined on the size of your waist.
For a waist size of 32″, you can approximate a length of 50 feet of rope. So, the larger the waist, the longer the rope.
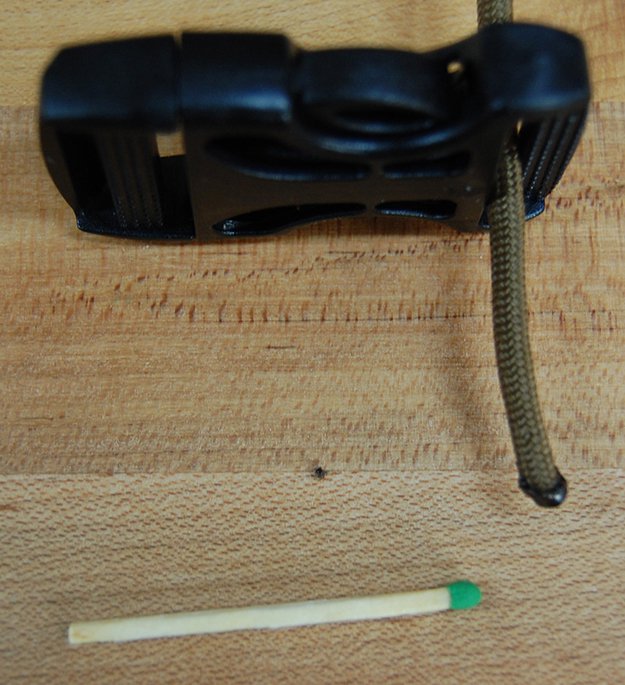
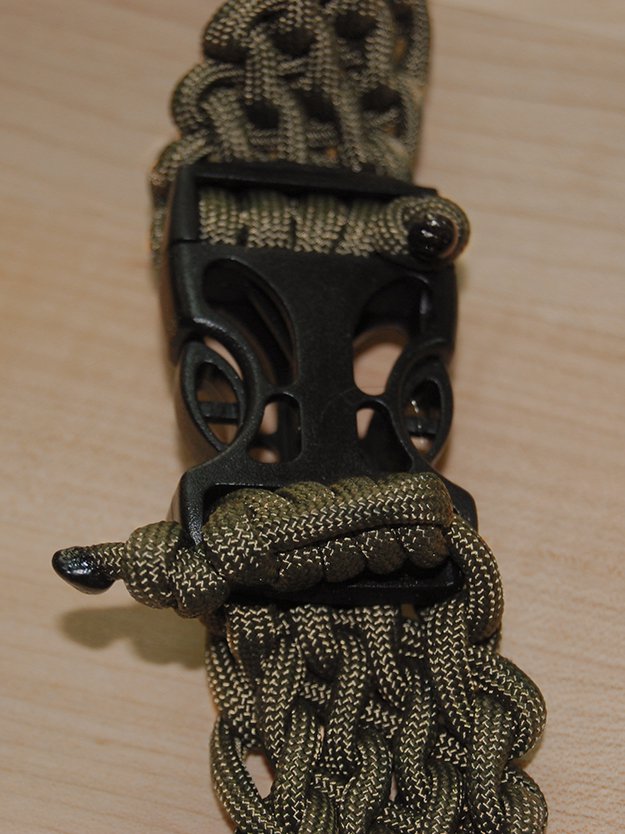
Step 2. Prepare the Paracord and Buckle

With this particular belt buckle, you cannot tighten your belt. But don't worry, it has a bit of a stretch because of the paracord, so you don't need to worry about Christmas dinner.
Right now, I am working on a belt with a standard metal buckle using this weave, and it looks amazing. This makes my new belt adjustable, and I know some have asked about that.
I will be posting this one soon, so if that is what you are looking for, please check back or follow us on Facebook to get updates.
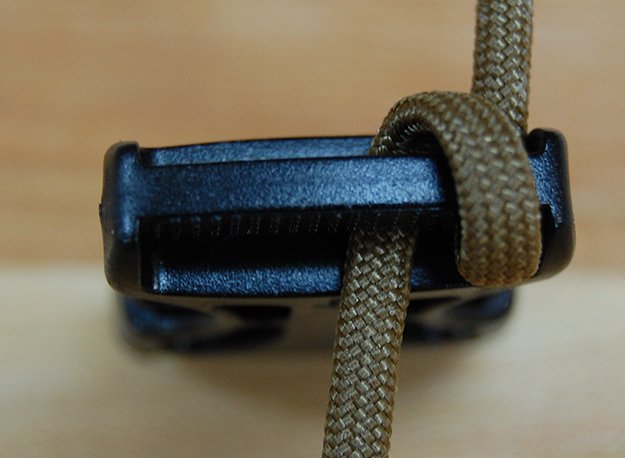
Step 3. Threading Your Paracord Belt Buckle

First off, you do not need to cut your paracord rope. The looping process of this paracord belt makes it so you do not need to measure how long the rope should be.
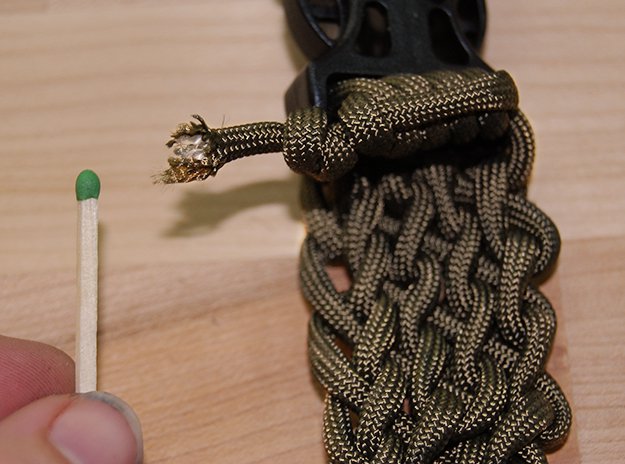
You will just keep unraveling the paracord to loop into your paracord belt as you make it. Using a match or lighter, melt the end of your paracord belt rope so that it does not fray.
Now, grab your paracord belt buckle and take one side to start your loops. Make sure you melt the frayed end of the paracord so that does not become unraveled.
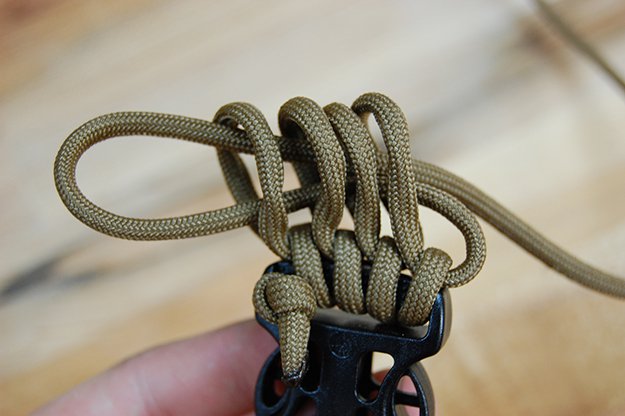
Step 4. Loop the Buckle

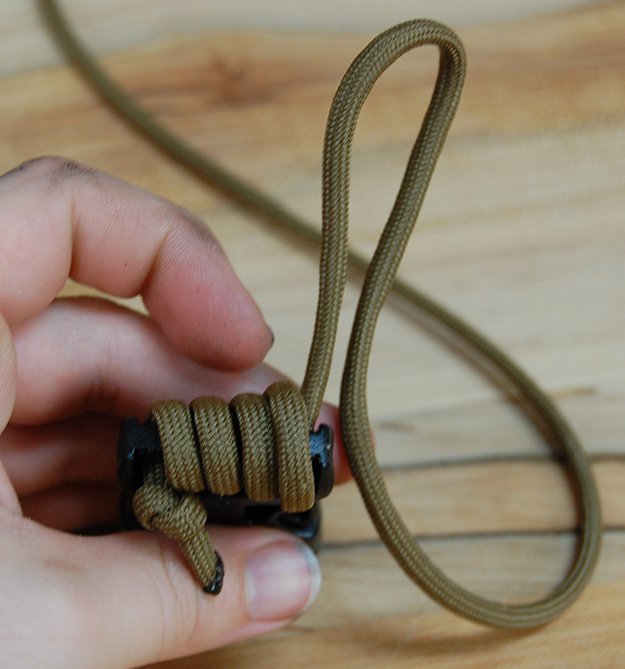
Begin the weaving process of your paracord belt with your first through-loop (TL=through loop).
You are going to loop the buckle 4 times, leaving the loops slightly loose to give space for paracord to pass through the loops.
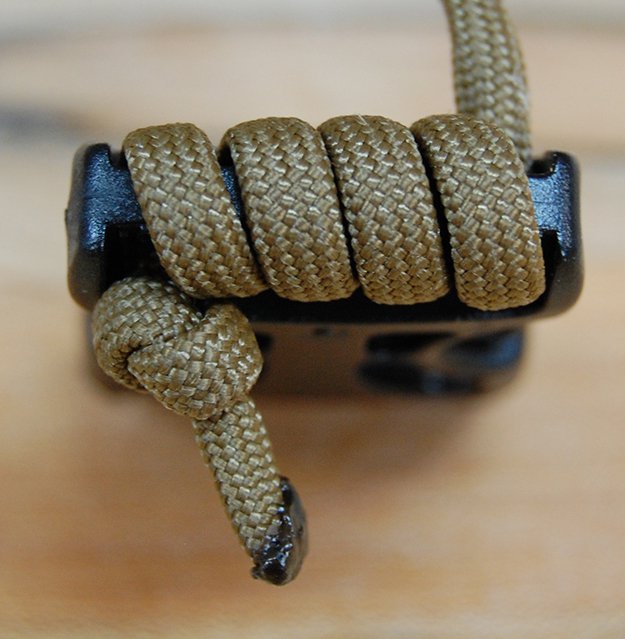
Tie the melted end so it does not come undone from the paracord belt buckle.

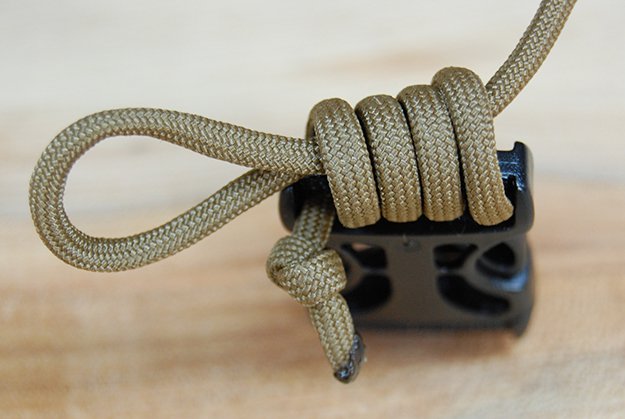
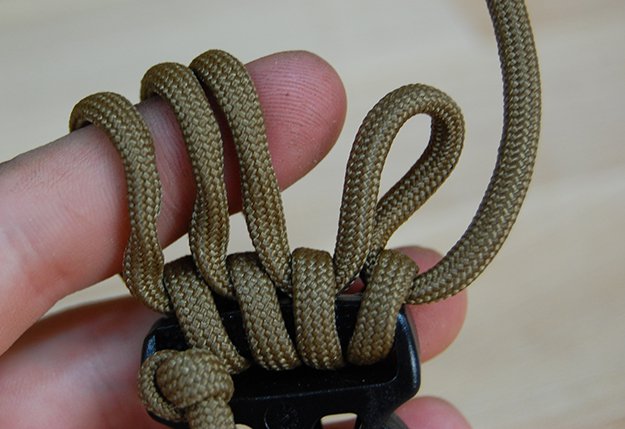
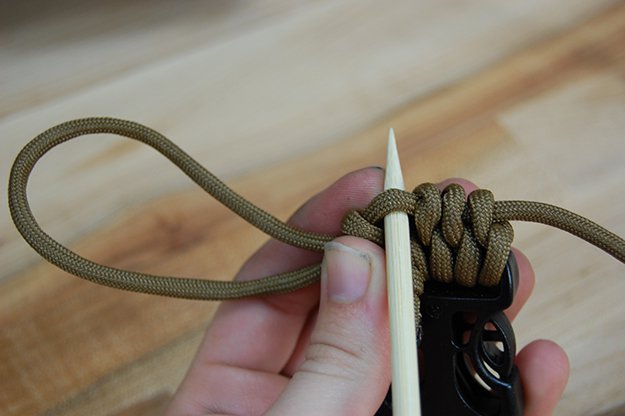
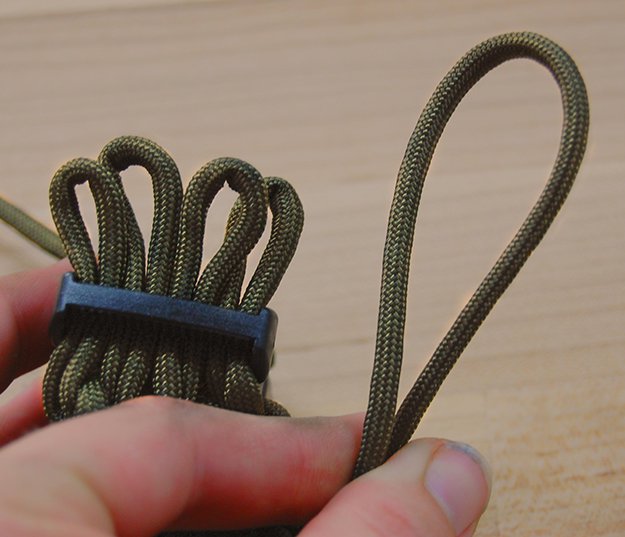
Take the unmelted end in your hand and make a loop with it. Now take that loop and slide it through the 4 buckle loops.
Leave a few inches of the through-loop (TL) at the end. You are going to want to make sure that the through-loop is positioned with the continuing end at the top.
This is what you are going to use to create more loops, so you need to have access to pull more paracord for your use.
RELATED: Paracord Projects: How To Make A Giant Monkey Fist
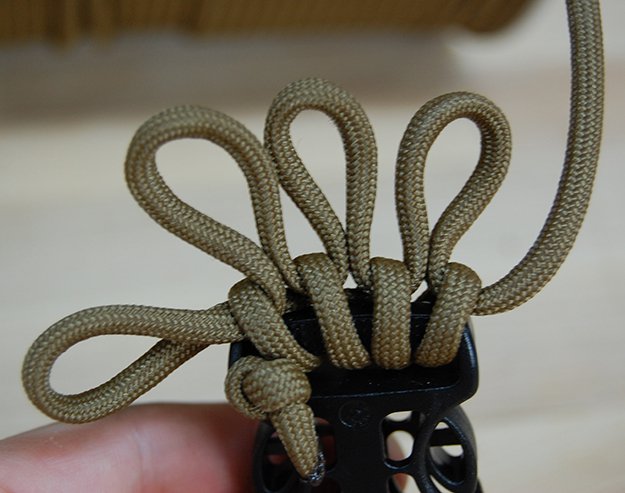
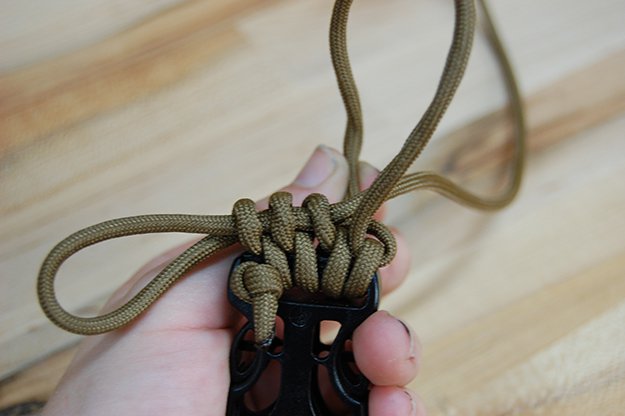
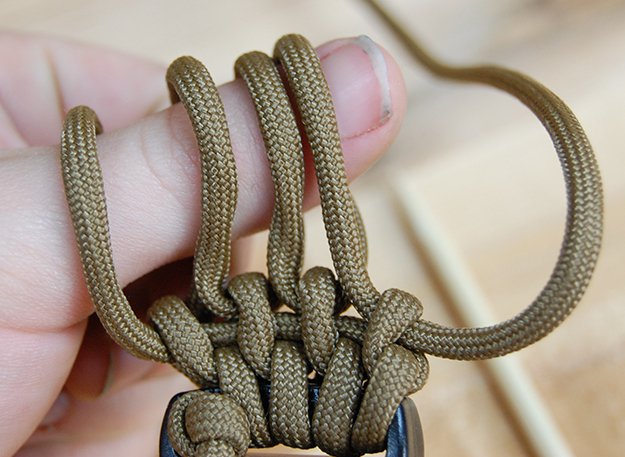
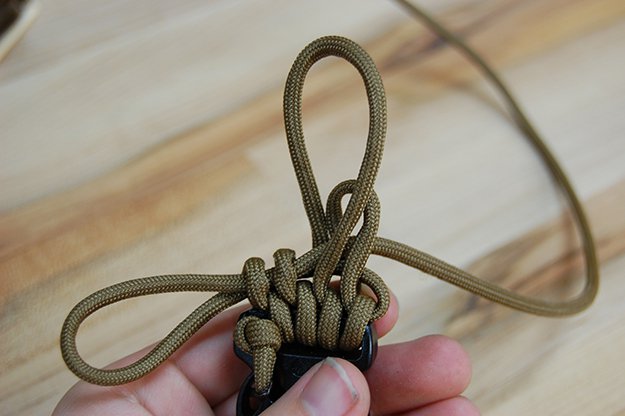
Step 5. Create Your Finger Loops

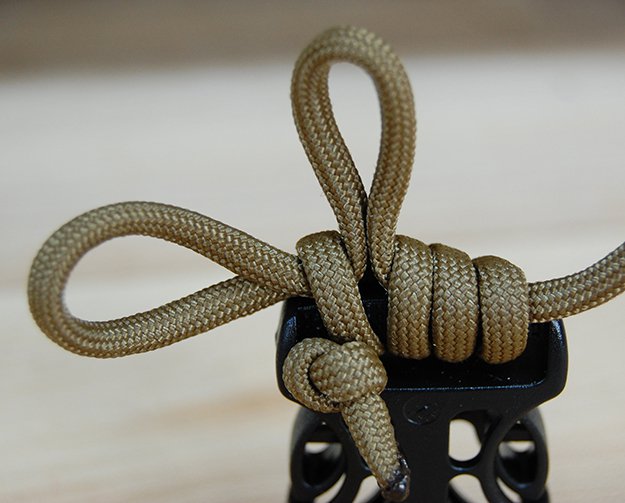
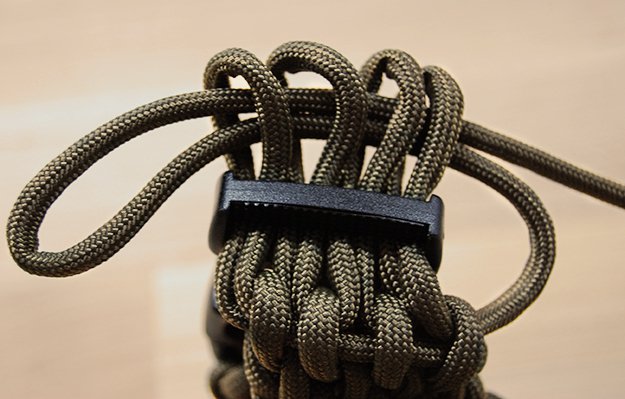
Slightly spread your 4 belt loops apart to reveal the through loop (TL). Make sure the top part of the through-loop (TL) is the part of the paracord that continues to your extra paracord, and not the one that connects to the buckle loops.
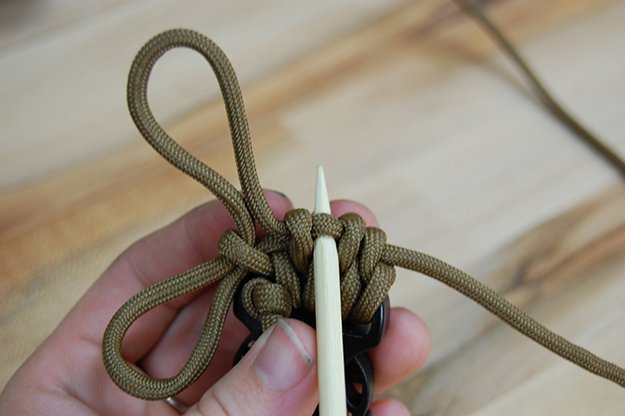
Step 6. Maneuver the Loops with a Skewer
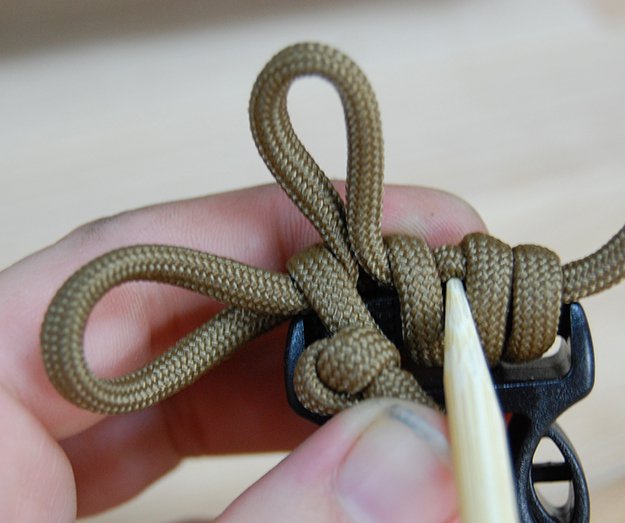
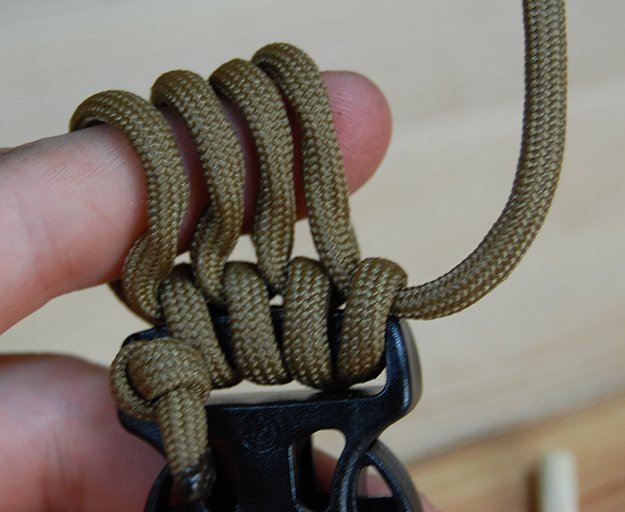
Now grab your skewer and pull up the (TL) into new loops in between the belt loops.
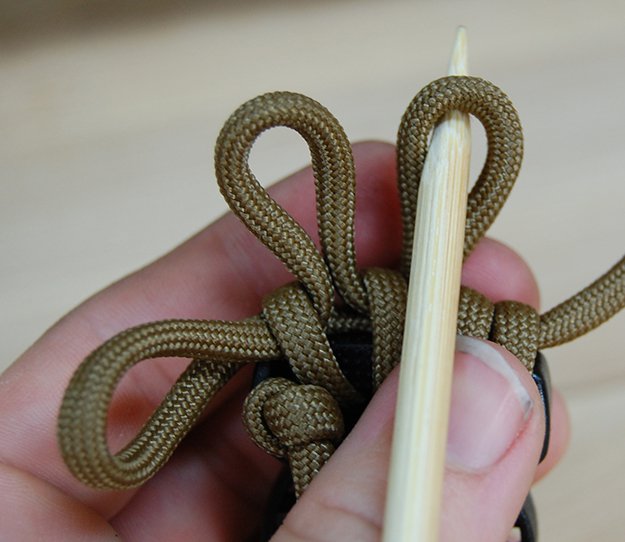
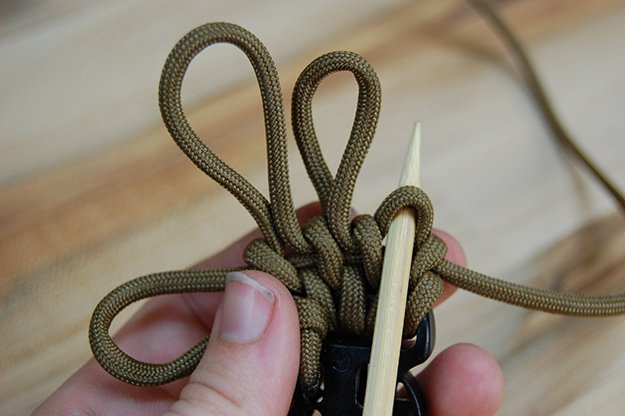
Do this until you have 4 loops total including your (TL). You want to make sure that all of these loops are roughly the width of your finger.
Your (TL) has now become one of your finger loops (FL). The most difficult part of this paracord belt weave is the beginning.
It may take you a few times to get it right. Have some patience. Once you figure it out, the rest is easy.
Place your finger inside the finger loops (FL). Make sure that your (FL) are twisted clockwise when placing on your finger.
You always want the part of the loop closest to the excess paracord to be facing you.
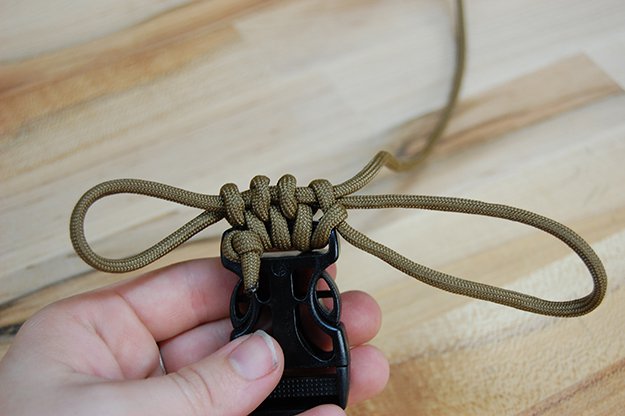
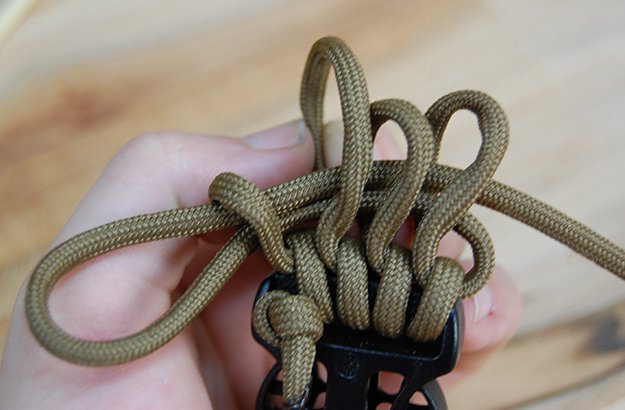
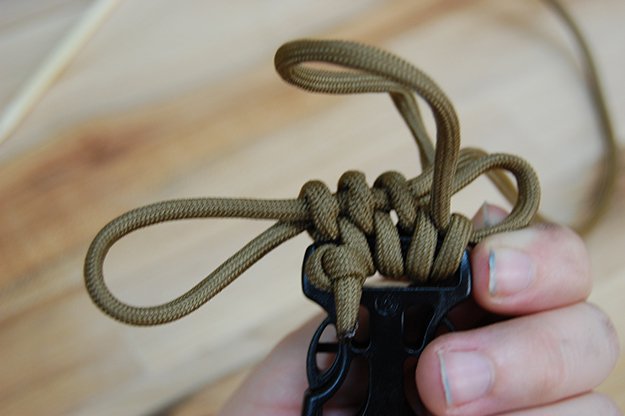
Step 7. Thread Finger Loops with Through-Loop
Thread finger loops (FL) with another through-loop (TL). Now you are going to basically repeat steps 3-5.
Make sure all if your (FL) are twisted in the right direction before you thread your though-loop (TL).
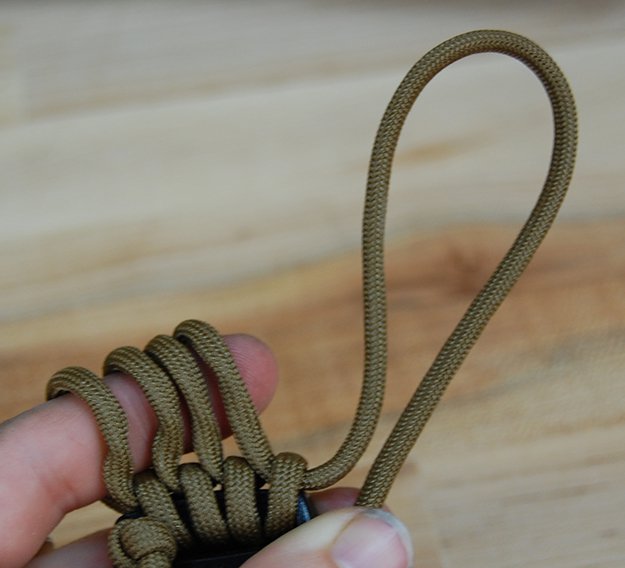
Thread your through-loop (TL) through your (FL). Make sure your running end of paracord is on the top side of your (TL).
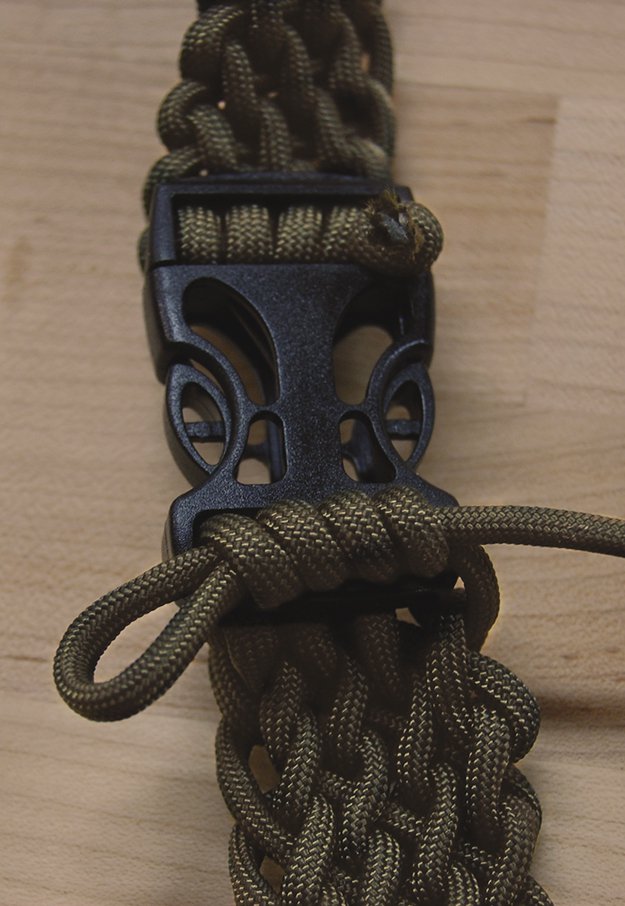
Step 8. Tighten Your Finger Loop
To start tightening your finger loop(FL). You are going to take your second (FL) in the row and pull on the back piece.
This will start to tighten your first (FL).
Work your way down the row, pulling from the back of the loops to tighten the loop in front of it.
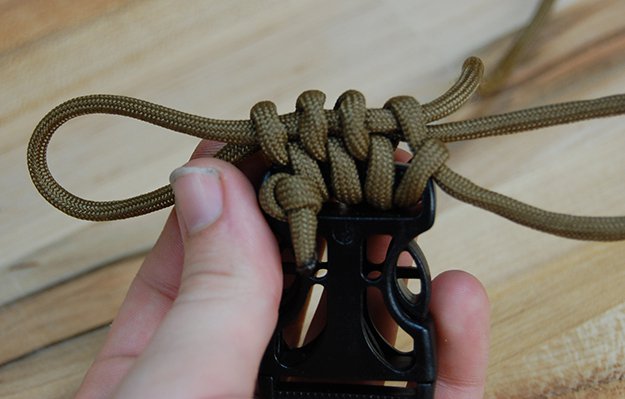
Lastly, you are going to pull on the (TL) on the bottom side of the loop that is attached to the (FL) to tighten them down. Now you have completed your first row of loops! Once you've got this down, all your belt is, is this repeating pattern.
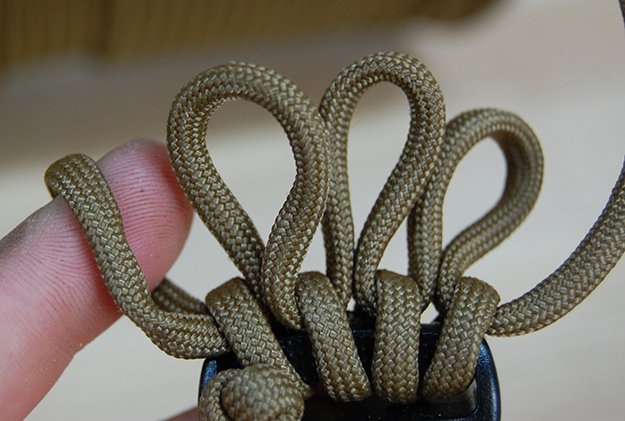
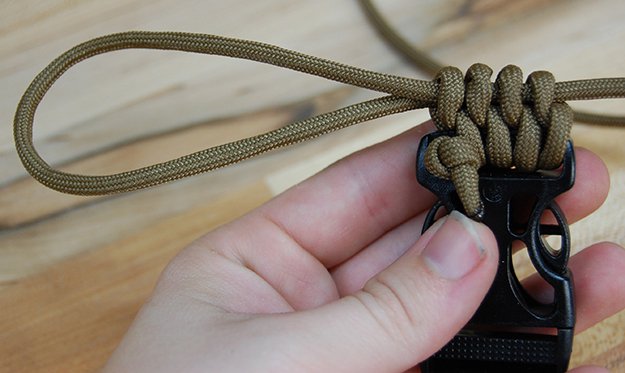
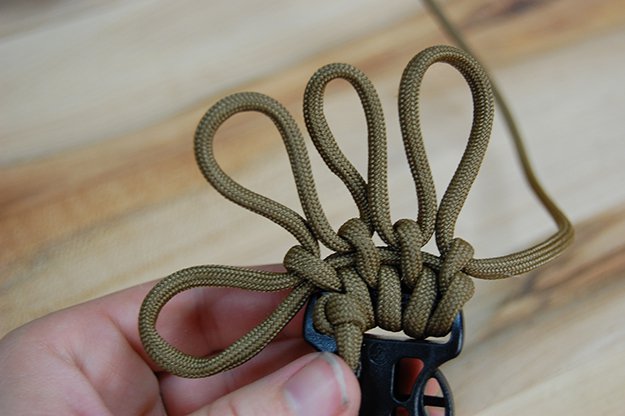
Step 9. Repeat
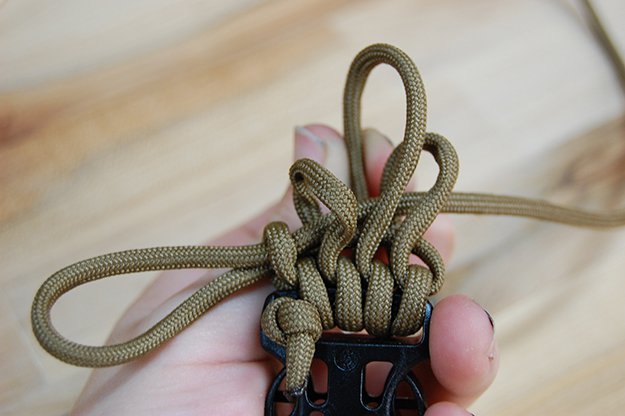
Repeat, repeat, repeat. Patience, patience, patience. Here are pictures of the next row to reiterate what was just shown.
Make sure your through-loop (TL) has the running end on top. This is where you are going to make your (FL) from.
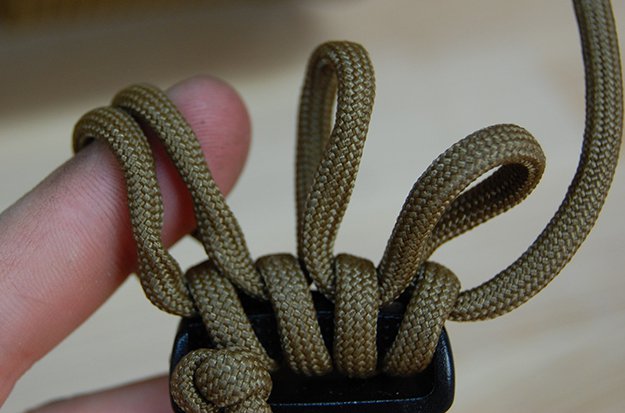
Create all your finger loops. (FL)
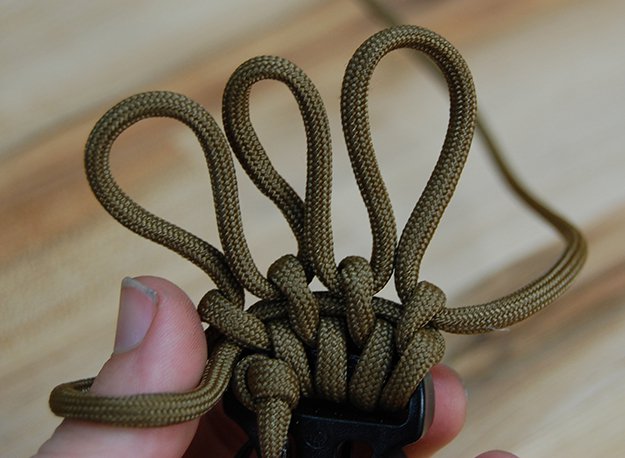
Make sure to twist them clockwise so that the running end is facing towards you.
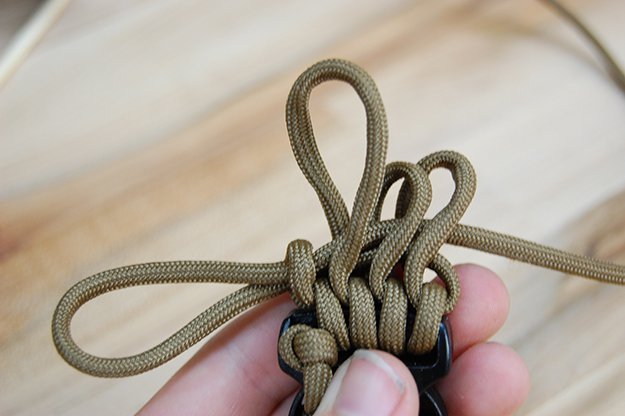
Thread the (TL) then tighten. And repeat. Continue this process until your belt is long enough to fit around your waist.
Step 10. Finish Your Paracord Belt
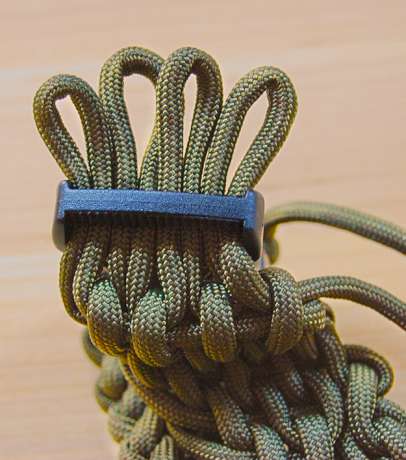
Finish your paracord belt. The last step is to attach your paracord to the other side of the belt buckle.
Create another row of (FL). Take all the (FL) and slide them through the paracord belt loop.
Create another (TL) and run it through the finger loop (FL) that are through the belt buckle.
Tighten your loops and leave your (TL) open just a bit.
Cut your paracord with a little extra slack and then run it through the (TL).
Tie a knot to keep it secure and then melt the end of the paracord so your paracord belt doesn't unravel.

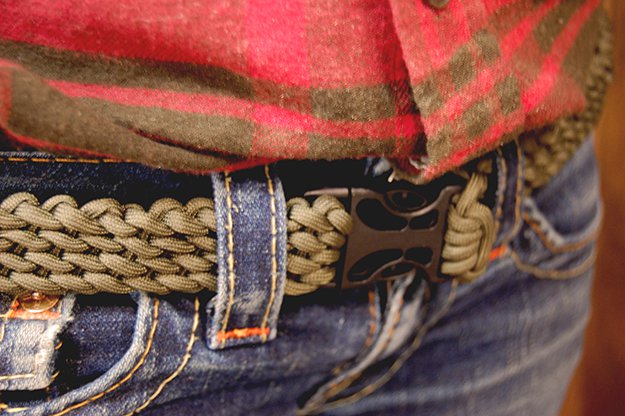
And now you have a completed paracord belt! Time to try it on!
Tips and Tricks on How to Make a Paracord Belt
There are a few things you want to be aware of while weaving your belt.
- The paracord likes to twist up on you while you are looping it.
- Be sure to untwist the paracord while you are working with it otherwise it will cause your weave to look wrong.
- Be sure to not tighten your loops too much either. This will also screw with the look of your weave, and make it difficult to pull out when its time for you to use your paracord.
Deploying Your DIY Survival Belt
This part is really easy! Here's all you have to do:
- Just untie your knot.
- Detach from your buckle.
- Pull the end of the paracord.
Your belt will begin to unravel. It will take you about 20 seconds to unravel your whole belt.
A quick, fast way to have the rope at your disposal whenever you need.
Want another paracord project? This video from Alpha One 982 will show you how to make a DIY paracord bottle wrap:
Why buy paracord accessories when they are so easy to make, and worth your time, too. Well, with these step-by-step instructions on how to make a paracord bracelet, you know better than to spend big bucks to buy one.
Will you give this DIY paracord bracelet a try? Let us know how it went and you may share some photos of your creation in the comments section below!
Up Next:
- How to Make a Macrame Lawn Chair | DIY Projects
- Learn to Make a Paracord Dog Collar | Instructions
- How to Make a Snare Trap with Paracord
Stay connected with us on Facebook, Twitter, Pinterest, and Instagram!
Editor’s Note: This post was originally published on December 2, 2013, and has been updated for quality and relevancy.
I’ve seen these around and wanted to make one. Thanks for the info. Will probably try to figure out a way to make it adjustable.
Jim, as I read the tutorial and the photos I thought of two ways to build in adjustment capability.
A) to shorten/tighten the belt simply release the final end loops and pulll to unravel until the remaining looped belt is the desired length. At this point you can cut the extra lenght of paracord and reinstall the buckle, (a permanent modification) or work the excess length diagonally along the inner side of the belt using the edge loops if conserving the full length of paracord is important.
B) to make an adjustable belt use 3 buckles rather than 1. Place two in the back with paracord simplly looped through, as you might rig a pulley, using at least 4 or better enough to be as wide as the looped part of the belt. You now will actually now make two equal belt “halves”, working off the free ends of these back buckles, to go to the front working buckle. Adjust by untying this “parapulley” and resecuring it. I have not made one so perhaps an accomplished paraweaver can work out more details
Stephanie, and folks, go to an outdoor site or military gear site(Brigade Quartermaster; Sportsmans Guide; etc) they all sell paracord in 500 foot rolls.
Thanks, George. Excellent suggestions. We will definitely work to incorporate this into an update. This belt is a tricky weave, but once you get it down, it is not difficult, just time consuming. Agree it would be good to have it be an adjustable paracord belt. We are also trying this belt with a metal buckle and want to make a video of this Slatt rescue weave soon. The beginning is the part where I really needed to see close up how to keep all the loops going the right way. Appreciate the feedback. Would love more suggestions from others as we look to add to our paracord tutorials.
You could also always adapt this to use a D-ring system instead of the plastic buckle. That way it would be adjustable, although the buckle area may also be a bit bulkier.
D rings a cool idea. I very much like the idea of using different buckles. Thanks
to Stephanie,i am having difficulty with this particular weave ,every time I get to the 3rd or 4th row the weave seems to waver toward the left ,if you can help ortell me what I am doing wrong that would be great.p.s I am definite on the way this knot or weave is made ,been through the insructions and tried a bunch of times,and also when I get so far the weave looks loose ,so I tried tightening on the f.l on the last pull is this ok ?
Where can I find all of these materials?
Google 550 paracord. Look on Ebay for buckles
What happened to Step 4?
Your instructions go from Step 3 to Step 5.
I really like this and I Thank You for your time in putting this together.
were would you find the buckle and that much paracord
Gorilla paracord. Google 550 paracord
I was wondering why these belts reminded me of some of my crochet projects, now I know why. Thanks for posting, I think I’ll be making one with D rings so that it can be adjusted.
I like this, and its something to do while you watch big bad blizzard! my problem, I got a big gut so its gonna cost me a lot, hope I can find a BIG spool of cord! but I like it! thanks for the info
Glad you like it! Good luck finding a large spool. Try Amazon and ebay for 550 paracord. We hope to be able to soon offer various quantities of paracord at a reasonable price as well as other cool paracord projects. If you have requests, please let us know.
I think that a panic snap would work well with your belts.You can find them in feed stores Crome and brass.may need and ring or small shackle on the end of the belt.
I used mine for a key ring.I have some other ideas you may be interested in.
Yours truly Darryel hubbard
Thanks, Darryel. Great idea. We are always looking to improve our parcord belt tutorial. I have looked at other weaves, but this rescue weave comes apart so much faster and better by far than any others. Adding a different buckle, and also making it adjustable are some of the things we want to try.
Anyone else have a survival belt weave they really like?
Stephanie, great post! Very clear and concise. I made one of these awhile back for my son. Instead of the plastic buckle I cut out a metal buckle from one of his old tattered belts. The way I ended it was just pulling through the last strand and melting it there. I also found another weave (Wide Soloman Bar – By TyingitAllTogether on youtube) that I used for making my own personal belt. I’m glad I found your site, many useful ideas here to keep me and my wife busy, and help get my boys involved more. Keep up the great work.
Thanks for the approval, and also for the new weave suggestion. I really have been looking for the best survival belt weave(s) and am still open to trying out new ones. Suggestions are awesome. Have fun with those boys!
If you had access to longer cord (500, 1000) you could use this to make a dog leash or similar to have longer cord available for emergency use.
I was thinking instead of buckle, you could put a D-ring / carabiner on the first end for clipping to dog leash or whatever.
Great tutorial. I have some long lengths I got from my son who had a whole spool of paracord salvaged due to the broken spool. I can make a long belt.
Yes, the dog leash is a great idea. Thank you!
FYI if you do any firearm hunting you can change the fastex buckles for sling swivels and use it on long guns.
This is really thorough and well written. I’ve done one and it was quite a challenge. I had to shorten it twice due to the stretchability.
I was also liking the idea of the dog leash until I thought about how it would feel on the hand. I don’t think that would be good for me until the dog was very well trained.
Many thanks. Writing good tutorials definitely has its challenges. Glad to hear I did a good job. I hope to improve as I go. Positive encouragement helps! Dog leash is on my list. Love paracord projects
How much paracord would you have to use to make a belt ???
100 ft, possibly less, depending on waist size
I’m impressed with you and your work. Great job.
I did not see anywhere in your instructions as to where I can obtain the belt buckle that you used. The only suggestion was to search on eBay which is fruitless since I don’t even know what kind to look for. Can you help?
I just found the belt buckle. I did not go to the end of you the page to find it on the bottom. Sorry about that.
Thanks again for your great articles.
I’m curious if you could find a weave that would allow the wearer to use a stran of para cord, and not lose the use of the belt? I like this very much thanks for posting it.
yea tried it and with ever roll i go it always ends up angling to the left (the last FL makes it lean to the left)
Was wondering if you had any photos of the one you made with the metal buckle. I am attempting it now but something doesn’t look right it almost seems crooked, maybe I’m weaving to tight. Not sure but my “OCD” is kicking in and it’s bugging me lol.
Will work on getting those posted.
Thanks for the belt weave. I’ve been looking for one for quite a while. For those concerned about stretching, you could do what I do before making bracelets or anything else where size is important. I place the cord in very hot water, almost boiling, for about one minute. Make sure all the cord is under the water. Take it out and hang it up to dry. The cord will be about 10% shorter but it won’t shrink much if at all when make the belt or the bracelet.
Hello, love the weave in this article. Simply for diversity purposes, I also found this one previously that does not use snap buckles:
http://www.m4040.com/Survival/Projects/Rescue%20Belt/RescueBelt.htms
I have used neither, but I think I may make both. Thank you Stephanie for this article.
I’m not understanding step 8. Everything else makes sense, this doesn’t. It looks like the ‘attached’ part at the second buckle is just held in by only a single line on the side, all of the finger loops held in by nothing more than their size. If this isn’t the case, please provide several more pictures providing more detail.
Great projects. Thanks for sharing!
Sweet blog! I found it while searching on Yahoo News.
Do you have any tips on how to get listed in Yahoo News?
I’ve been trying for a while but I never seem to get there!
Thank you
Can you use a belt buckle in steady?
A little modification on the other end but you can also use a belt buckle for this project.
Love this tutorial. Very nicely explained. Nice pictures. I’m going to make this belt just as soon as I get the cord and buckle. Thanks for sharing.
You’re welcome Patti, glad you liked it!
Gave my grandson (8) paracord jig for Christmas. He loves it; i am spending $$$ on cord. He wanted to make their rotweiler a collar but jig was too small. We measured caerfully, then made two halves, each with one end of the buckle, and with a 1/2 inch metal braided into the other end of each. Collar also just happens to fit him as a belt.
Oops! Metal ring in the middle. baj
Well written, Stephanie. I’m going to try my first-ever weave with the confidence your DIY article provides. I’m wondering if you have a reference for the plastic buckle you used? The link at the end of the article is for a metal one. Searching on Amazon, the buckles I find easily are buckles for bracelets, and obviously they are not wide enough for a true belt.
Looking for the pdf document on paracord projects.
Just doing a little thinking here. When you loop your TL to back thru the loops, a large crochet hook might help with pulling it through more quickly, same with pulling it up between the loops.