

A sleeveless tunic is a wardrobe must-have. With the right fabric choice, the humble sleeveless tunic can easily replace your favorite t-shirt and be suitable for a night out on the town.
Time: 30 ~ 45 minutes
Difficulty: EASY
Here it is:
DIY Sewing Projects: Sleeveless Tunic
Materials Required:
- 1-1.5 yards (depending on size)
- Coordinating thread
- Clear Ruler
- Pins
- An old tank top that fits.
- Marking tool (either disappearing ink or tailor’s chalk)
- Sharp Fabric Scissors
Measurements Required:
- Top of shoulder to desired length (mine went halfway down my thigh)

Step 1
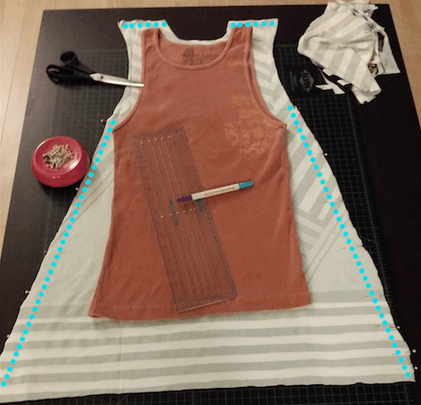
Fold your fabric, right sides together
Step 2
Place your old tank top on top of the folded fabric and mark (using chalk or disappearing ink) 1” seam allowance around the tank.
- Start flaring out the marking at a 35-degree angle starting from the armpit if you want a flowy fit (I went this route for my demonstration tunic)
- Start flaring out the marking at a 10-degree angle starting from the armpit if you want a more fitted look.
Step 3
Cut out your fabric.

- It’s okay if your cuts aren’t completely straight, the sewing process will resolve any imperfections in fabric cutting.
- This particular Rayon/Cotton Knit was especially tough to cut because of the slinky-ness.
Step 4
Sew up the marked sides using a zig zag stitch.

Step 5
Hem the neckline, the armholes, the bottom and you’re done!
I love to style the tunic with a contrasting cardigan and flats or wedges. Refrain from wearing chunky boots with this tunic, as it can look too messy and busy. Keep it simple
This figure-flattering tunic works well with graphic patterns (like mine), and solids! If you’re not using a knit fabric, you might want to give yourself another ½” seam allowance when you sew.

Interested in becoming a fashion designer? Check this out


