

Make a paracord watchband with this easy and simple DIY guide so you can add it to your paracord project collections!
RELATED: How To Make A Paracord Belt: Step-By-Step Instructions
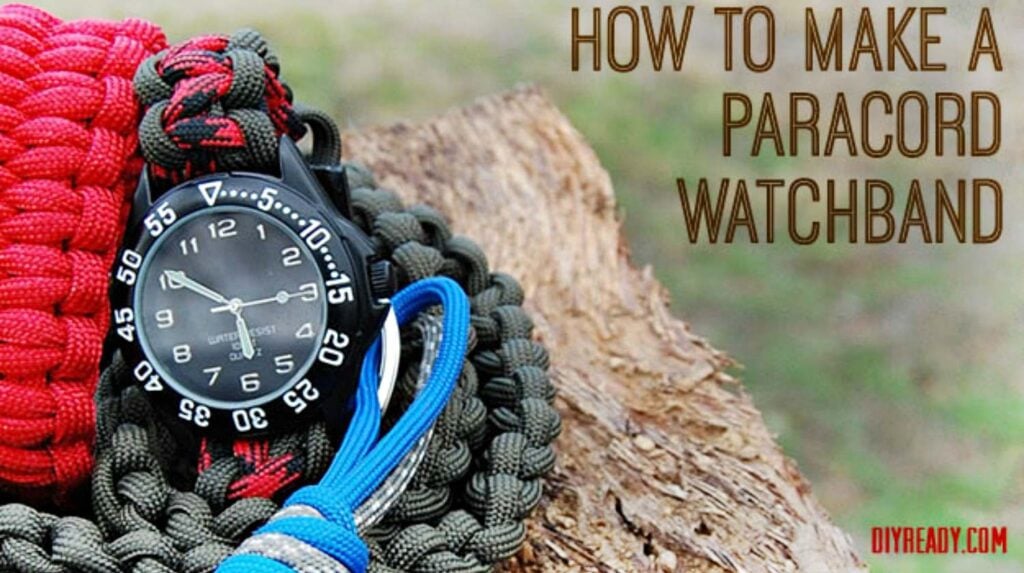
Easy Paracord Watchband for DIY Junkies and Survivalists
How to Make a Paracord Watchband with Buckle
Besides how to make a paracord watchband with buckle, we’re also often asked, ‘how to make a paracord watchband with two colors’. I love to wear my emerald green watchband when I’m out for a hike or camping–it blends well with my surroundings.
Some other days when I’m out with friends and want to be casual yet fun and trendy, I wear my two-colored red and black watch band. So if this is, what you’re going for, you just found your perfect DIY paracord watchband tutorial.
Now, let’s get this started!
Supplies Needed to Make A Paracord Watchband:
- 1 Basic watch face
- 12 feet of paracord, all one color, or 6 feet each of two colors
- Sharp scissors
- Torch lighter (regular lighter or soldering iron will work)
- Measuring tape
- 5/8 inch side release buckle
Looking for supplies? Here are our picks for supplies and materials:Paracord550 Paracord – Five Colors 100 Feet Total
Rothco Type III Commercial Paracord (Black, 550-Pound/100-Feet)
Side Release Buckles
50 – 1/2″ Side Release Plastic Buckles
Watch Face
 PlanetZia Rectangle Ribbon Watch Faces for Interchangeable Beaded Bands (2pcs Black Paint)Optional


If you want to personalize your paracord watch, you can use different paracord colors. Beside watchbands, you can also create a paracord bracelet using this weave and idea for yourself and your friends.
RELATED: How To Make A Paracord Survival Bracelet: Tire Tread
Instructions:
Step 1. Measure
With a measuring tape, measure around your wrist for the length your watchband is going to be. If you don’t have a measuring tape which goes around your wrist, you can simply use your paracord.
First, take a piece of a paracord and wound it around your wrist to measure its length. Take one end of the paracord and connect it to the other end, taking note where they meet for your wrist’s length and marking it for measurement.
Now, take out a tape measure or ruler to measure the paracord’s length. I measured mine at six inches. You might want to burn the edges of the paracords to make the weaving process easier.
Place the ends of the paracords over the fire so the ends melt. Wet your thumb and index finger then press the ends with both.
Step 2. First Loop and Knot
Next, grab one of the paracords, then find the center and fold it in half. Holding the folded paracord up, run it down through the end of the buckle.
You will create a loop from which you can slide the two paracord strands. Pull the two strands tight making your first knot, then slide it to one side of the buckle.
Now, do the same with the other paracord. You will now have four strands hanging from the buckle.
Step 3. Attach Your Watch Face/Piece
Next, pair the two ends of the paracords from different colors, then slide them beneath the watch face through the watch pins. Unhook the buckle and slide the pair of paracord strands through the release buckle you just unhooked.
Place the watch face in the middle of the paracord you measured as the length of your wrist or watch. Mark the area so you know where to halt with the weaving later on.
Step 4. Set the Paracords for Weaving
Now, slide the same pair of paracord strands through the release buckle pulling up to the end part of your entire watchband’s length. You will need to measure again to see your paracord watch strap fits right.
You can now start the weaving process and we will be doing the cobra weave. Part the pair of paracord strands dangling from the release buckle, each to one side.
Make sure to try the watchband first and adjust so it fits into the rest before tightening the loop. Normally it should not be more than a half-inch more than your measured wrist size as the length tends to stretch out as you tie the half-hitches.
Step 5. Start Weaving on One Side
Create an alternate half-hitch, working with the two loose ends of the paracord. Start with the left piece; place it under the two center cords connecting to the ends of the buckle.
Place the left piece back passing into the front center cords and sliding through the loop to the left, then tighten it.
Step 6. Do the Same with the Other Side
Do the same with the right side. Place the cord under the two center cords, passing it back through the front center cords and slide through the loop to the right, tightening each time.
Step 7. Weave on
Repeat the same process until you reach halfway through the paracord watch strap or at the watch face on the center. Slide the two working paracords under the pins of the watch.
Repeat the same weaving process until it reaches the ends of the other side of the buckle.
Step 8. Cut and Secure
Once done, cut the excess paracord with scissors. With a lighter, melt the cut ends and press until the melted cord attaches to the surrounding cords.
Now you have a paracord watchband with a side release buckle!
You might also want to check out this quick and easy video guide from Survival Life on how to make a paracord watchband using the trilobite weave:
Wasn’t this DIY paracord watchband fun and easy? Anyone with a knack for DIY or a bit of curiosity can do this paracord project in a jiffy.
Get started now and pretty soon you’ll be making more of these in a day in time for the gift-giving holidays!
Will you give this DIY paracord watchband a try this weekend? Tell us your plans for it in the comments section below!
Up Next:
- How To Tie A Paracord Bracelet: Oat Spike
- Learn To Make A Paracord Dog Collar | Instructions
- 31 Super Cool Reclaimed Wood Craft Ideas And DIY Projects
![]() Stay connected with us on Facebook, Twitter, and Instagram!Editor’s Note: This post was originally published on November 12, 2013, and has been updated for quality and relevancy.
Stay connected with us on Facebook, Twitter, and Instagram!Editor’s Note: This post was originally published on November 12, 2013, and has been updated for quality and relevancy.


