

At a Glance: Painted Mason Jar Pen Holder
- Kids will love painting mason jars in rainbow colors and draw on kawaii faces.
- Kids ages 6 and up can do most of this themselves.
- Total cost under $10 if you’re reusing masor jars you already have at home.
Does your kid’s desk looks like a craft store exploded on it? Loose pens rolling off the edge. Markers without caps. Colored pencils buried under everything. A painted mason jar pen holder will fix all of that, and the best part is you and your kid can make it together.
What You’ll Need
- Mason jars (regular mouth pint size works best — one per color)
- Acrylic craft paint or chalk paint in rainbow colors: pink, orange, yellow, mint green, teal, lavender
- Black paint marker or fine-tip black Sharpie (for the faces)
- Pink paint marker or a small brush with pink paint (for the cheek dots)
- Foam brush or wide flat brush
- Optional: matte sealer spray to protect the finish
Before you start, read this first
The two most common mistakes when painting a mason jar.
Paint peeling off the glass. This happens when there’s still moisture on the jar or you rush between coats. Wash the jar, dry it completely, and don’t skip the drying time between paint layers. Acrylic on glass needs that time to bond.
Marker lines that bleed or smear. This happens when you draw the face on paint that’s still slightly tacky. The paint feels dry on top but isn’t fully cured underneath. Wait the full 20 minutes between your last paint coat and when you pick up the marker. When in doubt, wait a little longer.
How to Make a Painted Mason Jar Pen Holder
Step 1: Wash and dry the jars. Parents, this one’s yours. Wash each jar with soap and water, rinse well, and dry it completely. Any leftover moisture or grease will make the paint peel later.
Step 2: Paint the first coat. Hand the brush to your kid. Then can do steps 2 and 3. Have them paint the outside of the jar in their chosen color using one smooth coat. Streaks and thin spots are totally fine as this is just the base layer. Set it aside and let it dry for 20 minutes.
Step 3: Paint the second coat. Smooth, even strokes all the way around. This is where the color really pops. Another 20 minutes to dry and you’re ready for the fun part.
Step 4: Plan the face together. While the paint dries, sit down with your kid and sketch out the face on scrap paper first. Kawaii faces are wonderfully simple. Draw curved lines for sleepy eyes, a little “>” for a wink, a tiny mustache, maybe some cat ears. You can practice on paper first to take the pressure off when it’s time to draw on the jar.
Step 5: Draw the face on the jar. This is your kid’s moment. Once the paint is fully dry, hand them the black marker and let them go for it. Encourage them to commit to each stroke instead of sketching. Kawaii faces are supposed to look a little wobbly and sweet.
Step 6: Add the cheek dots. Two small pink circles, one on each side of the face. A pink marker works great, or just dip a fingertip in pink paint. It’s a tiny detail that makes the whole jar look finished and absolutely adorable.
Step 7: Seal it up. This one’s for the grown-up. Let everything dry for at least 30 minutes. If you’ve got a matte sealer spray, give it one light coat and let it cure for an hour. It’s optional, but it makes a real difference if your kid’s reaching in for a pencil ten times a day.
Step 8: Fill it up. Hand it back to your kid for the best step: filling the jar with pencils, markers, colored pens, whatever needs a home. Line them all up and you’ve got a rainbow desk organizer they made themselves.
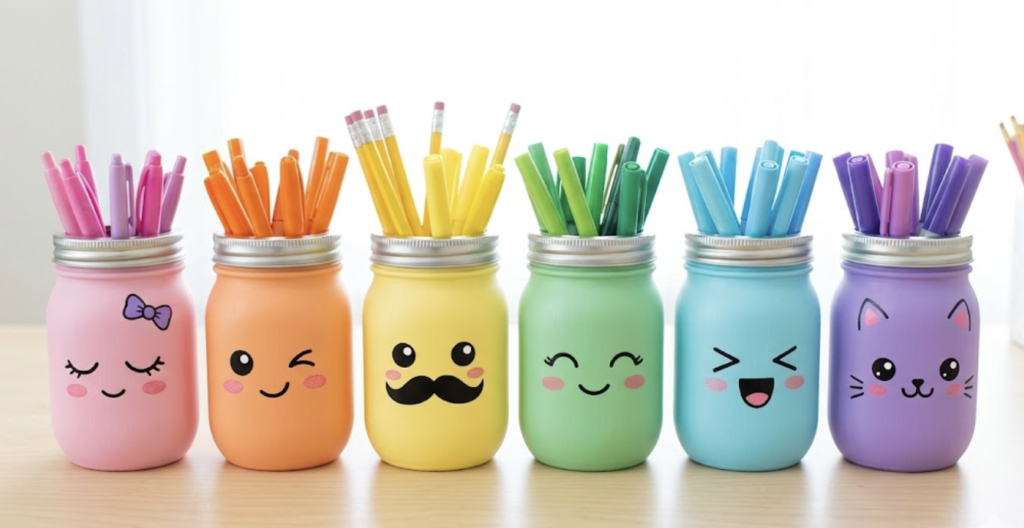
The Result
You can do different colors, each jar with a cute face.
This project takes about an hour of active time. Less if you’re doing one or two jars instead of a full set. Kids can handle steps 2 through 6 almost entirely on their own at age 8 and up. Younger kids (ages 5–7) do great with steps 5 and 6 while a parent handles the painting.
It’s the kind of craft that ends with something they’ll actually keep on their desk for months.
UP NEXT: 11 Easy Woodworking Projects For Kids
Frequently Asked Questions
What kind of paint works best on a mason jar pen holder? Acrylic craft paint and chalk paint both work well on glass. Chalk paint gives you a smoother matte finish right out of the container. Either way, apply two coats and let each one dry fully before moving on. A matte sealer spray on top helps the paint hold up with daily use.
How do you make a mason jar pen holder step by step? Wash and dry the jar, paint two coats of acrylic in your color, let it dry completely, draw a face on with a black paint marker, add pink cheek dots, and seal with matte spray if you want. Total active time is under an hour.
Will the paint scratch off if kids use it every day? It can, especially if it takes a hard knock or the paint wasn’t fully cured before use. The fix is simple: apply a matte sealer spray once the paint and faces are completely dry. One coat makes a real difference in how long it holds up.
Can you put painted mason jars in the dishwasher? No. Dishwasher heat and water pressure will strip the paint fast, even with a sealer coat. These are desk organizers, not drinking glasses. Hand-wipe only if they need cleaning.
What age is this craft good for? Ages 6 and up can do most of it with light supervision. The painting is beginner-friendly at any age. The face-drawing step works best once kids have enough hand control to make intentional lines usually around age 7 or 8. Younger kids can still participate in color-picking, cheek dots, and filling the jars at the end.


