


At a Glance: Rug Tufting for Beginners
- You need six things to start: a frame, a tufting gun or punch needle, backing fabric, yarn, carpet glue, and basic finishing supplies.
- The two mistakes that ruin first rugs: picking the wrong yarn and skipping the glue step.
- Pick a bold, simple design, and you can finish your first rug in a weekend.
If you have ever found yourself spiraling down a rabbit hole of rug tufting videos, you know how addictive they are. It’s the rare viral trend that’s actually more satisfying to do than it is to watch. It’s the ultimate creative high, turning a blank canvas into professional decor in a single weekend.
For DIYers, it’s the best way to stop settling for store-bought designs. You get to make something fluffy, colorful, and completely yours. You get to watch a blank piece of fabric turn into an actual rug. And when you’re done, you get to put it on your floor and tell everyone you made it yourself.
This guide gives you a good start. Step by step, plain English, no experience required.
What You’ll Need to Start Beginner Rug Tufting
- Tufting gun or punch needle
- Lumber and screws to build a frame
- Monks cloth or burlap (primary backing fabric)
- Acrylic or wool yarn
- Synthetic rubber carpet glue
- Staple gun or carpet gripper rods
- Non-slip mat or felt (secondary backing)
- Spray adhesive
- Hot glue gun and sticks
- Palette knife
- Permanent marker
- Scissors
Or, you can just get this kit.
Should Beginners Use a Tufting Gun or a Punch Needle?
This comes down to two things: budget and patience.
Punch Needle
A punch needle is a simple, handheld tool you push through the fabric yourself, one loop at a time (it’s slower and more hands-on). And it costs $20 to $60. If you want to really understand how tufting works from the inside out, this is a great place to start. Your hands do the work, and your brain switches off. Punch needles only cost $30 to $60 to get started, which lowers the stakes for your first attempt.
Tufting Gun
A tufting gun is electric. Pull the trigger, and it automatically punches yarn through the fabric. A section that takes an hour by hand takes about ten minutes with a gun. If you want a finished rug this weekend and are ready to invest, a tufting gun gets the job done for $150 to $300.
Both make real rugs. Both are valid. Choose based on what you actually have right now, time or money.
I used to think rug tufting looked like one of those crafts that required a whole workshop to even start. Thankfully, I came across this rug tufting kit online. It made the first step feel much less intimidating:
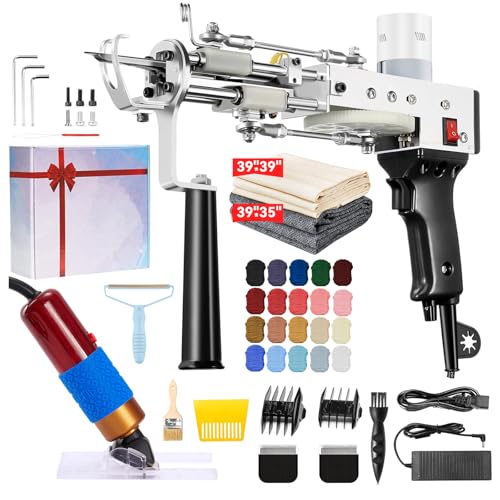
- Tufting Gun and Trimmer Kit: BESGEER tufting gun kit includes a tufting gun, a carpet trimmer Kit...
- Cut and Loop Pile 2-in-1 Rug Tufting Gun: The rug tufting kit can manually switch between cut pile...
How Do You Tuft Your First Rug Step by Step?
Step 1: Build Your Frame
Your frame is a big wooden square that holds your backing fabric stretched tight while you tuft. Think of it like a picture frame, except instead of a canvas you’re stretching fabric, and instead of paint you’re using yarn.
Build it by screwing lumber together at the corners. Pre-drill your holes first so the wood doesn’t crack or split. The inside measurement of your frame is the maximum size your rug can be. Build it to match the width of your backing fabric. Monks cloth comes by the meter, so a 90cm inside frame is a smart starting size. That gives you about 3cm of extra fabric on each side to grip and stretch.
Add small feet to the bottom so it stands on its own, or clamp it to a table at a height where you can work standing upright. Hunching over a low frame for two hours isn’t a good time.
Step 2: Attach Your Backing Fabric
Your backing fabric is the foundation of your rug. This is what you push the yarn through.
Monks cloth is the easier pick for beginners. It has visible grid lines that help you keep your rows straight and holds its shape well under tension. Burlap is cheaper and works fine, but it’s a little trickier to stretch evenly.
To attach it: start on one side, pull the fabric tight, and staple or clip it to the frame. Then go to the opposite side, pull it tight again, and secure it there. Work around all four sides gradually, adding a little tension at a time. When you’re done, tap the middle of the fabric. It should feel and sound almost like a drum. If it sags or wobbles, tighten it more.
One tip: if you bought monks cloth from a new seller on Amazon, test a small piece before you stretch the whole thing. Some types don’t work with a tufting gun, and there’s no way to know until you try.
Step 3: Pick Your Design
Here is the single most important design rule for your first rug: keep it simple.
Bold shapes only. Think circles, waves, letters, simple animal outlines, or a classic smiley face. Two to three colors maximum. Avoid tiny details, thin lines, and complicated patterns.
Why? Tufting guns take practice, and wobbly lines are almost guaranteed at the start. A bold design hides these first-time imperfections in the texture, while a detailed pattern will make every mistake stand out.
Transfer your design onto the backing fabric by projecting an image onto it and tracing it with a permanent marker, or just draw it freehand. Either way works fine. The marker disappears completely once the rug is tufted.
Step 4: Thread Your Gun
This looks more confusing than it is. Here’s what you do:
Feed your yarn through the yarn guide on the top of the gun first. Then use a bent wire (a straightened paper clip works great) to pull the end of the yarn through the small hole in the needle at the front.
Always load at least two strands of yarn at once. One strand is usually too thin and gives you sparse, uneven coverage. But, two to four strands give you a full, plush result. Remember that thicker yarn needs fewer strands and thinner yarn needs more.
For a full visual walkthrough of how to thread the gun and get your first lines going, watch the video at the bottom of this article.
Step 5: Practice on a Scrap Piece First
Before you touch your actual rug, grab a scrap piece of backing fabric and practice. This isn’t optional.
Start with straight lines. Get used to the speed (there’s an adjustable knob on the handle; start on the slower setting). Once straight lines feel comfortable, try gentle curves by working in short bursts and adjusting the angle of the gun as you move.
Two things to remember while you’re tufting: the flat metal foot at the front of the gun has to stay flat against the fabric the whole time, and you move the entire gun in the direction you want to go, not just your wrist. Think of it like driving a car, not like writing with a pen.
Step 6: Tuft Your Rug
Start by tufting the outline of each color area in your design. This gives you a clean border to fill inside. Then fill in each section row by row, keeping your rows close together and consistent.
The back of your rug will look messy while you work, and that’s completely normal since you’ll cover it all later.
How close should your rows be? Close enough that you can’t see the backing fabric between them. If you’re not sure, do a small test section and check it from a few feet away.
Step 7: Fix Mistakes
Tufted the wrong area? Just use your pliers to pull the yarn back out and re-tuft it.
Just don’t pull yarn out over and over in the same spot. Repeated pulling weakens the backing fabric and can cause small tears.
If your lines look crooked, use pliers to nudge the yarn into place. Most small mistakes will be hidden once you trim the pile during the finishing step.
Step 8: Glue the Yarn in Place
This is the most important step in the whole process, so don’t rush it.
Keep the rug flat and still on the frame. Don’t take it off yet. Use your palette knife to spread synthetic rubber carpet glue across the entire back of the rug. Cover every single piece of yarn. Extend the glue about 3cm past the edge of the tufted area to seal the monks cloth border and keep it from fraying.
Let the rug dry flat on the frame for a full 24 hours without touching or flipping it. Glue that dries while the rug is flat stays flat, but if you take it off early, the rug will likely curl.
Step 9: Remove From the Frame and Cut the Border
Once the glue is completely dry, take the rug off the frame. Cut around the outside edge, leaving about 3cm of backing fabric all the way around.
If your rug has curved edges, cut small notches into that 3cm border. This lets the fabric fold over smoothly without bunching. Straight edges don’t need notches.
Step 10: Fold and Seal the Border
Apply hot glue along the back edge of the border, fold the extra fabric over, and press it flat with your palette knife until the glue cools. Work in small sections, about 10cm at a time, so the glue doesn’t set before you fold.
Use the palette knife to press, not your fingers. Hot glue is genuinely hot.
Step 11: Attach the Secondary Backing
Trace the shape of your finished rug onto your secondary backing material (non-slip mat or felt) and cut it to match. Spray adhesive on the back of the rug, press the secondary backing onto it, and hold firm pressure for about a minute.
Press hard. If it’s not sticking well, add a little more spray adhesive and press again.
Step 12: Trim the Pile
Run clippers or scissors across the surface of your rug to even out the pile height. Work in sections and go slowly. This is the step where your rug goes from looking like a craft project to looking like something you actually bought. The difference is real.
Step 13: Clean and Oil Your Gun
Yarn fiber builds up inside the gun after every session, which can lead to jamming or skipping if left alone. Clean it out with a brush or compressed air, then add a few drops of sewing machine oil to the moving parts. Just two minutes of maintenance keeps your gun running smoothly for next time.
Why Does Yarn Fall Out After Tufting and How Do You Fix It?
Shedding usually means the glue was spread too thin or didn’t dry for the full 24 hours. Re-apply synthetic rubber carpet glue to the area, ensuring every tuft is covered, and let it cure completely.
A few other things to check while you’re troubleshooting:
Gun jamming repeatedly, even after cleaning: check your yarn. A skein wound too tightly can cause feeding problems. Try loosening it or switching to a different skein.
Backing fabric tearing mid-project: stop tufting that area. A small tear can be patched with a piece of extra backing and glue. A large tear means that the section needs to be restarted.
No professional help needed for this project. It’s a craft, not a structural job.
How Much Does It Cost to Start Rug Tufting for the First Time?
It depends on how you start.
The most affordable route is a punch needle, a small piece of burlap, two skeins of acrylic yarn, and a basic wood frame. That gets you into your first rug for under $80.
If you want a tufting gun, budget $150 to $300 for the gun alone. Add monks cloth, yarn, glue, and finishing supplies and you’re looking at $250 to $400 for a full beginner setup.
Either way, the supplies last across multiple rugs. After your first two or three projects, the cost per rug drops significantly.
What a Finished Rug Looks Like
Your rug is done when: the design reads clearly from standing height, you can tug a tuft, and it doesn’t pull out, and the back is clean and fully covered.
Lay it flat on the floor in good light and photograph it from above. That’s your proof-of-completion photo. Share it. You made that.
You’ve Got This
Your first rug isn’t going to be perfect, and that’s completely fine. Every tufter you’ve seen on social media making it look easy has a pile of practice rugs somewhere. The difference between them and where you are right now is just the number of rugs they’ve finished.
Start simple. Test your yarn. Don’t rush the glue. Finish the rug.
Then come back and make another one. FREE RAINBOW RUG PATTERN HERE>>>
Show Us What You Made
First rug done? We want to see it. Save this guide to your Pinterest boards so you can come back to it any time. Tag us in your finished rug photo on on Facebook, Pinterest, or Instagram and let the community cheer you on. And if you want to share your process or ask questions while you’re building, our Facebook community is full of people at the same stage you’re at right now. Drop in and say hi.
Frequently Asked Questions: Rug Tufting for Beginners
What’s the easiest yarn for rug tufting beginners? Acrylic yarn is easiest. It feeds smoothly through a tufting gun, cuts cleanly, and costs less than wool. Avoid cotton as it slips over the cutting blade and produces uneven results.
How long does it take to finish a first rug? A small rug (approximately 2×3 feet) takes one to two weekends. Day one covers setup and tufting. Day two covers gluing, a mandatory 24-hour dry time, and all finishing steps.
Can you start rug tufting for under $100? Yes, a punch needle ($20 to $60), a small piece of burlap, two skeins of acrylic yarn, and a basic wood frame can get you started for under $80 total.
What glue is used for rug tufting? Synthetic rubber carpet glue is the standard choice. Apply it across the entire back of the rug and allow a full 24 hours to cure flat before removing the rug from the frame.
What backing fabric should beginners use? Monks cloth is recommended for beginners. Its visible grid lines help keep tufting rows straight, and it holds tension well on the frame. Burlap is cheaper but harder to stretch evenly.
QUICK POLL
What design are you picking for your first rug?
Whatever you picked, defend it in the comments below.









