


At a Glance: DIY Concrete Walkway
- Affordable DIY concrete walkway projects for small backyards are surprisingly easy to pull off using a reusable mold, giving you a custom-stone look without the four-figure contractor bill.
- The workflow is a straightforward four-step loop: prep the dirt, pack down a gravel base for stability, pour your mix, and smooth the surface with a trowel.
- To keep your path from cracking under pressure, baby the concrete by misting it with water for about a week to ensure it cures into a rock-solid finish.
When you want to preserve your lawn or the grass on your front yard, you don’t want people to walk around or on them. That’s why most people take their time to do some landscaping and plant concrete walkways to guide their visitors on where to walk. But you don’t need to spend a lot of money for this project. I will show you this amazing DIY concrete walkway project that you can do in 4 easy steps. I kid you not when I say “4 EASY STEPS.”
How To Get This Amazing DIY Concrete Walkway In 4 Steps
A walkway made out of just soil and dirt is very unpleasant to look at, not to mention that it makes your yard or lawn look very dirty and messy. A concrete walkway serves only the purpose of guiding people where to walk but it also makes your yard beautiful to look at and preserve the integrity of your lawn. Products like walk makers or concrete walkway molds are selling like hotcakes because people want their lawn to look great. But if you’re like me and want to save hundreds of dollars in commercial landscaping, then this DIY concrete walkway project is just the project for you.
Supplies and Tools needed for your DIY Concrete Walkway Project:
Tools :
- Shovel
- Hoe
- Trowel
- Mixing tub
Supplies :
- Concrete walkway mold
- Concrete Mix
Steps:
1. Prepare the area
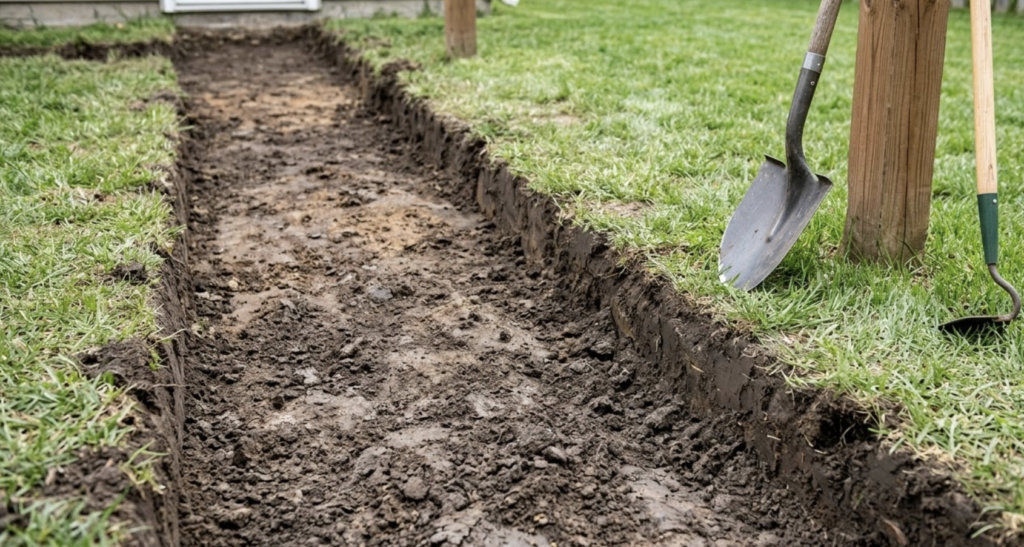
Scrape away sod, soil, or loose dirt as needed. Make sure to keep the ground even.
2. Add gravel

Add 2″ to 4″ of compatible gravel. Use the hoe to compress the layer and make sure that it is leveled and flattened firmly.
3. Apply Concrete Mix
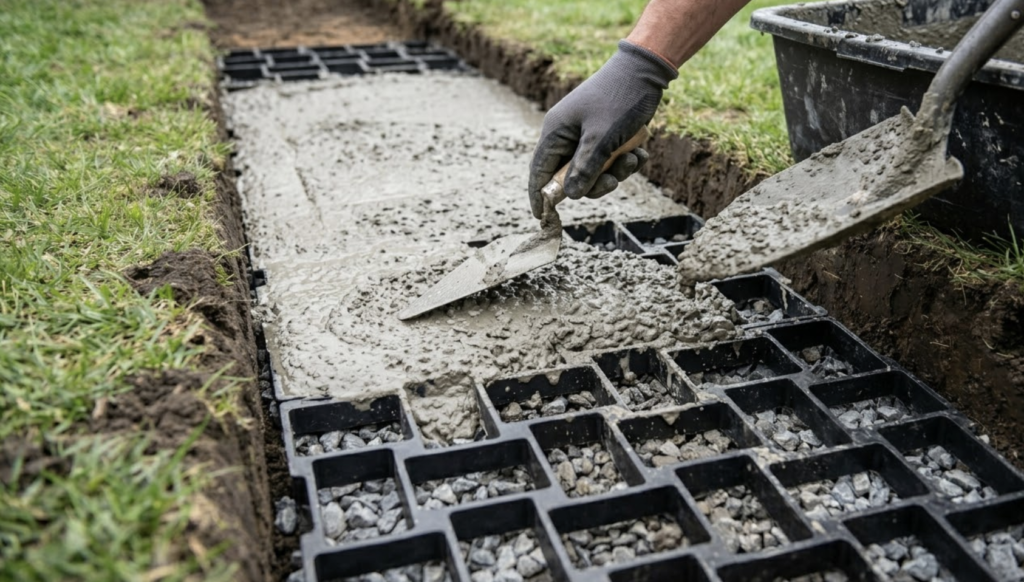
Mix a batch of concrete for the first section. The ratio for this project is a bag of concrete mix to one fill-up of the mold. Shovel the concrete mix into the form to fill in each portion. Using a trowel, smooth the surface out.
Remove the form and trowel the surface if you want to make it smooth or even bevel the edges and achieve desired finish.
4. Spray with water
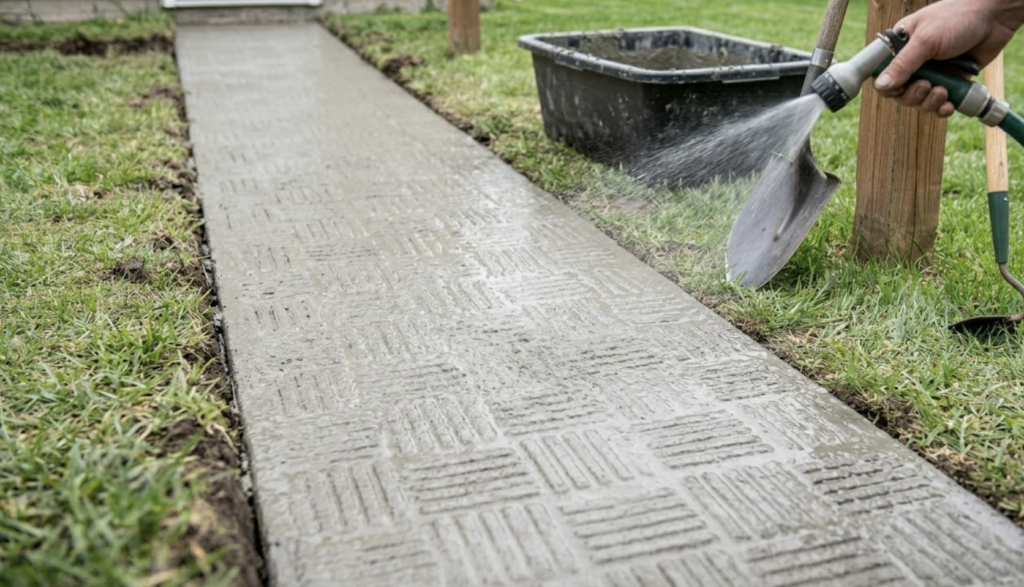
To ensure your walkway stays rock-solid and crack-free, you need to cure the concrete rather than just letting it dry out. Once the surface loses its glossy “wet shine” and before it turns bone-dry or white lightly, mist it with a fine spray from your garden hose. This moisture “feeds” the chemical hydration process that hardens the slab, making it up to 50% stronger and preventing the surface from shrinking too fast and snapping. Keep the path moist for the next five to seven days before using or stepping on it. Repeat the steps 2 to 4 as needed.
Check out HomeMadeModern‘s tutorial video below to nail this easy DIY project!
The project looks difficult and challenging, but it actually isn’t once you get down and dirty, pardon the pun. I love that this DIY concrete walkway has a lot of applications, so you can go a long way with this project. This is a perfect landscape addition to your backyard that will allow your family to wander around your garden without getting the muddy experience. Maybe soon, you’ll have a walkway for your rosebeds or for your shrubberies and like this project, it will only require 4 easy steps to do it.
Click here other DIY projects you might want to create.
Featured Image Via flawlesscarpentry
Can I save time by pouring a concrete walkway directly over existing grass?
It’s tempting, but a huge mistake. Pouring over grass or loose dirt leads to uneven settling and major cracking as the organic matter rots away. To ensure your path doesn’t snap in six months, always scrape away the sod and pack down a 2-4″ gravel base for drainage and stability.
How do I prevent weeds from growing in the gaps of a concrete mold walkway?
To prevent weeds from growing in between the concrete walkway, use polymeric sand. Once your concrete is fully cured, sweep this specialized sand into the joints and mist it with water. It hardens like glue, creating a flexible barrier that blocks weed seeds from taking root while still allowing the path to “breathe” during temperature changes.
Will my DIY concrete walkway crack during winter freeze-thaw cycles?
In colder climates, the ground “heaves” when it freezes. To prevent your path from buckling, use a fiber-reinforced concrete mix and ensure your gravel base is a full 4 inches deep. This creates a “floating” foundation that can move slightly with the frost without snapping the individual sections.


