


Create this hanging lightbulb planter and add one more nifty creation to your DIY decor collection! I saw a great photo of a hanging lightbulb planter project a few times on Pinterest but had trouble finding instructions that showed how to make it. After spending far too long digging with no luck, I figured it wouldn’t be too hard to wing it—and it wasn’t. I like this light bulb planter DIY because it is unusual and adds a lot of visual impact, but costs nothing and takes very little time. Read on and let’s get started!
Make a Hanging Lightbulb Planter from Repurposed Bulbs!
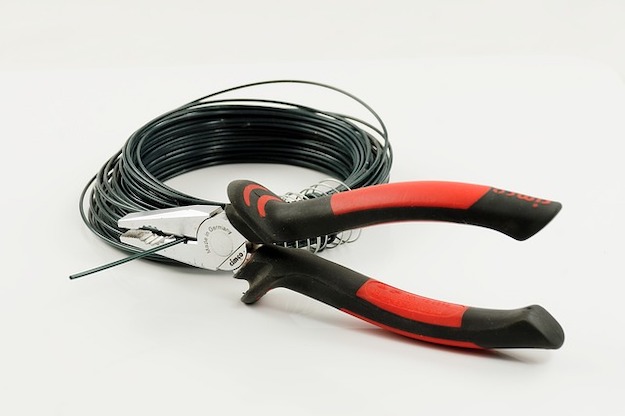
Supplies You Need:
- A lightbulb
- Pliers
- Twine or fishing line (Whichever you prefer. I used baker’s twine)
- Safety goggles (You will be breaking some glass so don’t skip these!)
Instructions:
Step 1. Prepare the Lightbulb
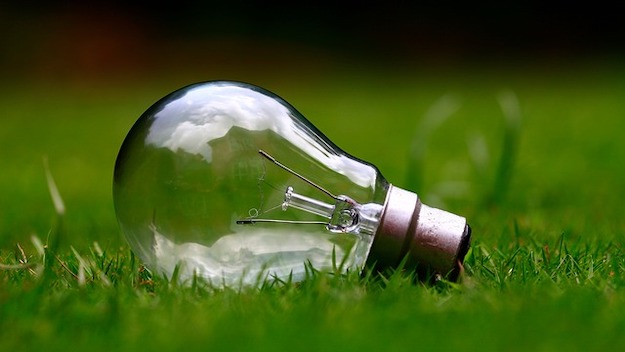
Check out the bottom of the light bulb and you will see this round metal tab sticking to it. Use your pliers to peel off this metal tab, carefully. The metal tab on the lightbulb should come off easily with pliers.
Step 2. Take Out the Parts in the Insulation

In order to get to the inside of the lightbulb, you will have to remove the black glass piece (Yes, it’s glass, so be careful!) To do this, hold the lightbulb at the metal base so that you don’t break the bulb piece.
Firmly tap the side of your metal pliers (you can use a hammer if you prefer) against the black glass. With a couple of hits, the black glass will break. Turn the light bulb upside down so all the broken glass falls out.
Step 3. Remove the Filament

Now that you’ve removed the black glass on the bottom, you’ll need to remove the glass that encases the filament. Once again, hold the lightbulb by the metal base. Use the tip of your pliers to gently tap the glass until it breaks.
This can be tricky, so be extra careful not to tap too hard or you risk breaking the bulb. Once broken, continue to use your pliers to remove the filament and any extra glass on the opening.
Step 4. Attach String
Cut your string or fishing line to the desired length and tie it to the base of the lightbulb.
Now you are ready to prep your vase for hanging!
Step 5. Put Your Plant for Decor
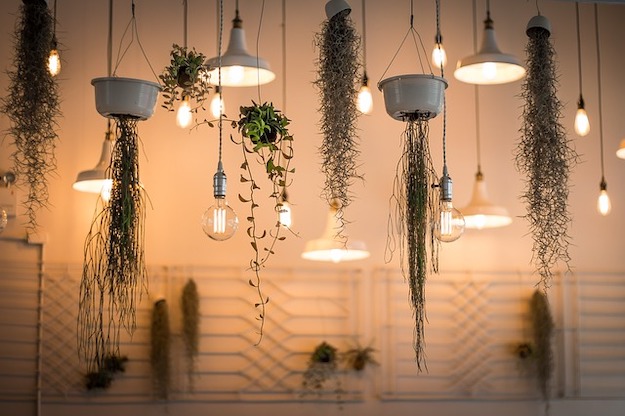
Put some fresh or dried flowers in this DIY bulb planter! You can experiment with larger bulbs, as well as different shaped ones. Enjoy!
Check out this video from Just 5 Minutes for 5 brilliant ways to repurpose lightbulbs:
https://www.youtube.com/watch?v=Lws7RlIMnic
You can actually put lots of things other than flowers in this hanging light bulb vase. But this light bulb vase DIY does not have to hang, also. I propped one on a tealight and set it on an end table, and it looked great. Once you have emptied the lightbulb, you can get pretty creative. I intend to post additional projects soon, but if you have ideas for a cool project using repurposed lightbulbs, let me know. I would love to hear about it and see photos.
Will you give this DIY hanging lightbulb planter a try? Let us know in the comments section below.
Up Next: Lightbulb Guide | Choosing The Best Lightbulbs For Your Home [Infographic]
![]()
Stay connected with us on Facebook, Twitter, Pinterest, and Instagram!
Editor’s Note: This post was originally published on December 6, 2013, and has been updated for quality and relevancy.


