At a Glance: Mini Reni Trend on Furniture
- Joanna Gaines, our favorite Fixer Upper home makeover star, is leading this trend, which uses tiny tweaks and budget-friendly styling to refresh a space.
- On her Magnolia Network show, she transforms entire rooms in about a week using paint, trim, and smart styling with zero demolition required.
- Mini renis are small-scale renovations popularized by Joanna Gaines that refresh spaces in about a week.
You don’t need a demo crew to get the Magnolia look. Here are 3 projects Joanna Gaines uses to transform a room in under an hour for less than $50.
Jump to the Project:
#1: The Art Forward Vignette
#2: The Heritage Table Reset
#3: The Scalloped Cloud Shelf
The Reveal
What Is a Mini Reni in Home Decor
A mini reni (short for mini renovation) is a small-scale makeover that refreshes a room or space using cosmetic updates instead of construction. Think paint, styling, trim work, and furniture rearrangement rather than knocking down walls or replacing major systems.
Joanna Gaines popularized the concept on her Magnolia Network show called “Mini Reni,” which premiered in 2023. The show became a hit because it proved you don’t need months of construction or massive budgets to transform your home. Each episode shows Joanna refreshing three rooms in just one week using budget-friendly cosmetic changes.
The philosophy behind mini renis is “refresh, don’t rebuild”. While Joanna typically uses mini renis for full room makeovers on her show like transforming kitchens, dining rooms, and living spaces without demo days, the same approach works beautifully for smaller projects. You can apply mini reni thinking to individual furniture pieces, styling vignettes, or single-wall transformations.
How To Do a Mini Reni on Furniture
The secret to furniture mini renis is identifying the ONE thing that makes a piece look dated, then fixing only the problem. Here are three home projects you can finish this weekend.
Project 1: The Art Forward Vignette (20 Minutes)

This is how you create an instant focal point on any flat surface in your home without buying expensive art or frames. A thrifted tabletop easel becomes the star, and textured art (bought or DIY’d) gives the piece that gallery-worthy finish.
The Mini Reni:
Thrifted tabletop easel + textured canvas = instant focal point that looks luxe.
What You’ll Style:
Any console table, mantel, bookshelf, or entry table that looks plain or boring
Materials:
- Thrifted tabletop easel, wood or metal, 12-18 inches tall ($5-10)
- Textured canvas art or blank canvas board, 8×10 or 11×14 ($8-15 if buying, $5 if DIY)
- Acrylic paint in 2-3 neutral tones if creating DIY art ($3-6)
- Palette knife or old credit card for texture
- 2-3 decorative base objects: candle, small plant, vintage book ($0-15 from around your home)
- Small wooden tray or board for vignette base, optional ($8-12)
Step-by-Step Tutorial:
Step 1: Find and Clean Your Thrifted Easel
Hit your local thrift store and look for small tabletop easels in the art supply or home decor section, then wipe them down with a damp cloth to remove any dust or grime.
Step 2: Select or Create Your Textured Art Piece
Choose a neutral abstract canvas with visible texture, or create your own by applying thick acrylic paint with a palette knife in sweeping, layered strokes.
Step 3: Position Easel on Console, Shelf, or Mantel
Place the easel slightly off-center on your surface (not dead center), and leave room for supporting objects on one or both sides.
Step 4: Place Canvas on Easel at Slight Angle
Rest your textured art on the easel and angle it back slightly so it leans naturally without tipping forward.
Step 5: Add 2-3 Base Objects Around Easel
Arrange a small candle, greenery in a simple vase, or a stack of vintage books beside the easel base to keep the objects lower than the canvas height.
Step 6: Adjust Spacing and Balance the Vignette
Step back, check if the items look balanced and adjust object placement until the whole vignette looks “natural” and cohesive rather than staged.
Joanna’s Mini Reni Secret: Use odd numbers (1 easel + 2 side objects, or 1 easel + 1 candle + 1 plant) and vary heights to create an “unscripted” vibe.
Total Time: 20 minutes
Total Cost: $15-40
Project 2: The Heritage Table Reset (60 Minutes)
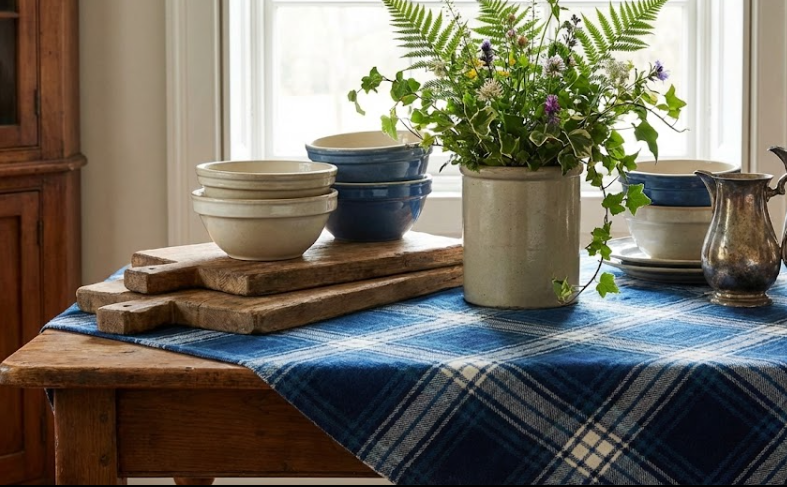
Joanna Gaines is a master of the layered tablescape, and this mini reni proves you don’t need fancy china or a degree in table styling to pull it off. A plaid runner instantly adds a farmhouse aesthetic, and stoneware layers give off a vintage look without the heirloom price tag.
The Mini Reni:
Plaid runner + layered stoneware = styled tablescape that looks like you spent days on it.
What You’ll Style:
Your dining table or kitchen table that currently has nothing on it
Materials:
- Plaid table runner in buffalo check, gingham, or tartan, 72-90 inches long ($15-25)
- Stoneware dinner plates in neutral tones, 4-8 plates depending on table size ($20-40 for set)
- Stoneware bowls to match or coordinate ($15-30 for set)
- Cloth napkins in linen or cotton, coordinating colors ($10-20 for set of 4-8)
- Flatware set you already own ($0)
- Centerpiece elements: pillar candles, eucalyptus stems, small wooden bowl ($10-20)
- Charger plates in natural materials like wood or woven rattan, optional ($20-40 for set)
Step-by-Step Tutorial:
Step 1: Lay Plaid Runner Down Center of Table
Drape your plaid runner lengthwise down the table center and let it hang evenly on both ends (about 6-12 inches of overhang).
Step 2: Position Dinner Plates at Each Seat
Place one stoneware dinner plate directly on the table (or on a charger if using) at each seating position and space them evenly.
Step 3: Layer Bowls on Top of Dinner Plates
Center a stoneware bowl on each dinner plate to create Joanna’s classic layered table setting.
Step 4: Fold Napkins and Place on Bowls or Beside Plates
Fold cloth napkins into simple rectangles and lay them either inside each bowl or to the left of each place setting.
Step 5: Arrange Flatware on Either Side of Plates
Position forks on the left and knives and spoons on the right of each plate and aim for a “relaxed” placement rather than formal.
Step 6: Create Centerpiece with Candles and Greenery
Arrange 2-3 pillar candles in varying heights down the runner with fresh or faux eucalyptus stems tucked between them for organic movement.
Step 7: Add Optional Chargers or Accent Pieces
If using charger plates, slide them under dinner plates for an additional accent.
Step 8: Step Back and Adjust Spacing for Balance
Walk around your table, check sightlines across seated guests, and adjust any objects that feel too crowded or too sparse.
Joanna’s Mini Reni Secret: Don’t overthink the napkin fold or obsess over perfect spacing. The Heritage Table Reset works because it looks collected and lived-in. Use neutral stoneware (cream, beige, soft gray) so the plaid runner becomes the star without competing colors. This mini reni works for everyday dining or special occasions because it hits the sweet spot between casual and elevated.
Total Time: 60 minutes
Total Cost: $40-50 (less if you already own stoneware and linens)

- FOR YOUR TABLE: This table runner measures 14x108" in size, appropriate for a table that can seat...
- EASY CARE: 100% cotton, machine wash on gentle cycle, tumble dry low, low iron if needed

(As an Amazon Associate, we earn from qualifying purchases.)
Project 3: The Scalloped Cloud Shelf (2 Hours)
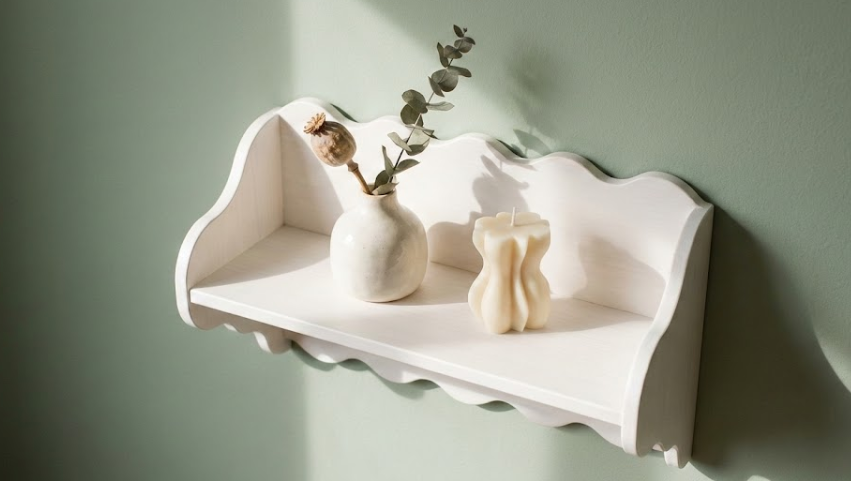
This is the mini reni that makes people think you hired a custom carpenter. Pre-cut scallop trim (sold by the foot at any craft store) glues right onto the front edge of a plain shelf, and paint ties it all together. Zero sawing skills required beyond a simple straight cut.
The Mini Reni:
Pre-cut scallop trim + paint = a custom-looking shelf that elevates any wall
What You’ll Transform:
Any plain floating shelf, basic wall shelf, or thrifted shelf that looks builder-grade and boring
Materials:
- Plain floating shelf or simple wall shelf, thrifted or new, 24-36 inches long ($10-20)
- Pre-cut scallop wood trim sold by the foot at craft stores, enough to cover shelf front edge ($8-12)
- Wood glue or construction adhesive ($4-6)
- Chalk paint or latex paint, 1 pint in chosen color ($8-15)
- 220-grit sandpaper ($3-5)
- Paintbrush or foam brush, 2 inches wide ($3-5)
- Measuring tape
- Miter saw or hand saw for one straight cut ($0 if borrowing, or ask the hardware store to cut)
- Small finishing nails or brad nailer, optional for extra hold ($5-10)
- Tack cloth for dust removal ($2-4)
Step-by-Step Tutorial:
Step 1: Remove Shelf from Wall and Lightly Sand
Take down your shelf if it’s already installed, then lightly sand all surfaces with 220-grit sandpaper to scuff the finish so paint and glue adhere properly.
Step 2: Measure the Front Edge of Your Shelf
Use a measuring tape to measure the exact length of your shelf’s front edge where the scallop trim will attach.
Step 3: Cut Scallop Trim to Match Shelf Length
Cut your pre-cut scallop trim to the exact measurement from Step 2 using a miter saw or hand saw and make a clean straight cut.
Step 4: Apply Wood Glue to Back of Scallop Trim
Squeeze a continuous bead of wood glue along the entire back flat surface of your scallop trim piece and spread it evenly with your finger or a scrap piece of cardboard.
Step 5: Press Trim Firmly onto Shelf Front Edge
Align the scallop trim with the front edge of your shelf, press it firmly into place, and hold for 30-60 seconds to ensure strong initial contact.
Step 6: Secure with Finishing Nails If Needed
For extra hold, tap 3-4 small finishing nails through the trim into the shelf edge at evenly spaced intervals, or use a brad nailer if you have one.
Step 7: Let Adhesive Cure for 30 Minutes
Set the shelf aside on a flat surface and let the wood glue cure for at least 30 minutes before handling (check your glue bottle for specific cure time).
Step 8: Paint Entire Shelf with First Coat
Apply your first coat of paint to the entire shelf including the scallop trim, using long smooth brush strokes and painting in the direction of the wood grain.
Step 9: Apply Second Coat After 2-3 Hours
Once the first coat is completely dry to the touch (2-3 hours), apply a second coat of paint for full coverage and a professional finish.
Step 10: Let Cure Overnight, Then Rehang and Style
Allow the paint to cure overnight (24 hours for full hardness), then reinstall your shelf on the wall and style it with books, small plants, or decorative objects.
Joanna’s Mini Reni Secret: Choose scallop trim with soft, cloud-like curves rather than sharp dramatic scallops for that modern farmhouse vibe Joanna loves. Paint the entire shelf (shelf surface + scallop trim) in one cohesive color rather than trying to create contrast – the scallop shape creates enough visual interest on its own. Soft white, cream, sage green, or warm gray are classic mini reni shelf colors that work in any room.
Total Time: 2 hours active work (plus overnight cure time)
Total Cost: $35-50
- High-Precision Abrasive Paper: This Shineboc 9x3.6 inch sandpaper set comes with 21 sheets of...
- Premium Material: Crafted from high-quality silicon carbide, it is electrostatically coated to...
Slide left to reveal!
Mini Reni Projects FAQs
What is a mini reni?
A mini reni (mini renovation) is a small-scale makeover that transforms a room or space in about a week using cosmetic updates instead of demolition or construction. Joanna Gaines popularized mini renis on her Magnolia Network show as a faster, more affordable alternative to full Fixer Upper-style gut renovations. Mini renis focus on paint, styling, trim work, and furniture arrangement rather than knocking down walls or replacing major systems.
How long do furniture mini renis take?
Mini renis take 20 minutes to 2 hours of active work, depending on project complexity. The Art Forward Vignette finishes in 20 minutes from start to styled. The Heritage Table Reset takes 60 minutes to layer and arrange all elements. The Scalloped Cloud Shelf requires 2 hours of hands-on work plus overnight cure time for the paint. On her show, Joanna completes entire room mini renis (three spaces) in one week, but these smaller single-project mini renis fit into a weekend afternoon without taking over your entire month.
What supplies do I need for mini renis?
Basic mini reni supplies include items you likely already own or can borrow: paintbrushes, sandpaper, wood glue, measuring tape, and basic hand tools. Unlike major renovations that need power tools, contractor-grade supplies, and specialized equipment, mini renis commonly use simple accessible materials that beginners can handle confidently.