
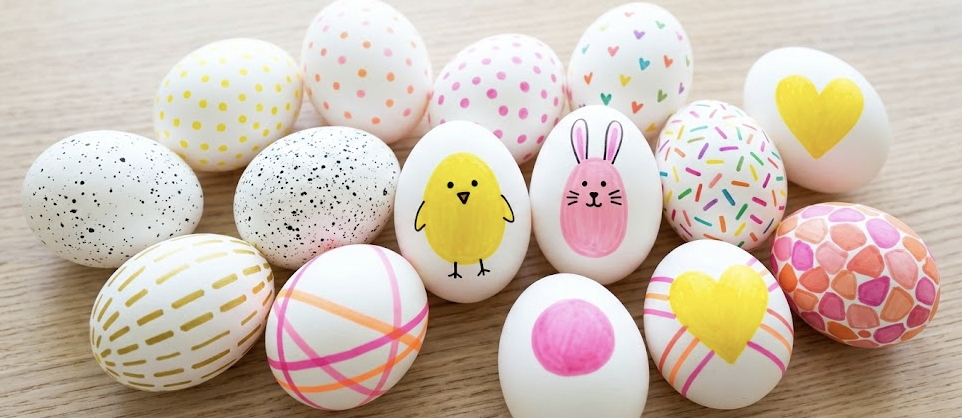

I love a cute Easter craft, but I don’t like the usual mess or the pressure to buy a bunch of pricey supplies. So I started gathering Easter egg designs that are easy to recreate with Sharpies, markers, and other budget-friendly materials. Below are 7 of my favorites that still turned out colorful and special enough for the holiday.
Jump to:
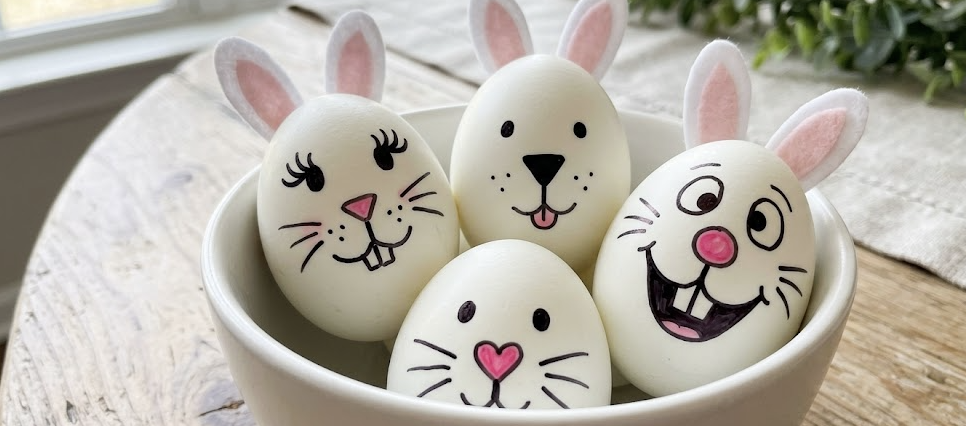
Bunny Face Easter Eggs
Sprinkle Easter Eggs
Tie-Dye Eggs
Thumbprint Bunny
Bedazzled Easter Eggs
Galaxy Eggs
Decoupage Easter Eggs
MORE SEASONAL PROJECTS: 7 CLEVER SPRING ORGANIZATION HACKS
1. How to Make Bunny Face Easter Eggs
Materials Needed:
- White hard-boiled eggs
- Fine-tip black permanent marker
- Pink permanent marker
- White paint pen (optional, for the teeth)
Steps:
- The Egg Shape. Start with your clean, white egg. (If using real eggs, make sure they are completely dry and room temperature to avoid ink bleed.)
- Add Pink Nose. Draw a small, simple pink shape in the upper center. Make a triangle, heart, or oval nose to make each bunny unique.
- Draw Eye Dots. Add two solid black circles just above the nose. Keep them level!
- Add Eyebrows. Draw simple black arched lines above the eyes. This gives them an expression.
- Add Whiskers. Extend three thin black lines from each side of the nose. Keep them light.
- Draw Muzzle (W). Draw the classic “W” muzzle shape (like two ‘U’s connected) directly below the nose.
- Add Muzzle Dots & Lashes. Add small pin-prick dots above the mouth line. Also, add subtle lash flicks to the eye dots.
- Add Teeth & Final Touches! Add one or two small white square teeth hanging from the center of the ‘W’ mouth. Add any final small details, like a tiny pink inner ear spot, to complete your design!
I use these Artistro paint pens for basically every project on this list, and they’re my go-to markers for crafts time with the kids. We pull them out every year for Easter because the colors actually stay vibrant on the shells without fading or bleeding into a muddy mess. Definitely worth grabbing if you want an easy, smudge-free art day!
- BRUSH + FINE DUAL TIP: Switch easily between detailed lines and expressive strokes with a 1 mm fine...
- PREMIUM WATER-BASED ACRYLIC PAINT: Filled with richly pigmented, water-based acrylic paint, these...
As an Amazon Associate I earn from qualifying purchases.
2. How to Tie-Dye Eggs Using Sharpie

Materials Needed:
- White hard-boiled eggs
- Multi-colored permanent markers (like ARTISTRO)
- Clear plastic wrap
- Isopropyl alcohol (91% works best)
- Dropper bottle or pipette
Steps:
- Gather Your Supplies. Set out white hard-boiled eggs, multi-colored permanent markers, clear plastic wrap, and a dropper bottle of isopropyl alcohol (91% works best).
- Scribble the Colors. Lay a square of plastic wrap flat and scribble overlapping patches of blue, green, yellow, and pink ink directly onto the surface.
- Activate the Ink. Squeeze a few droplets of alcohol onto the marker patches. Watch as the colors begin to bleed and blend together into a liquid tie-dye.
- Wrap and Transfer. Place a room-temperature egg in the center of the wet ink. Bundle the plastic wrap tightly around the egg and gently massage it to press the colors into every curve of the shell.
- Peel and Reveal. Carefully unwrap the plastic bundle to reveal your one-of-a-kind marbled pattern.
- Dry and Display. Place your finished eggs in a carton to dry completely. Once dry, display them on a colorful napkin or in a basket to show off your hard work!
3. How to Make Sprinkle Easter Eggs

Materials Needed:
- White hard-boiled eggs
- Bright, multi-colored Artistro markers
Steps:
- Prep Your Canvas. Gather white hard-boiled eggs and a set of bright, multi-colored markers. Ensure the eggs are completely dry and at room temperature.
- Draw the First Layer. Pick one color and draw short, uniform “dash” marks (about half an inch long) randomly across the shell. Leave plenty of white space between them.
- Scatter New Colors. Switch to a second color and fill in some of the gaps. Angle these new lines differently than the first set to create a natural “scattered” look.
- Layer the Rainbow. Continue adding 3–4 more colors one by one. Keep your strokes the same size and avoid letting the different colors touch or overlap to keep the look crisp.
- Fill the Gaps. Rotate the egg and look for any large white patches. Add a final few dashes until the “sprinkles” cover the entire egg evenly.
4. DIY Thumbprint Bunny Easter Egg

Materials Needed:
- White hard-boiled eggs
- Pink ink pad
- Fine-tip black marker
Steps:
- Prep & Supplies. Lay out the white egg, the pink ink pad, and the fine-tip black marker.
- Dip & Stamp. Apply pink ink to your fingertip and press it firmly onto the eggshell.
- Add Faces. On the dry print, draw two simple eye dots and a small ‘Y’ nose/mouth shape.
- Draw Ears. Draw long, wobbly loop shapes above the face for ears.
- Add Details. Add whiskers (3 lines per side) and tiny looped feet.
5. How to Bedazzle Easter Eggs
Materials Needed:
- White hard-boiled eggs
- Self-adhesive rhinestones or gems
- Tweezers
Steps:
- Clean & Dry. Ensure white eggs are room temperature and moisture-free so the adhesive grips.
- Pick a Pattern. Choose a center “belt,” tiny floral clusters, or a sleek diagonal line.
- Position Gems. Use tweezers to place self-adhesive rhinestones precisely onto the shell.
- Press & Secure. Firmly push down on each stone for three seconds to lock the adhesive.
For my own bedazzled eggs, I actually just used some leftover rhinestones I had laying around from a sewing project. I definitely wouldn’t recommend letting the little kids help with this one since the gems are super tiny and totally a choking hazard, but they’re perfect if you want to sit down and make a fancy, sparkly egg for yourself. If you’re wondering, I get my rhinestones right here:

- Pack of 1440 Pieces Crystal AB Rhinestones SS12,Size 3.0-3.2mm.
- Hight Quality Glass Rhinestones Flatback,Prefect Cutting, Add Sparkle to Your Crafts.
6. How to Decoupage Floral Eggs

Materials Needed:
- White hard-boiled eggs
- Decorative paper napkins (with floral/printed designs)
- Mod Podge or whisked egg white
- Small paintbrush
Steps:
- Separate the Layers. Peel away the back white layers of your decorative napkin. You only want the tissue-thin top layer with the printed design.
- Tear Your Designs. Roughly tear out the individual flowers or patterns. Tearing (rather than cutting with scissors) creates soft, feathery edges that blend invisibly into the eggshell.
- Apply the “Glue”. Brush a thin layer of whisked egg white (for a natural, food-safe option) or Mod Podge onto a dry, white egg.
- Smooth and Seal. Place your napkin piece onto the wet spot. Gently brush more adhesive over the top, working from the center outward to smooth out any wrinkles or air bubbles.
- Dry and Set. Let the eggs dry completely in a carton. Once dry, the paper will be fused to the shell, looking like a custom-painted masterpiece.
7. How to Make Gold-Speckled Galaxy Easter Eggs

Materials Needed:
- Hard-boiled eggs
- Boiling water
- White vinegar
- Heavy food coloring (indigo, teal, or purple)
- Paper towels
- Old toothbrush (or stiff-bristled brush)
- Metallic gold acrylic paint
Steps:
- Submerge & Soak. Bathe eggs in a mix of boiling water, vinegar, and heavy food coloring (Indigo, Teal, or Purple). Soak for 5–10 minutes to achieve a rich, moody “midnight” base.
- Dry Completely. Let the eggs sit on a paper towel until the shells are bone-dry to ensure the paint sticks.
- Prep the Gold. Dip a stiff-bristled brush (an old toothbrush works best!) into metallic gold acrylic paint.
- Flick the Splatter. Hold the brush a few inches above the eggs and flick the bristles with your thumb to create a fine mist of gold “stars.”
- Set and Dry. Let the splatters dry for at least 10 minutes before moving the eggs.
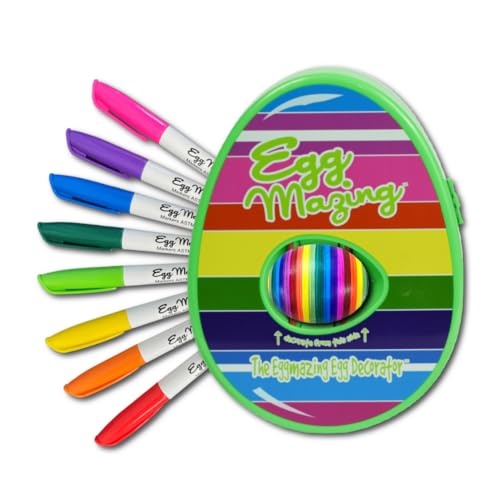
BONUS: How to Use the EggMazing Decorator

Materials Needed:
- EggMazing Decorator machine
- 8 quick-dry markers (included with the kit)
- 4 AA batteries
- Hard-boiled eggs (dry and room temperature)
Steps:
- Load and Launch. Pop 4 AA batteries into the base and nestle a dry, hard-boiled egg into the center rollers. Flip the “on” switch to start the egg spinning!
- Stripe and Style. Choose one of the 8 quick-dry markers and gently touch the tip to the spinning shell. The machine creates perfectly straight, 360-degree stripes for you.
- Layer the Rainbow. Swap colors frequently to build vibrant patterns. Since the ink dries on contact, you can overlap colors immediately without any smudging or bleeding.
- Remove and Play. Once the egg is fully decorated, switch the machine off and lift your masterpiece out. It’s 100% dry and ready for the Easter basket instantly!
I was anticipating the usual dye mess all over the kitchen table, but this spinning egg decorator turned out to be genuinely brilliant. My toddler just held a marker to the shell while it spun, and we ended up with perfectly striped eggs without a single drop of dye to clean up. Perfect not just for Easter, but for bonding time with the kids!
- ENDLESS EGGMAZING FUN: Have hours of excitement decorating eggs in an original way at Easter or all...
- FUN WITHOUT THE MESS: No dyes means no smells and no messy clean up with the self-contained...
FAQs
1. Are eggs decorated with markers and acrylic paint safe to eat? If you’re using permanent markers, acrylic paint pens, or regular Mod Podge, the eggs should strictly be used for display purposes only, as the ink and chemicals can seep through the porous shells. If you want to eat your creations later, stick to food-safe food coloring, or use the whisked egg-white method mentioned in the Decoupage tutorial!
2. Why is my marker ink smudging and bleeding on the shell? The most common culprit is condensation! If your hard-boiled eggs just came out of the fridge, as they warm up, they will “sweat.” This moisture causes permanent marker and paint pen ink to bleed and smudge. Always make sure your eggs are completely dry and have reached room temperature before you start drawing.
3. Can I use fake eggs for these crafts instead of real ones? Absolutely! Given the high grocery store prices right now, swapping real eggs for wooden, ceramic, or matte plastic craft eggs is a fantastic idea. All of these tutorials (especially the Sharpie, paint pen, and bedazzling methods) work perfectly on craft eggs, and you get to keep your beautiful creations for years to come!
QUICK POLL: With 2026 egg prices, is Easter egg decorating still a sacred tradition or just a total waste of money?
Vote above, then sound off in the comments! How are you handling the great egg inflation of 2026? Are you switching to plastic, scaling back, or buying the real deal no matter the cost? Tell us your strategy!


