
At a Glance: Baba Yaga Hut
- About 16 inches tall and roughly $25 in materials. Cardboard walls, wire-and-clay legs, craft paint. Nothing here needs a saw or a power tool.
- Two evenings, not one. Build and sculpt the first night, then let the clay cure overnight before a single brush touches it.
- Crooked is the goal. This is the one build where a wonky roof and uneven legs mean you got it right.
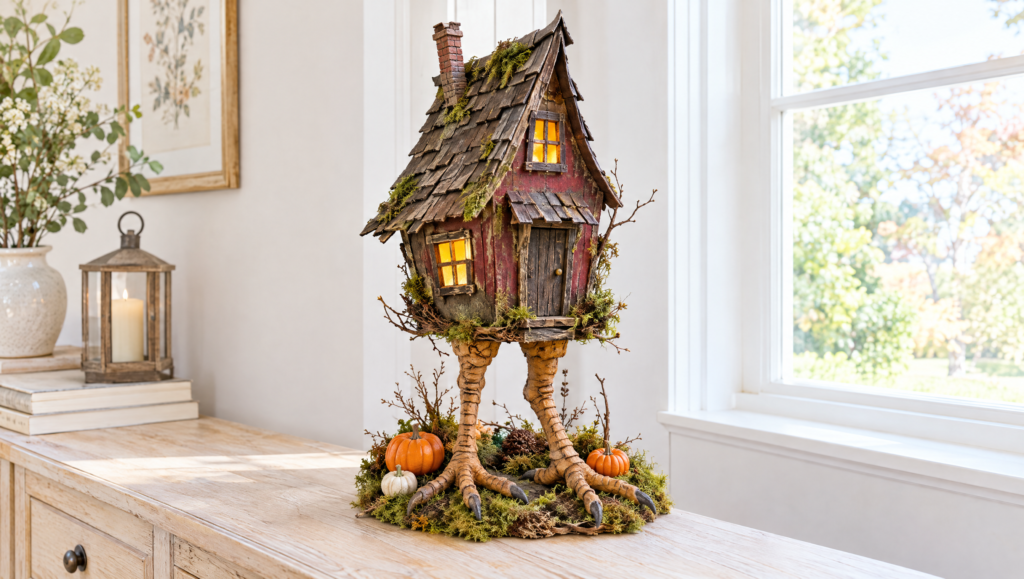
A Baba Yaga Hut is a small house that stands on a pair of giant chicken legs, and it is the single strangest thing you can put on a porch in October. The build is cardboard, wire and air-dry clay, about $25 of materials, and two evenings with a drying break in between. Jump straight to the steps.
Here is why this one lands. Every third house on the street has the same inflatable and the same plastic tombstones. Nobody has a cottage walking around on bird legs. People stop, squint at it, and then ask you what it is, which is the part that makes it worth the two evenings.
Why a Baba Yaga Hut beats another plastic pumpkin
If the name is new to you, that is fine. It is new to most of the people who will walk past your build.
Baba Yaga is a witch out of Slavic folklore, and she lives deep in the forest in a hut that stands on chicken legs. The hut moves. It turns to face you, or turns away, depending on whether she wants company. She is not a straightforward villain either, which is part of why the stories stuck around for a few hundred years: she helps the people who ask properly and eats the ones who do not.
You do not need to know any of that to build the thing. But it is why the design works as decor. A house on legs reads as wrong at a glance, before anyone can explain to themselves why. That is a stronger reaction than a skeleton gets.
RELATED: Haunted Halloween Specter Mirror DIY Decoration
What goes wrong on a Baba Yaga Hut build
Painting the clay too early
This is the one that ruins builds. Air-dry clay is firm to the touch in about 24 hours but is not fully cured for roughly 72. Paint it at hour six and you seal the water inside, which means soft legs that sag under the hut and hairline cracks that open up a week later. Check the time on your own package and then wait longer than you want to.
Building a hut the legs cannot hold
Cardboard is light until you glue a layer of clay texture onto all four walls. Then you have a top-heavy box balanced on two thin wire ankles, and it tips the first time a door slams. Keep the wall texture thin, keep the roof hollow, and give the legs a hidden base to stand on instead of asking the clay feet to do the work.
What you need to build it
One hut, about 16 inches tall
Some links below are affiliate links. If you buy through them, we may earn a small commission at no extra cost to you.
- Corrugated cardboard. A shipping box is perfect. You need four walls and two roof panels, so one medium box covers it.
- A hot glue gun. Every joint on this build is glue. A mini gun is plenty.
- Glue sticks. Buy more than you think. A textured hut eats them.
- Air-dry clay, about 2 pounds. This is the legs and the wall texture. One standard tub does both.
- Wire, 16 to 18 gauge. Floral wire or garden wire. It is the skeleton inside each leg.
- Acrylic craft paint. You need browns, a grey, a deep red and black for the wash.
- A stiff brush and a cheap flat brush. The stiff one does the dry-brushing. The flat one does the base coats.
- Dressing for the base. Faux moss, a handful of twigs, small stones, dried leaves. Your yard has most of this for free.
Three ways to budget it
- Under $15, scrap build. Shipping cardboard, garden wire from the shed, one tub of clay, and paint you already own. Moss and twigs from the yard. The clay is the only thing you have to buy.
- $25 to $40, the version in these photos. Clay, a glue gun with sticks, a basic acrylic set, and a bag of faux moss. This is the sweet spot and what the step costs above assume.
- $60 and up, showpiece. Add foam core for crisper walls, heavier armature wire, glow-in-the-dark paint, a moss mat for the base, and battery fairy lights behind the windows. Worth it if this is going out front for a few seasons.
One safety line and then we build. A glue gun runs hot enough to blister, so work on a scrap board and put it in its stand every time you set it down.
How to build a Baba Yaga Hut, step by step
A Baba Yaga Hut comes together in four steps, and the drying break sits between step two and step three. Read that one before you start so the timing does not catch you out.
1. Build the frame crooked on purpose
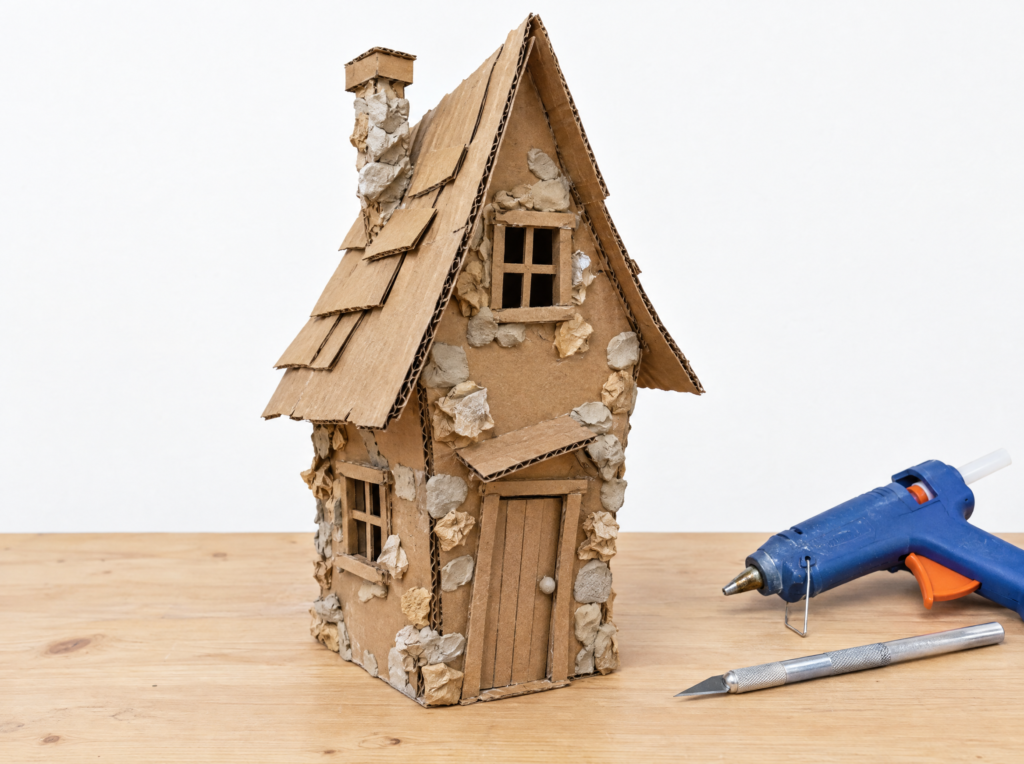
1. Cut four wall panels about 7 inches tall and two roof panels a little longer than the walls are wide.
2. Trim one wall shorter than the other three. That single cut is what makes the finished hut lean.
3. Glue the four walls into a box, then glue the roof panels on at a steep uneven pitch.
4. Cut a small door and two windows. Keep them off-center and slightly out of square.
5. Press a thin skin of clay or crumpled paper onto the walls for bark-like texture. Thin. A heavy coat is the mistake above.
Finished height on the box should land around 10 inches. The legs add the rest.
2. Sculpt the chicken legs
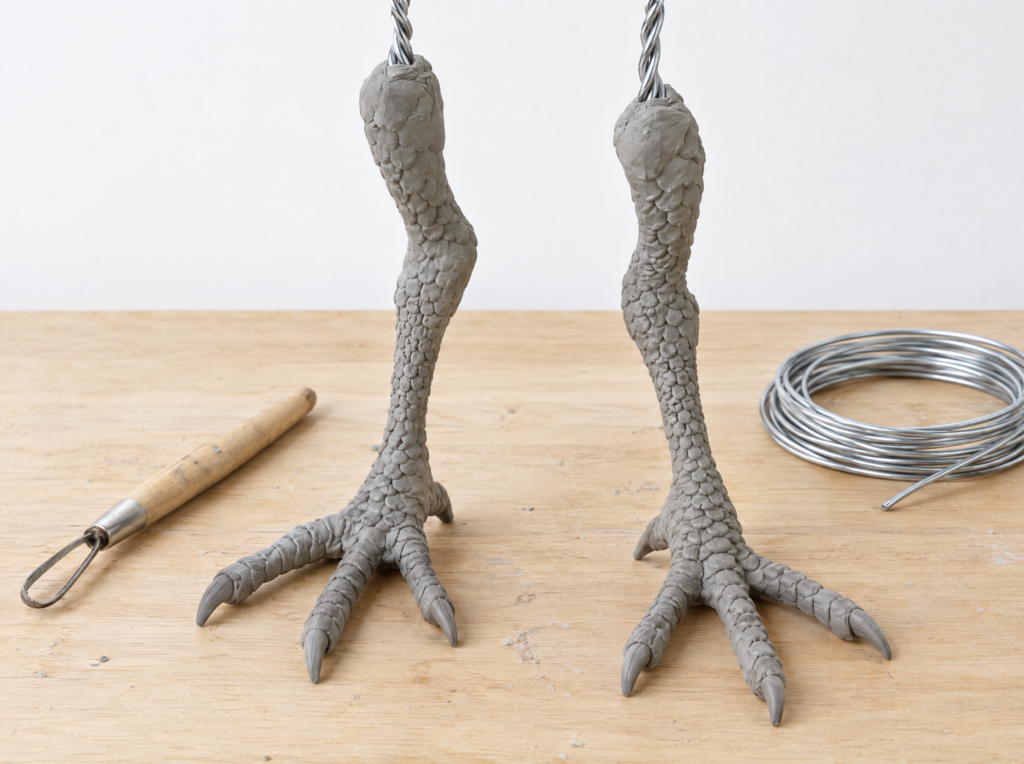
1. Bend two wire armatures about 6 inches tall, each with three splayed toes at the bottom and a bend at the knee.
2. Leave 2 inches of bare wire at the top of each leg. That tail is what anchors into the hut later.
3. Pack air-dry clay around the wire, thinner at the ankle and thicker at the thigh.
4. Score scales in with the back of a knife while the clay is soft, then pinch out claws on each toe.
5. Stand them up and walk away. Overnight minimum, a full day if the legs are thick.
Make them mismatched. One leg bent further forward than the other reads as mid-stride, and mid-stride is what sells the illusion that the hut just stopped walking.
3. Paint, then join the two halves
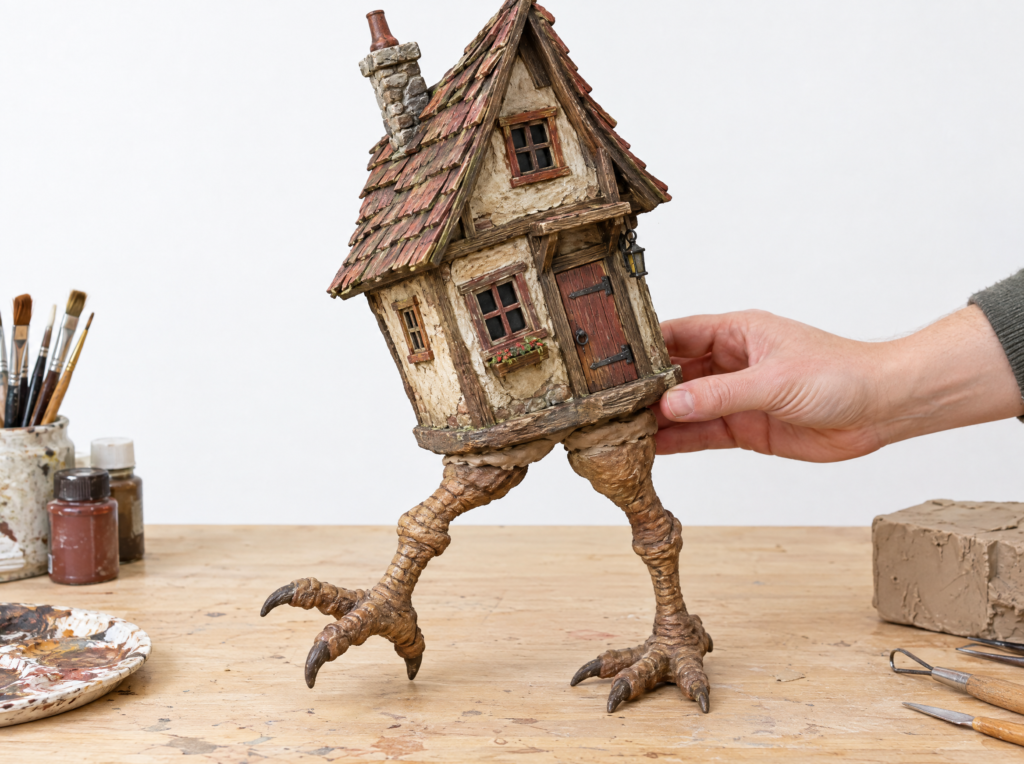
1. Confirm the clay is cured. Press a thumbnail into the thickest part of a thigh. No dent, no give, you are clear.
2. Base coat the hut in mid brown and the legs in a grey brown. Let that dry.
3. Poke two holes in the underside of the hut and push the bare wire tails up into them.
4. Flood the holes with hot glue and hold the hut at a tilt until it sets. Count to thirty.
5. Glue the clay feet down onto a scrap board or a slab of foam. Hide that base under moss in the next step.
The tilt is the whole point. A hut sitting level looks like a birdhouse. Push it 10 or 15 degrees off and it looks like it is about to take a step.
4. Age it and dress the base
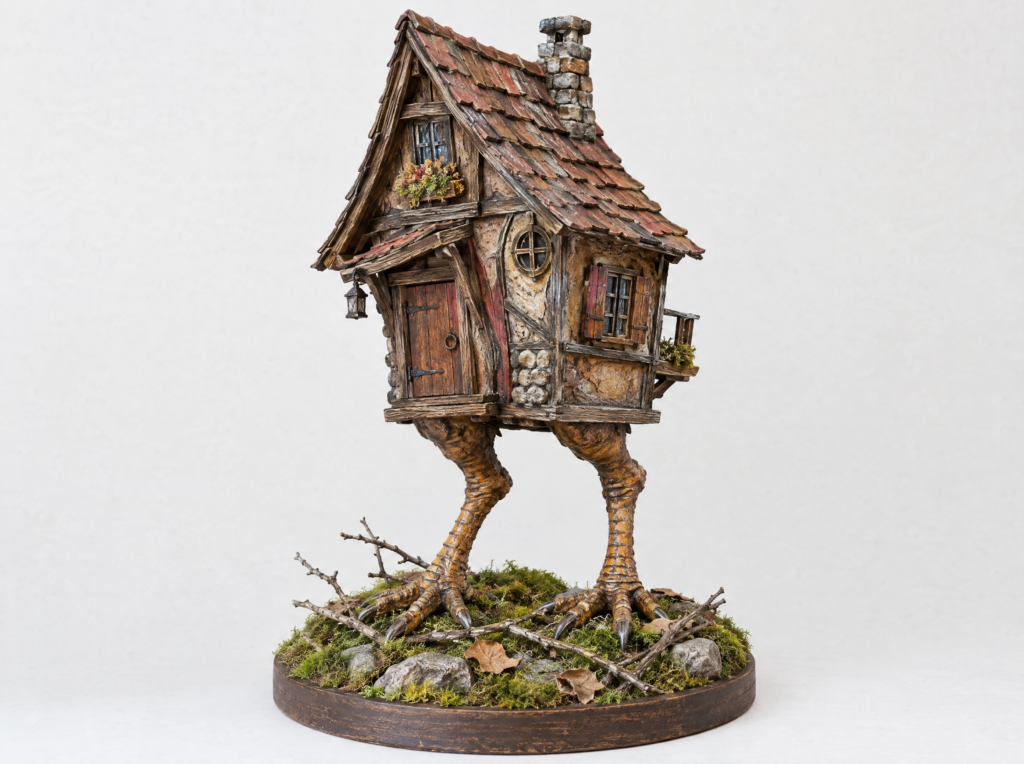
1. Thin black paint with water about four to one and brush it into every edge, corner and seam. Wipe the high spots back with a rag.
2. Dry-brush a pale grey over the roof and wall texture. Nearly no paint on the brush. That is what makes the wood grain pop.
3. Glue moss over the base board, then set twigs down like fallen branches and press in a few small stones.
4. Scatter dried leaves last, loose, so the scene does not look arranged.
5. Optional, and worth it. Hit the window frames and a couple of claw tips with glow-in-the-dark paint so the hut keeps working after dark.
Forest details

Moss, twigs and stones do more for the illusion than anything you paint on the hut itself. Lay the twigs so they cross each other rather than sitting parallel, and keep the stones in odd-numbered clusters. Both tricks stop the base from reading as a craft-store diorama.
Aged effects

Weathering is where a cardboard box stops looking like a cardboard box. Concentrate the dark wash low on the walls and along the base of the legs, because that is where dirt collects on a real structure. Leave the roof peak lighter so the piece still has some contrast at a distance.
Glow-in-the-dark accents

Glow paint needs light to charge, so the hut has to sit somewhere bright during the day to be worth anything at night. Paint the window openings, the roof edge and the claw tips. Hidden symbols on the back wall are a nice touch for anyone who walks all the way around it.
RELATED: DIY Ghosts: Create Floating Halloween Decorations with Cheesecloth
How you know you nailed it
One test tells you whether the Baba Yaga Hut works, and it is the only one that matters. Set the finished hut on a table and photograph it straight on from about three feet away. If the picture makes the hut look like it is standing rather than sitting, the legs and the tilt are right. If it looks like a box with sticks under it, go back and push the lean further.
Indoors it works year round on a shelf or a mantel. Outdoors, cardboard and hot glue will not survive a wet October week, so keep it under a covered porch or move it in when the forecast turns. Want a build that handles weather? Our Halloween wood crafts hold up a lot better outside, and the glowing tomato cage witch is built for the yard from the start.
The verdict on this one
A Baba Yaga Hut costs about $25, takes two evenings, and gets a bigger reaction than decorations that cost ten times as much. The folklore is a bonus, not a requirement. What you are really building is a house that looks like it walked there, and nothing else on the block does that.
Related projects
- 25 Cute and Creepy Halloween Decor Ideas
- Haunted Halloween Specter Mirror DIY Decoration
- 9 Halloween Wood Crafts To Decorate Your Spooky Home With
- How to Make a Glowing Tomato Cage Witch in Four Steps
- DIY Ghosts: Floating Halloween Decorations with Cheesecloth
Built one? We want to see the legs. Post it to Facebook so the rest of us can judge your dry-brushing, pin the supply list to Pinterest before you forget which gauge wire worked, and tag the finished hut on Instagram. Mid-stride shots only.
Before you start cutting
Baba Yaga Hut FAQs
Size, drying times, weather, and whether the kids can help.
About 16 inches total, split 10 inches of hut over 6 inches of leg. That ratio is what makes the legs read as too spindly for the house, which is the effect you want. Go much taller and the cardboard starts needing internal bracing.
Yes, with tacky craft glue and patience. Clamp or tape every joint and give each one an hour before moving on. The leg-to-hut connection is the weak point without hot glue, so wrap the wire tails around a cardboard crossbar inside the hut instead of relying on adhesive alone.
Around 24 hours to be firm to the touch and closer to 72 to cure all the way through. Brands vary, so read your package. The thumbnail test is quicker than the clock: press into the thickest part of a leg, and if it dents at all, it is not ready.
Under cover, yes. In the rain, no. Cardboard wicks water and hot glue lets go in damp cold, so a covered porch or a sheltered entry is the limit. Several coats of matte clear sealer buy you some humidity tolerance but will not save it from a real soaking.
Split it by task. Clay sculpting, scale texture, painting and dressing the base are all good kid jobs and they are most of the build. Keep the box cutter and the glue gun on the adult side of the table. The folklore reads as a bedtime story, which is a decent hook for getting them interested in the first place.
Hot take: is a folklore build too weird for the front porch?
Some people think a Baba Yaga Hut is the best thing on the street. Others think it needs a plaque explaining it. Vote, then tell us in the comments which camp you landed in and why.