

Last Updated: June 2026
At a Glance
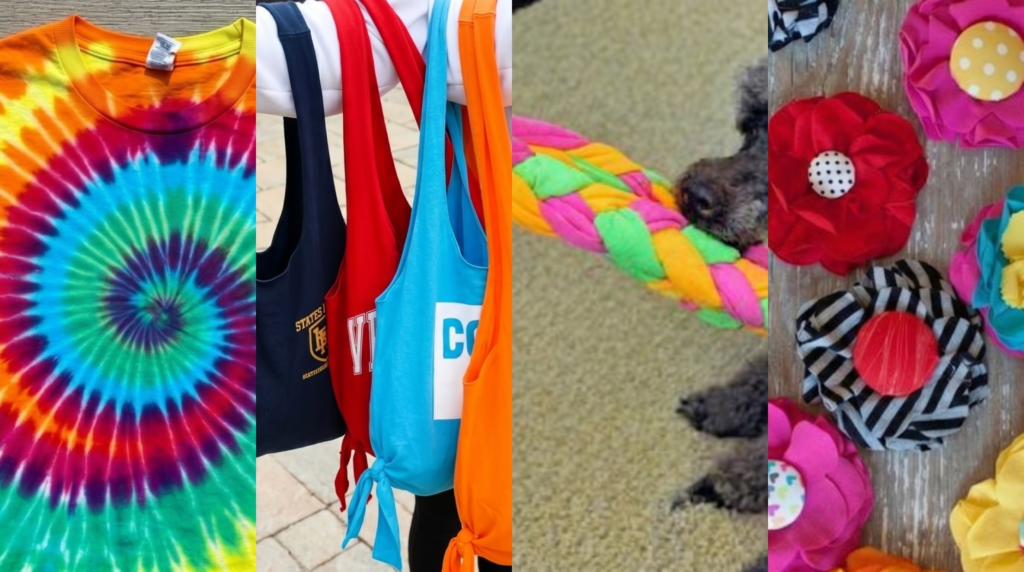
- This guide features a collection of four creative, no-sew DIY projects designed to repurpose old, sentimental, or outgrown T-shirts into practical household items. The projects include a braided dog toy, decorative rag flowers, a classic spiral tie-dye shirt, and a fringe-knotted tote bag.
- Time Required: Most of these individual projects can be completed in about 15 to 30 minutes (excluding the setting and washing time required for the tie-dye project).
- Skill Level: Beginner. These are low-mess, kid-friendly, and completely no-sew crafts that anyone can jump right into.
We all know hard it can be to throw out those outgrown T-Shirts, especially when they hold special memories and meaning. Here at DIY Projects, we believe in saving and UpCycling. Let us show you some of our favorite ways to take those T-Shirts out of hibernation and UpCycle them into everyday use. You don’t have to throw them out, and you’ll have some new goods for your home. Win-Win!
1. T-Shirt Dog Tug Toy
Materials:
- T-Shirts (3)
- Scissors
Directions:
- Cut 10 strips of each colored fabric about 20 inches long (stretched out).
- Alternating colors, lay the strips altogether in one bundle.
- On one end of the trips, tie a double knot, leaving several inches extra on the end.
- Below the knot, separate into 3 sections and braid about 6-8 inches.
- Tie another double knot at the end.
2. T-Shirt Rag Flowers
Materials:
- T-Shirt
- Scissors
- Hot Glue
- Optional: Buttons/Gems
Directions:
- Cut a long strip from the T-shirt about 2 inches wide x ten inches long.
- Fold this strip a little less than half way down.
- In an additional piece of fabric, cut a circle. This will be the backing of the flower.
- Fold the long strip in half and roll the long strip into a flower shape, twisting as you fold.
- Using hot glue, adhere the flower to the circle.
- Press down firmly and let dry for a minute.
- Gently pull the petals of the flower till it looks pretty.
- Snip at two to three places to make smaller petals at the top.
- Add a button or gem in the center to complete the flower.
Here’s where I got the cute buttons:

- Material:Plastic
- Color:Mix,more than 8 colors,more choice for your craft
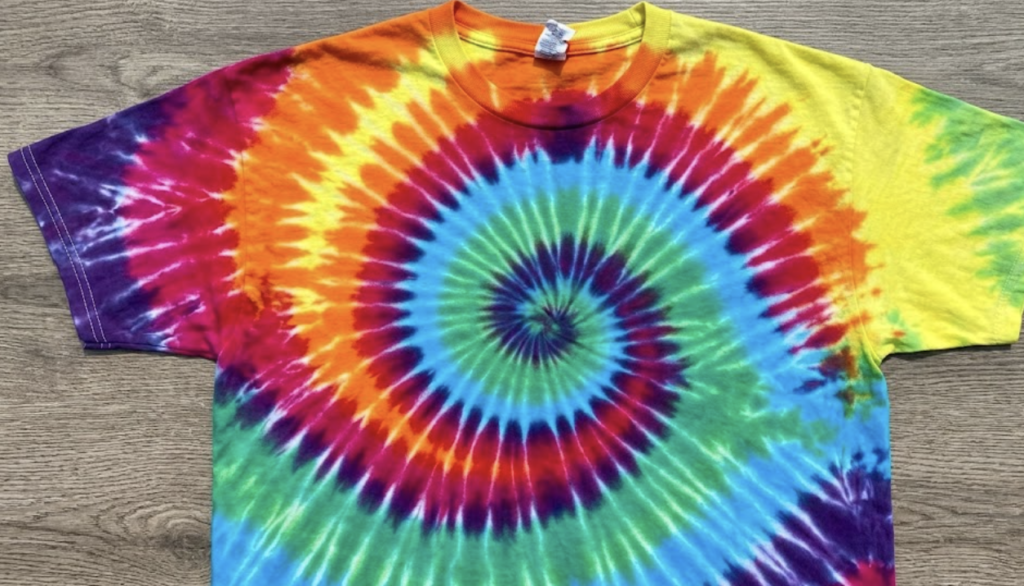
3. Classic Spiral Tie-Dye T-Shirt
Materials:
- T-Shirt (white or light-colored)
- Tie-dye kit (squeeze bottles of dye)
- Rubber bands
- Plastic wrap or a sealable plastic bag
Directions:
- Lay a damp T-shirt flat, pinch the center of the fabric, and twist it tightly until the entire shirt forms a flat, circular spiral.
- Wrap 3 to 4 rubber bands tightly across the spiral to hold its shape, crossing them in the center to create wedge-shaped sections.
- Squeeze different colors of dye onto the various wedge sections on both sides of the bundled shirt.
- Place the dyed shirt into a plastic bag and let it sit for 6 to 8 hours to allow the colors to set.
- Rinse the shirt thoroughly under cold water until the water runs clear, then wash and dry it normally.
This has always been go-to dye kit:

- ULTIMATE TIE DYE KIT FOR GROUPS — Everything you need in one box: 36 prefilled full-size (2.75 fl…
- JUST SHAKE, SQUEEZE & TIE DYE — Tulip’s One-Step fabric dye formula couldn’t be easier. Just add…
Full tutorial: How to Make a Classic Spiral Tie Dye Shirt
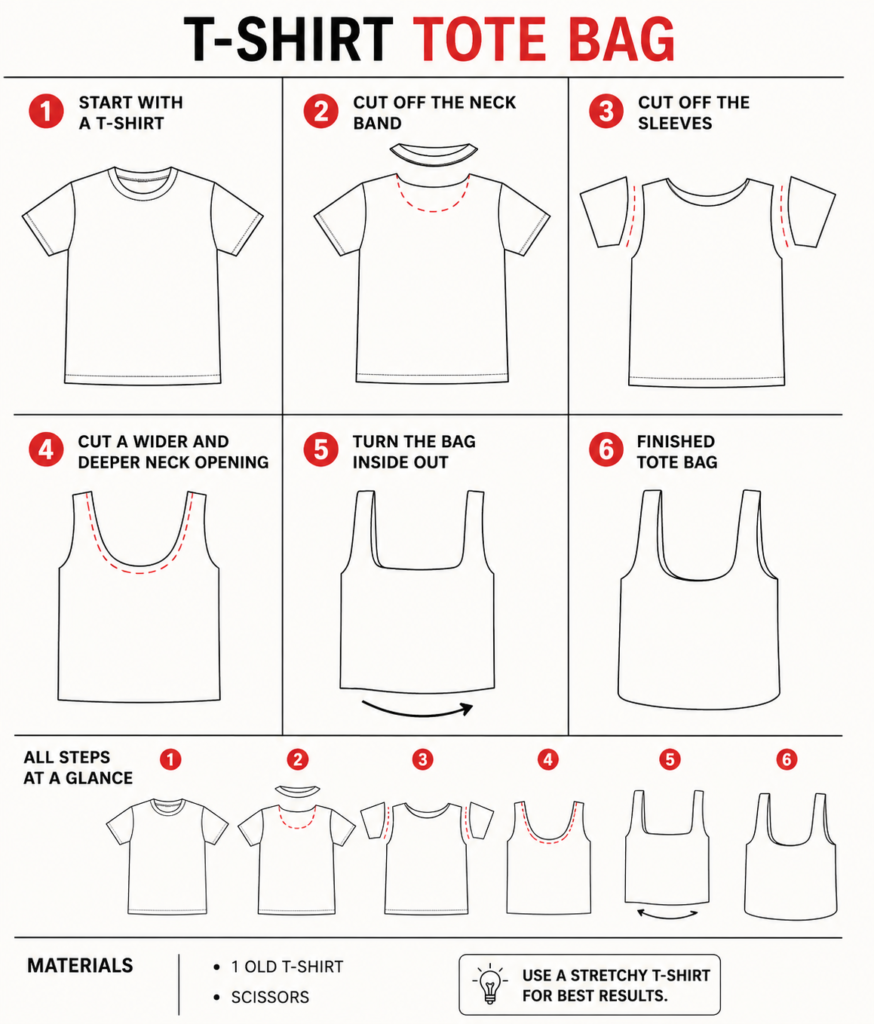
4. DIY T-Shirt Bag

Materials:
- T-Shirt
- Scissors
- Ruler
Directions:
- Place the shirt on your flat surface and cut off the sleeves right along the inside curve of the shoulder seams.
- Turn the t-shirt inside out with the bottom seam closest to you.
- Arrange the bottom edges together and begin cutting vertical slits from the bottom, about 2 inches deep and 1.5 inches apart. You can use a ruler to keep your cuts even.
- Make a vertical cut along the two side seams, also about 2 inches deep.
- Starting from one side, start knotting the top to the bottom layer by tying a set of cuts together. Double knot each tie to ensure a nice and secure base for your bag.
- Turn your new t-shirt bag right side out.
Full tutorial: How to Make a No-Sew Tote Bag from an Old T-Shirt (Easy DIY)
FAQs
Do I need a sewing machine or any sewing skills for these projects?
Not at all! Every project listed in the guide is completely no-sew. For instance, the tote bag secures itself using double knots at the fringe , the dog toy uses braided strips and double knots , and the rag flowers are assembled using hot glue.
What materials do I need to make the DIY T-Shirt Tote Bag?
You only need an old T-shirt, a pair of scissors, and a ruler to ensure your fringe cuts are even. Using a stretchy T-shirt will give you the best final results.
How many T-shirts do I need to make the braided dog toy?
You will need 3 T-shirts for this project. The directions require cutting 10 strips of each colored fabric (stretched to about 20 inches long) before tying and braiding them together.
How do you finish the center of the T-Shirt Rag Flowers?
To give the flower a clean, completed look, you can hot-glue a button or a gem right into the center. The guide notes using assorted colorful plastic craft buttons for a fun touch.
What is the trick to getting the perfect spiral pattern for the tie-dye shirt?
Start with a damp T-shirt laid completely flat. Pinch the absolute center of the fabric and twist it tightly until the entire shirt forms a flat, circular spiral. From there, bind it tightly with 3 to 4 rubber bands crossing in the middle to lock the wedge shapes into place before applying your dye.
QUICK POLL
What kind of project fits your week right now?
Not in the choices? Let us know what kind of project you’re looking forward to make!


