


Want to know how to make DIY paper mache bowl? If you’re looking for a craft project that will serve as a DIY decor and help you get organized, then this is the project for you. It will only take you a few minutes to make your very own paper mache.
How to Make a Paper Mache Bowl | Paper Mache Projects
Paper mache bowls are an easy and fun way to create a handmade piece of art for your home or office. These bowls can be used for display, for holding your keys and other items. The surface is easy to paint, allowing you to use your favorite colors and designs to your finished bowl.
What you’ll need for your paper mache bowl:
- newspaper
- flour
- a pinch of salt
- a bowl (for molding)
- craft or acrylic paints
- brushes
- Elmer’s glue (optional)
- whisk
- tape
- sand paper
- protective sealer
- permanent black marker
- jute
- hot glue
Step 1
Prepare your work area before starting this project, it is helpful to clear an area and cover it with garbage bags or aluminum foil. Paper mache is a very messy craft.
Step 2

Cut out the newspaper into strips. The length of your strips may vary depending on the size of the project; however, for this project you will want the strips to be about 1″ wide.
Step 3

Wrap your bowl with plastic wrap, press out the extra air as much as possible and tape down the inside of the bowl.
Step 4

Prepare the paste. There are many different recipes for paper mache available to use but for this recipe,w e will use: 1 cup of flour, 2 cups of water, 1/4 cup white glue (optional), and a little bit of salt (salt helps prevent mold). Mix all ingredients until smooth, the whisk will help you get rid of the lumps. This recipe will make a pretty creamy paste but you can add more water if you’d like to.
Step 5

Pull out your 1″ strips of newspaper and dip each one in the paper mache paste. With your fingers, remove excess paste. Apply the strip over your bowl and smooth it down with your fingers. Make sure that you overlap the layers going in different directions. Keep doing this until you have several layers of newspaper covering the entire bowl. The more layers you apply the stronger the bowl will be. Let dry overnight or as long as necessary before proceeding to the next step.
Step 6

Remove the bowl by pulling off the tape, and then gently pull the plastic wrap from the bowl form. Use a butter knife to help you with this step if necessary, but be very gentle and eventually your bowl will pull away.
Trim the edges with a pair of scissors. At the stage, I added more paper mache to the rim because it had some parts that were thicker than others and I wanted it to look pretty even all around. If you are happy with your rim, the next step is to sand the bowl lightly.
Step 7

Paint the bowl on the inside and the outside with any color of your choice. If you are using Craft paints it will need a few coats. If you’re painting the bowl a lighter color then it would be best to give it a coat of white paint first and then the color of your choice.
Step 8

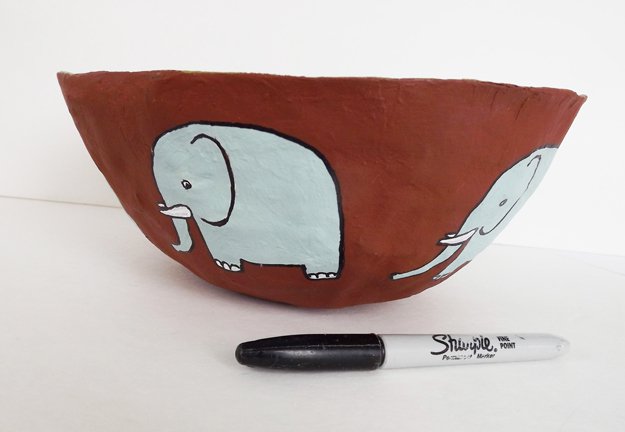
Print, cut and trace several elephants all around the bowl. I do this the old fashion way, by taking a pencil and rubbing it on the back of the image. Then I turn the image right side up, tape it to the bowl, and go over the lines with the pencil. When you lift the paper off, you will have a pencil image of the elephant on the bowl.
Step 9

Paint all the elephants and let dry.
Step 10

Using a permanent black marker outline all the elephants. Once all the images are done, apply a coat of a protective sealer to the bowl. I used Krylon Crystal Clear Acrylic Sealer but you can use any sealer you prefer.
Step 11

Using a hot glue gun, carefully hot glue jute around the bowl and you are done!
Here’s the pattern I used for the paper mache bowl:

Did you enjoy our tutorial on how to make a paper mache bowl? Let us know in the comments section below what your thoughts are on this paper mache project. Do you have any other craft projects you’d like to share? Share it with us and we’ll give it a try. We love doing cool DIY projects by making craft projects, home decor projects, upcycling ideas, recipes, tutorials and anything you can do yourself. That’s why we created this site, we want people to be more in touch with their creative side and realize that there’s a lot of things that they can do themselves. We’d love to hear from you and create a community of DIY enthusiasts where any project is just a click away. Stay connected with us on Facebook, Twitter,Pinterest and Instagram!


