


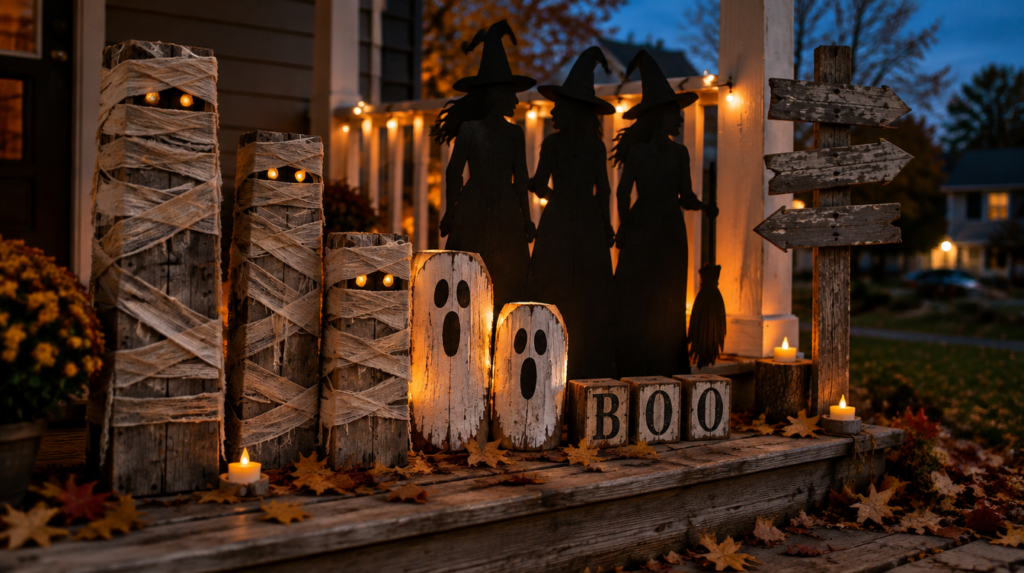

At a Glance: Halloween Wood Crafts
- Nine projects, ordered easiest to hardest. The first two need no saw at all. The last two need carving tools and a full weekend.
- Check the pallet stamp before you cut. Look for HT, which means heat treated. Skip anything marked MB, because that wood was fumigated with a pesticide.
- Most of these cost under $20. Scrap wood, one can of paint, and a couple of hours is the whole budget for six of the nine.
Halloween wood crafts are decorations built from scrap lumber, pallet boards, plywood offcuts, or log rounds, finished with paint and sometimes lights. The easiest ones need no saw at all, just offcuts and craft paint. The hardest need a jigsaw or carving gouges. Pick by the tools you already own, not by the photo you like most. Jump to the wood and tools, or jump straight to the nine projects.
Every one of these started as wood somebody else was going to throw out. That’s the best part of building Halloween decor out of scrap. A pile of offcuts behind the garage turns into a yard display that looks like it came from a specialty store, and the whole thing stores flat in the rafters until next October.
What goes wrong with Halloween wood crafts?
Grabbing the Wrong Pallet
Free pallets are the backbone of half these projects, and they aren’t all the same. Pallets that crossed a border carry a stamp showing how they were treated. The two approved treatments are heat, marked HT, and methyl bromide fumigation, marked MB. Heat treatment is nothing but temperature and time. MB means a pesticide was used.
Look for HT and take it. Put MB back. Skip anything with oil stains, spilled chemicals, or no marking at all, since an unmarked pallet tells you nothing about where it’s been. This takes five seconds in the parking lot and it’s the single most useful habit in scrap woodworking.
Cutting Dry Wood in a Closed Garage
Sawing and sanding reclaimed boards throws a lot of fine dust, and dry old wood throws more than fresh lumber. OSHA puts it plainly: breathing wood dust may cause allergic respiratory symptoms, mucosal and non-allergic respiratory symptoms, and cancer. That’s worth a mask, not a shrug.
Cut outside or open the garage door, wear a fitted dust mask rather than a loose paper one, and run a shop vac near the cut if you have one. Reclaimed boards also hide nails and grit that chip blades and can throw a cut back at you, so pull every fastener and check both faces before the blade touches wood.
What wood and tools do you need for Halloween wood crafts?
Covers all nine projects
- Pallet boards or scrap 1x lumber. Stamped HT. Pull the nails first. Good for blocks, mummies, coffins, and signs.
- Plywood, half inch or thicker. For anything cut to a shape. Exterior grade if it’s going in the yard.
- Log rounds or firewood chunks. Four to eight inches across. The ghost and snowman project is built on these.
- Matte black and white paint. Craft acrylic for indoor pieces, exterior latex or spray for yard pieces.
- A fitted dust mask. Not optional once a saw or sander is running.
- Jigsaw. Needed for the silhouette and the coffin. Nothing else on the list requires it.
- Drill and screws. For the post sign and the coffin.
- Carving gouges. Only for the skull. Skip this one if you don’t already own them.
- Battery tea lights or fairy lights. Warm white. Never a real flame inside a wood piece.
Quick tip: Sort your scrap pile by thickness before you start, not by project. Once you can see what you actually have in half inch, three quarter inch, and log rounds, the right project picks itself. Most people stall out because they fell in love with a build their wood pile can’t supply.
What are the best Halloween wood crafts to build?
These run easiest to hardest. The first two need no saw. By number five you need a jigsaw, and the last two are weekend builds. Every project credits the maker whose build it came from, so you can watch the full thing before you commit.
1. Boo Blocks

Wood and tools: three scrap blocks, craft paint, wooden letters. No saw if the offcuts are already square.
Time: 20 minutes plus drying.
What goes wrong: blocks that rock. Sand the bottom face flat on a sheet of sandpaper laid on a table, and check each block sits still before you paint it. A block that wobbles will knock the other two over.
2. Painted Cinnamon Broom
Wood and tools: a cinnamon broom and craft paint. Nothing else.
Time: 30 minutes.
What goes wrong: nothing much, which is why it’s second on the list. Be straight with yourself that this is a finishing project rather than a build, since you’re buying the broom and decorating it. The cinnamon scent fades after a few weeks, and paint is what gives the broom a second life. A candy corn pattern in orange, white, and yellow across the bristles reads from across the porch.
3. Reversible Ghost and Snowman Logs
Wood and tools: log rounds or firewood chunks, white paint, black paint for the face. One crosscut per log if they need shortening.
Time: an hour plus drying.
What goes wrong: painting both faces before the first side cures, which smears the ghost. Paint one end, let it dry fully, then flip it. This is the smartest project here because it works twice. A ghost face on one end and a snowman on the other means the same piece carries you from October through February.
4. Scrap Wood Mummy
Wood and tools: pallet offcuts, cheesecloth or gauze, googly eyes, glue. A saw only if you want the pieces a specific height.
Time: 45 minutes each.
What goes wrong: wrapping too neatly. A mummy that looks bandaged by a nurse isn’t creepy. Wrap loose, let strips hang, and leave gaps where the wood shows through. Build three at different heights and stand them together, because a mummy family reads far better than one lonely mummy.
5. Three Witches Plywood Silhouette
Wood and tools: exterior plywood, jigsaw, matte black exterior paint, string lights behind it.
Time: a half day including paint.
What goes wrong: cutting detail too fine. Thin fingers and hat brims snap off in the first wind. Keep every cut-out at least an inch wide at its narrowest point. Seal the cut edges too, because bare plywood end grain drinks water and delaminates in a single wet week. Backlighting is what sells it, so set the lights behind the panel rather than in front.
6. Directional Post Sign
Wood and tools: a 4×4 post, scrap boards for the arrows, drill, exterior paint, stencils or a steady hand.
Time: a half day.
What goes wrong: a post that leans by week two. Set it in a bucket of gravel or concrete rather than pushing it into soft ground, and angle the arrows in different directions so the piece reads from the sidewalk. The weathered finish does the heavy lifting here. Dry brush grey over black and sand the edges back so it looks like it’s been standing there for years.
7. Toe Pincher Coffin
Wood and tools: reclaimed boards, jigsaw or circular saw, drill and screws, dark stain or black paint.
Time: a full weekend.
What goes wrong: the angles. A toe pincher is six sided, so the two shoulder joints meet at an angle rather than square, and most people cut them by eye and end up with gaps. Cut a cardboard template first and trace it. The classic shape is wide at the shoulders and narrow at the feet, and getting that taper right is the whole project.
8. Carved Wood Skull
Wood and tools: a softwood block, carving gouges, mallet, sharpening stone.
Time: several evenings.
What goes wrong: starting with hardwood or dull tools. Both make a beginner think they can’t carve. Use basswood or pine, keep the gouges sharp, and rough the whole skull before you detail any one part. Carving is the only project here that’s a genuine skill rather than a technique, so give yourself a practice block you’re willing to ruin.
9. Nightmare Before Christmas Clock Prop
Wood and tools: plywood, jigsaw, drill, paint, and patience for the face layout.
Time: a full weekend or more.
What goes wrong: the hands and the numbers. A clock face reads wrong instantly if the spacing is off, so mark the twelve positions with a compass and a protractor rather than spacing them by eye. This is the most involved build on the list and the one that gets the most attention on a porch, because people recognize the shape before they’re close enough to see the detail.
How much do Halloween wood crafts cost to build?
Scrap Pile Build (under $20)
Free pallet wood or offcuts, one bottle of craft paint, and letters or googly eyes from the dollar store. The Boo blocks, the mummy, and the ghost logs all land here. This covers three of the nine projects with change left over.
Yard Ready Build ($40 to $70)
Add a sheet of exterior plywood, a quart of exterior latex, a can of clear sealant for the cut edges, and a set of outdoor rated string lights. This is what the silhouette and the post sign need to survive a month of weather instead of a week.
Keeps Forever Build ($120 and up)
Add a basic carving set, a jigsaw if you don’t own one, and a labeled storage bin sized to the biggest piece. This is the version where the coffin and the clock come back out looking the same every October instead of getting rebuilt. The bin matters more than people expect, because most of these pieces die in storage rather than outdoors.
When should you skip the build?
Three of these need a jigsaw or carving gouges, and borrowing a power tool you’ve never used to cut plywood in a driveway is how people get hurt. If you don’t own the tool and don’t have someone to show you, build the first four projects this year and come back to the others. There’s no prize for starting with the coffin.
Two hard lines, though. Battery lights only inside any wood piece, never a real candle, because a hollowed log or a plywood box is a fire waiting for an excuse. And if a yard piece needs to be wired into your outdoor lighting, buy an outdoor rated product or get a licensed electrician rather than running your own cable. Everything else on this list is paint and patience.
You nailed it if
- Every block and log sits flat with no rocking.
- No cut-out on the silhouette is thinner than an inch at its narrowest point.
- Cut plywood edges are sealed, not bare.
- The whole display packs into one bin without anything being forced.
- Somebody slowed down on the sidewalk to look.
Conclusion
Halloween wood crafts reward a scrap pile more than a budget. Start with the blocks or the logs this weekend, check the pallet stamp before anything gets cut, and wear the mask when the saw runs. By the time you’ve built three of these you’ll be eyeing the coffin, and you’ll have the offcuts to do it.
Building more for the porch this year? The pool noodle candles and the glowing tomato cage witch both pair well with a wood display, and the floating witch hat lights fill the space above it.
Show Us Your Build
Got a scrap pile that turned into something good? Post it on our Facebook page so we can see what you salvaged, and save this one to your Halloween board on Pinterest for when next October sneaks up on you.
A few helpful answers
Halloween wood crafts FAQs
Wood choice, tools, and making them last.
Check the stamp first. Pallets treated for export carry a mark showing the method, and the two approved treatments are heat, marked HT, and methyl bromide fumigation, marked MB. Take the HT ones. Leave anything marked MB, stained with oil, or carrying no marking at all.
The Boo blocks and the painted broom. Neither one needs a saw. The blocks are offcuts, paint, and stick-on letters in about twenty minutes, and the broom is pure decorating. Both are good first projects for building with kids.
Exterior grade, half inch or thicker. Interior plywood uses glue that fails when it gets wet. Whichever you use, seal the cut edges after shaping, because bare end grain soaks up water and the layers start to separate within a week of rain.
Yes, and a fitted one rather than a loose paper mask. OSHA states that breathing wood dust may cause allergic respiratory symptoms, non-allergic respiratory symptoms, and cancer. Dry reclaimed boards throw more fine dust than fresh lumber, so cut outside when you can.
One bin sized to the biggest piece, kept somewhere dry. More of these get wrecked in storage than outdoors. Stack flat pieces with cardboard between them, keep painted faces apart, and don’t store anything in a damp basement or the paint will lift at the edges.
How scary is too scary for a front yard?
This is the fight that shows up on every neighborhood page in October. One side builds coffins and hanging figures and says a front yard is the one place you get to be theatrical. The other side points out that the same sidewalk carries three-year-olds in dinosaur costumes, and a few towns have had displays taken down over it. Wood props cut sharper than inflatables do, so where’s your line?
Pick one, then argue it in the comments. If you voted full horror, tell us the piece that got a complaint. If you voted keep it friendly, name the one display you’d ask a neighbor to move.









