

Stuck at home? Why not get a new hobby and try making this DIY French market crochet bag that’ll come in handy for your next trip to the grocery?
RELATED: DIY Sewing Projects: How to Make a Drawstring Bag
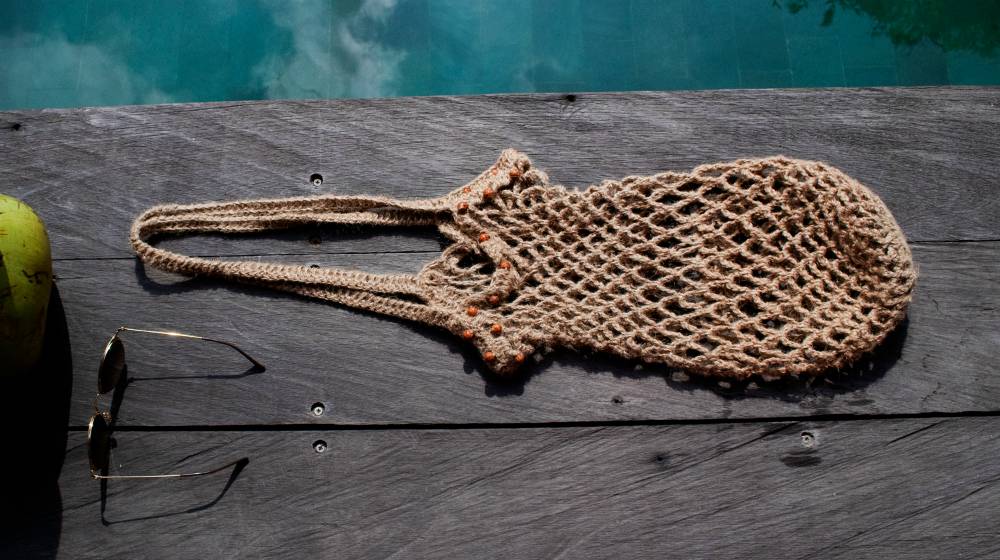
French Market Crochet Bag | DIY Project You Can Use for Your Groceries
What You’ll Need:
- A size 4 yarn
- A size 5mm hook
Step 1: Create a Slip Knot
Start by creating a slip knot using your yarn. Afterward, chain four.
Step 2: Slip Stitch Into the First Chain
Now, take your hook and go into the very first chain you made. Slip stitch into that chain and you should have a little cluster of yarn.
Step 3: Turn the Cluster Into a Small Crocheted Disk
Pull hard on the sides of the cluster to find its center. Once you’ve found the center, you’ll be making a double crochet through it.
Create a total of 10 double crochets inside of one stitch in the center opening of the cluster. Complete the first row of your crochet bag by slip stitching into the very first double crochet you made.
You should now have a little crocheted disk.
Step 4: Finish the Second Row
For the second row, create two single crochets inside every double crochet you made in the previous row. Keep making those single crochets inside every stitch you come across for the entire row until you’ve gone around the disk once.
When that’s done, you should already have your second row. You could choose to stop here and proceed to the next step or, if you want to have a bigger bag, then repeat the process and just add more rows.
The demo above, however, only does one row of single crochets.
Step 5: Complete the Knitting Design of Your Crochet Bag
Now that you’ve completed your row or rows of single crochets, it’s time to start making the crochet bag’s knitting design. Start by chaining four and then slip stitching it into the next stitch.
Next, chain another four and slip stitch again into the next stitch. Continue to repeat the process until you complete your first row of loops. Essentially, this is what you’ll be doing until the end of the project.
You might notice that the loops are very close together at the start. As you keep going, though, the knitting should get wider and wider.
When you’re done with the first row, you should have a snowflake-shaped crochet. If you decided to make yours bigger, it should still look like a snowflake – just a bigger version of the one above.
Step 6: Add a Few More Loops
For the next row, make more loops on top of the first row of loops.
Instead of using four chains, however, start chaining five instead of four. This should help the loop stretch across from one loop to the next.
In other words, instead of slip stitching into stitches that are fairly close to one another, you have to reach over to the next loop. As an effect, your loops have to be bigger, thus the need for five chains instead of four.
Chain five, reach over to the next loop, and slip stitch into that loop. Keep doing this for a number of rows.
RELATED: How To Crochet Stitches | Crocheting For Beginners
Step 7: Check for Curving or Ruffling
While most tutorials give a specific number of rows to make, it’s better to take it by looks. Try to see if there is any curving or ruffling.
If your crochet bag is ruffling, it essentially means that you should just keep going. Your five chains for a loop should still be fine and there is no need to increase the number of chains that make up a single loop.
Once you see that the crochet bag is starting to curve, however, it means you have to make your loops bigger and longer. Essentially, when you’ve completed a number of rows and you start to notice your crochet bag curving on its own, this is your signal that the base of the bag is done.
Step 8: Crochet the “Body” of the Bag
When your crochet bag is curving on its own, it’s time to increase the number of chains that make up a loop. Switch it up and create seven chains to a loop instead of five.
Similar to the earlier step, crochet seven chains, reach over to the next loop, and slip stitch into that loop. Continue doing this until you’re satisfied with the size of the bag.
Keep in mind that the bag stretches a lot. Your “relatively small” crochet bag might turn out to be a large one once you put things inside it.
Step 9: Give It a Solid Lining
Make a row of single crochets just to give the top of the bag a solid lining. Create four single crochets in every loop you come across.
Do that for the entire row and go across the circle. Finish when you come back to your starting point.
Step 10: Add a Strap to Your Crochet Bag
No bag is complete without a strap. Your next step is to crochet your way over to the point where you want to attach your strap.
When you’ve decided where you want to attach the strap, start making it by creating a chain of 100. If you want your strap to be longer, then chain more and vice versa.
When you’re done, slip stitch it to the point where you want to attach the strap. Make sure to give it a decent amount of space to fit your arm.
Step 11: Add Another One
Now, make it even by adding another strap on the other side of the bag. Just single crochet your way over to the opposite side of the bag and do the exact same thing.
Chain a hundred and attach it to the same side opposite of the other strap.
Step 12: Make Your Crochet Bag’s Straps a Bit Thicker
To finish, you might want to make your straps a bit thicker. A single chain can dig into your skin. Adding another layer of crochet on top of the strap makes it thicker, more comfortable, and sturdier.
Do this by single crocheting on top of the chains that make up the strap. When you’re done, put it on your shoulder, go to the grocery, and show off your new French market crochet bag.
Want to see how it’s done? Follow along with this video on how to make a French market crochet bag by Krystal Everdeen:
Making your very own DIY French market crochet bag is a great start if you want to get into crocheting as a hobby. Who knows, you might find yourself stitching Christmas sweaters for your kids next!
Did you find this crochet bag project challenging? Share any tips you might have to make this DIY craft easier in the comments section below!
UP NEXT:
- 20 Simple Sewing Projects That Any Beginner Can Make
- Learn to Make this Cute Mermaid Cosmetics Bag
- DIY Iron On Picture Phone Case Project While On Home Quarantine
Calling all crafting DIYhards, DIY Projects needs YOU! Click here if you want to contribute for us.
Don’t forget to stay connected with us on Facebook, Twitter, and Instagram!


