Free Group T-Shirt

Building Your Own Workbench | The Foundation To Future Projects

Hello everyone, my name is Hunt Ethridge and welcome to my new column Hunt & Gather!  I love tools, I love creativity and I like combining the two.  Whether it’s designing and building something from scratch, rehabbing an old piece or upcycling a unique item for a new life, if I can get my hands dirty and make something, I’m a happy man! So today, I am going to be kicking off by explaining how I built my own workbench.

So my wife and I just bought and moved into our first adult house.  Living in the NYC metro area, it had only been apartments before that.  Needless to say, I was excited about all of the space and projects!

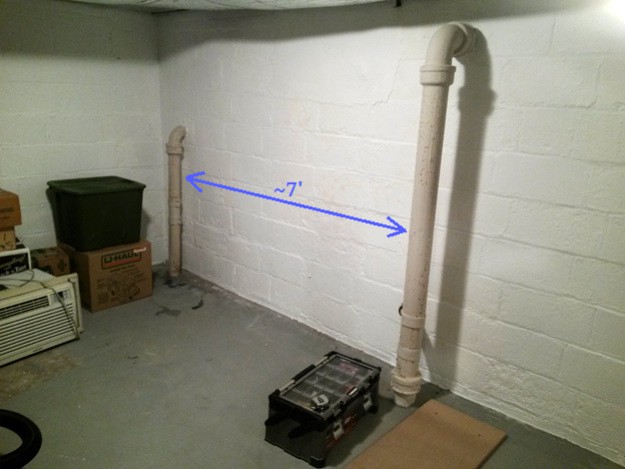
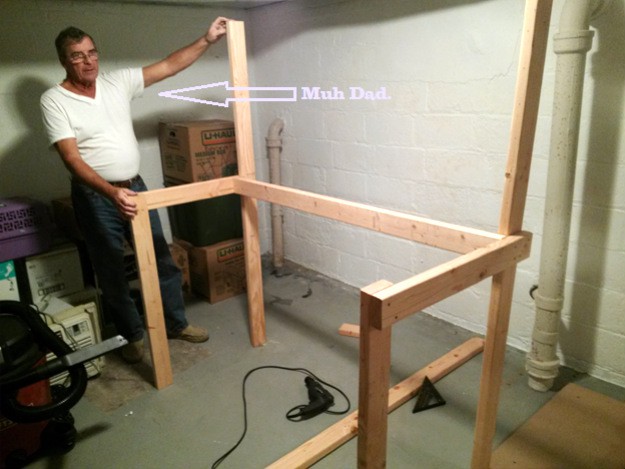
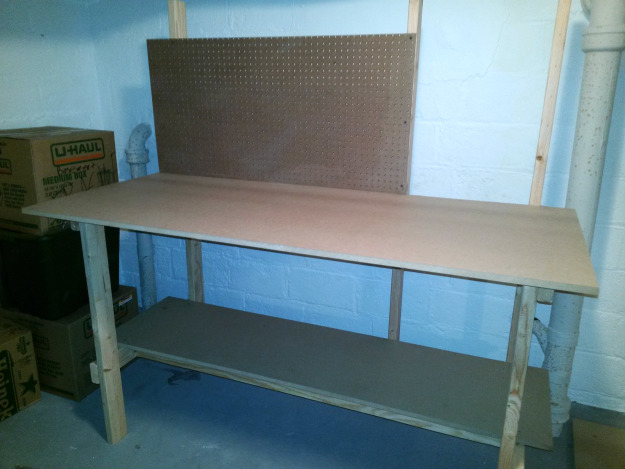
Well, before I could really start on any projects, I needed a work space and workbench.  So I decided to build one to the size and specifications I needed.  You can see below what my basement looked like. Luckily, I had a decent space to work with.

Building Your Own Workbench | The Foundation To Future Projects space to work with

Tools used:

  • Power drill
  • Circular saw
  • Hammer
  • Large square
  • Triangle
  • Level
  • Clamps
  • Tape measure
  • Pencil

Supplies used:

  • (11) 2”x4”x6’s
  • 6’x3’x1” MDF board
  • 6’x2’x1” MDF board
  • 2 2’x4’ pegboards
  • Pegboard hooks and kit
  • Wood screws (2 ½” and 3”)

Building Your Own Workbench

Step #1: Designing the workbench

I grew up watching my dad work at his workspace.  And he also built my first workbench so I could do projects next to him.  Luckily my dad was in town, so we brainstormed about how we wanted it to look and what size it would be.  We sketched out some plans on my trusty graphing pad to get an idea of what we could do.  The finished product actually ended up looking pretty close to our original sketch!  (Don’t use these numbers, they are just guesses and thoughts!)

Building Your Own Workbench | The Foundation To Future Projects step 1 sketch

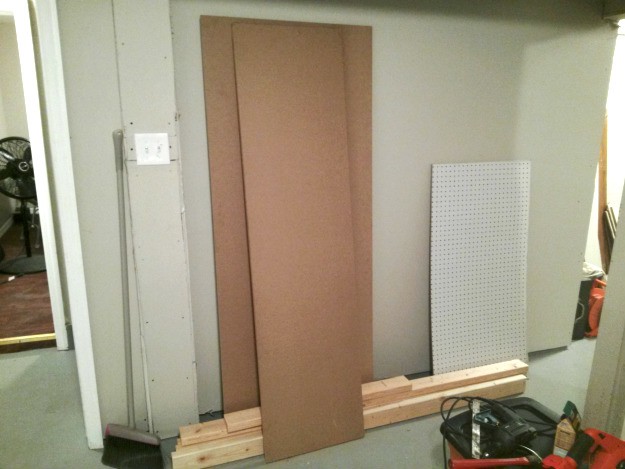
Step #2: Figuring out the materials needed

I like MDF boards because they are so smooth and solid so I wanted to use that as my work surface.  You could also use particle board or some other type of wood.  But make sure you get a smooth surface and that it’s solid as you’re going to be hammering and banging things for years!  I knew that I wanted to use peg board in the back to hang my tools on, so I needed 2 sheets of that.  Then I used 2x4s for the base and cross beams.  I needed 3 for the back supports and 4 for the cross beams.  Then 2 more for the front legs and another 2 for the supports.  I could have bought some 8’ pieces to cut down on waste, but I wanted to have some extra both in case something went wrong and to start a stockpile of scrap wood.

As a rule of thumb, I like to buy 10%-20% more material than I think I’ll need.  That way, you don’t need to keep running back to the store if you split a piece of wood or lose a few screws.

Building Your Own Workbench | The Foundation To Future Projects step 2

Step #3: Start laying out and marking the wood

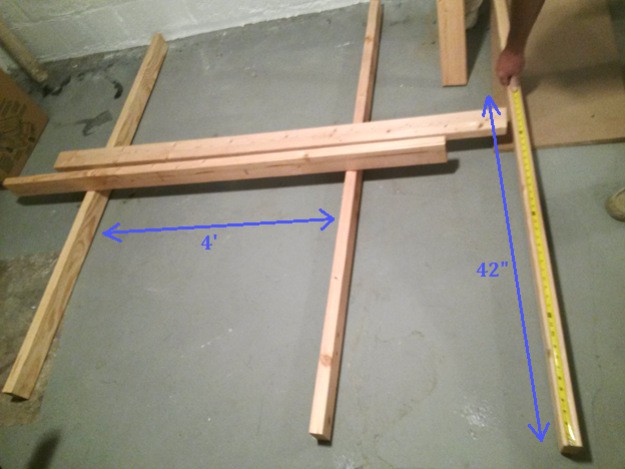
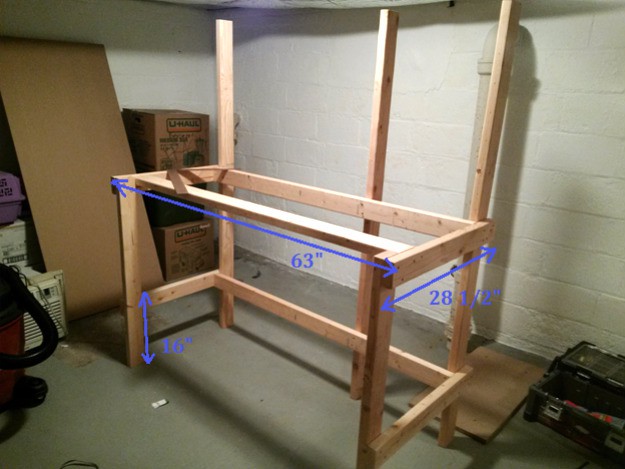
When possible, I like to lay things down on the floor to get a sense of spacing and size and how they all fit together.  What’s right in planning doesn’t always look right in practice.  I wanted the level of the workspace at 42” so I could easily work on it standing up (I’m 6’ tall) or while sitting on a stool.  Obviously if you are shorter or taller, find the height that works best for you.  Once you’ve got everything marked out and you’ve sort of visually pieced it together, it’s time to start cutting.

Building Your Own Workbench | The Foundation To Future Projects step 3

Step #4: Get outside structure built with legs, support and crossbeam

First I attached the back crossbeam to the two outside back support legs.  Now I have height and length set.  Next, I attached the supports to each leg and added the front legs.  To be safe, I only put 1 screw in the front legs while I used the square and level to double check my angles.  Once I was sure we were good, I attached the rest of the screws.  It is very helpful to have someone else to help you hold things in place while you’re measuring/attaching things.  Thanks dad!

Building Your Own Workbench | The Foundation To Future Projects step 4

Step #5:  Add the rest of the supports and beams

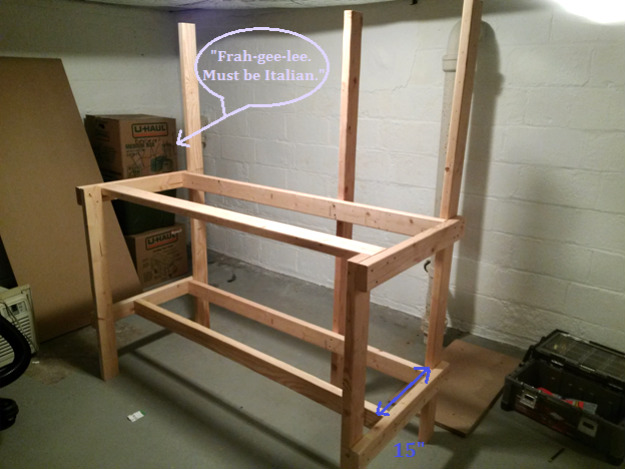
Added the third back leg and the top crossbeam.  Some people might think that you want the 2×4 flush up to the front to give the most support.  While structurally it makes more sense, you definitely want a lip/overhang on the front edge so that you can attach a vise, clamps or other tool.  I gave myself a lip on three sides.  I also laid the board “flatwise” for two reasons, 1) for more support and 2) to make it easier to attach to the surface (see step #7).  Front lip is 8 ½”, side lips are 3 ½”.  The bottom supports are where I am going to add a shelf.  They are 16” off of the floor.

Building Your Own Workbench | The Foundation To Future Projects step 5

Step #6: Measure desired depth of bottom shelf

I didn’t want the shelf to come all of the way out to the front as I imagined barking my shins on it and swearing up a storm.  So I decided on 19” deep shelf.  I still wanted a little lip, so I added the front crossbeam for the shelf 15” from the back edge.  Okay!  Now the base is built, time to start adding the surfaces.

Building Your Own Workbench | The Foundation To Future Projects step 6

Step #7:  Attaching the surfaces

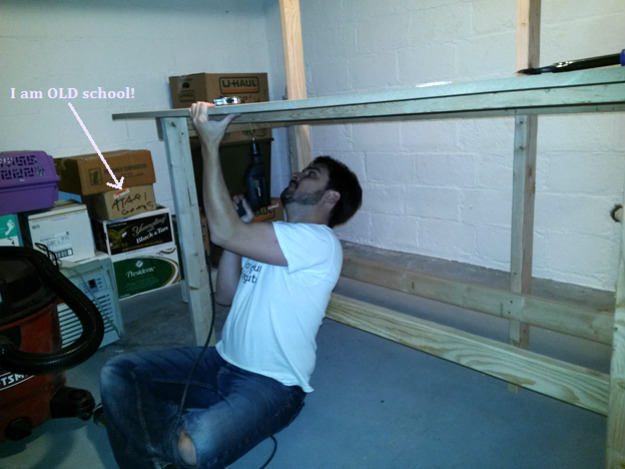
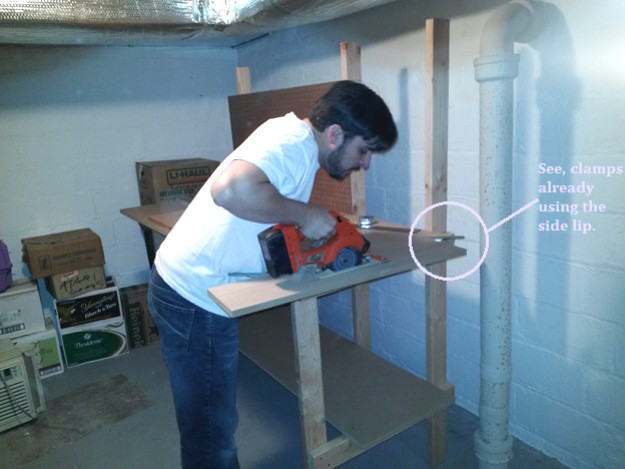
For my top surface, I cut the board to 72”x 30”.  You don’t want much deeper as you’ll need to reach the back for your tools.  For the back edge, I screwed down into the 2×4 as I wasn’t going to use that inch for any real workspace, so I didn’t mind the screw heads.  For the front, I screwed up into the MDF to hold it in place (see photo.)  I wanted a smooth and unblemished area in the front with no screw heads.  I used 2 ½”, self-driving screws so I didn’t need to pre-drill any holes.

Building Your Own Workbench | The Foundation To Future Projects step 7

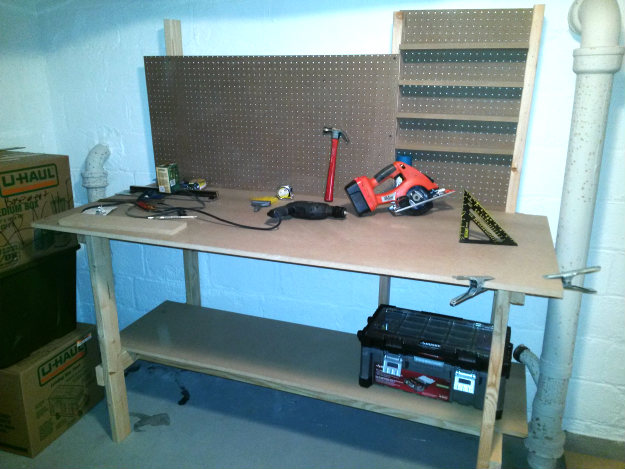
Step #8: Add the pegboard

I wanted to have the pegboard to be able to hang my tools on.  The pegboard came in sheets of 2’x4’, so I grabbed two of them.  The first one I put on its side, on the left of the bench.  I just simply screwed them into the 2x4s, nothing special.

Building Your Own Workbench | The Foundation To Future Projects step 8

Step #9: Measure and cut wood for shelves

You’ll want to have some little shelves for hardware, safety glasses, tape, pencils, etc.  You can build them any size that you want, that work best for you.  I decided on 4 shelves.  Using some of the leftover MDF (this is why I always overestimate!), I cut 4 shelves at about 18”x4 ½”.  As you can see, I’m already using the lips on the edge of the shelf to clamp the wood I’m cutting.  (Don’t be an idiot like me, always use safety glasses!)

Building Your Own Workbench | The Foundation To Future Projects step 9

Step #10: Install shelves and backing

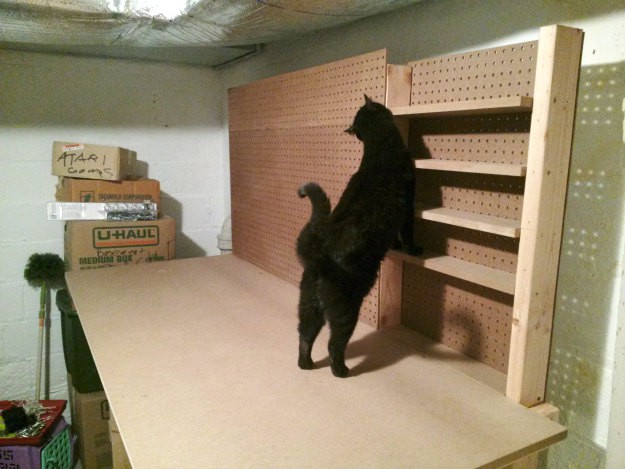
Again, you can make the shelves any height that you wanted.  I wanted the bottom shelf to be able to accommodate spray paint cans, so I put the first shelf at 9 ¼”.  The rest I kind of eye-balled, but they’re ~4” – 5”.  Just screwed them in from the side of each 2×4.  For the backing, I used pegboard again.  It’s one piece, measured out and attached from the back, into the supporting 2x4s.

Building Your Own Workbench | The Foundation To Future Projects step 10

Step #11: Finish the top of the pegboard

Using the rest of the second sheet of pegboard, I cut a long piece to finish up the top of the backing.  My cat Brigit is inspecting my handiwork.  I think she approves!

Building Your Own Workbench | The Foundation To Future Projects step 11

Step #12: Add finishing touches
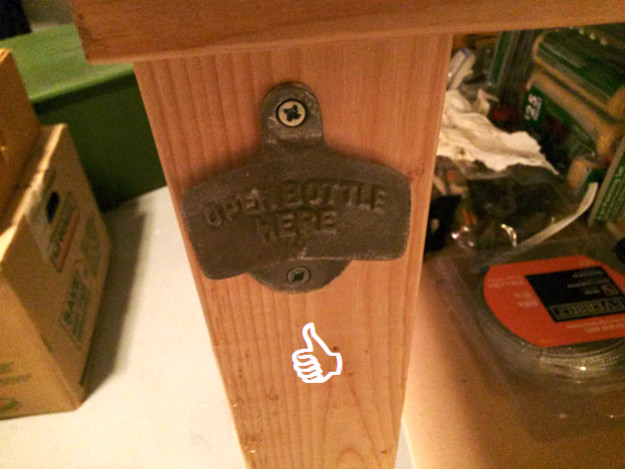
I mean, right?

Building Your Own Workbench | The Foundation To Future Projects step 12

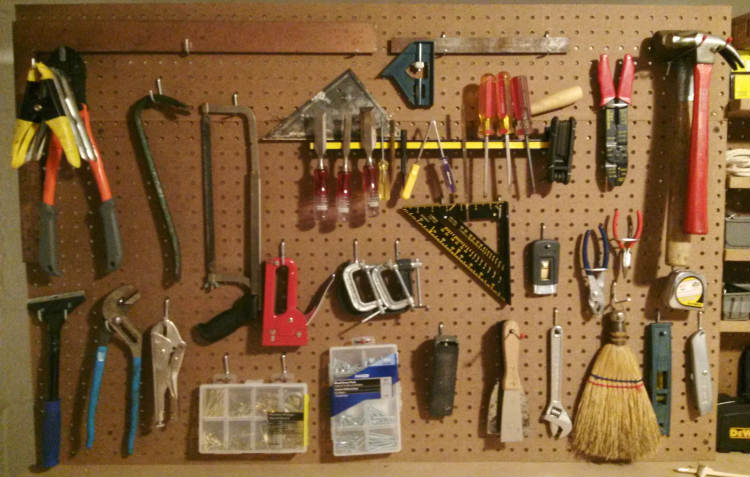
Final Step: Hang up your tools and fill up your shelves

Enjoy the look of this because it will never look this neat and clean again!  One tip when buying the hooks and other hardware for your pegboard, get a magnetic strip!  It’s great to hold random things, small stuff and oddly shaped tools.  Also, I had a bunch of little containers that were in my tool box that I removed and added to the shelves.  Use whatever you want, but make sure you have a bunch for all the little things that you’ll use and need.
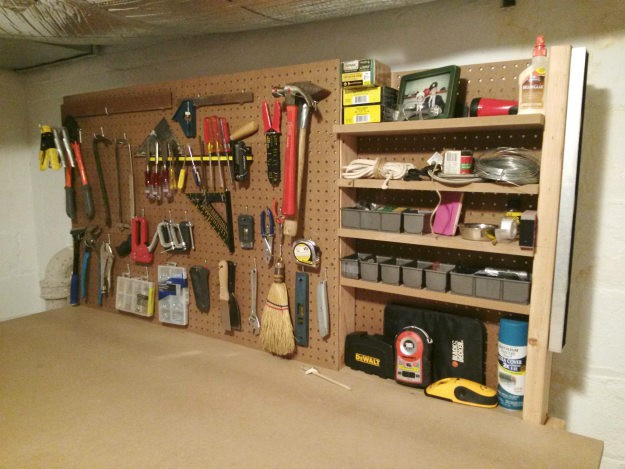
Building Your Own Workbench | The Foundation To Future Projects final step

Another view:

A pulled back view of the whole workbench.  Already getting messy!

Building Your Own Workbench | The Foundation To Future Projects

What went wrong:

No project goes exactly the way you want it.  So I wanted to add this section to show you that we all have to make game-time fixes and help you look out for possible pitfalls.

  1. The floor nearest the wall was about an inch higher than the rest of the floor.  I could have cut the back legs an inch shorter or added shims underneath the front legs.  Instead, I just pulled it away from the wall a bit for a more level, more sturdy bench.
  2. I mis-measured one 2×4.  I was supposed to get two pieces out of it, instead I only got one.  No worries, that’s why I had an extra board on hand.  Mis-cut piece became scrap and will become part of another project someday.
  3. Getting back behind the bench to attach the small shelves and pegboard was problematic.  Also, as I was eye-balling it, I missed a screw or two.  Not too big a deal and easily fixable.

Up NextOff-Grid Solar Survival: Top 5 Things to Consider Before Diving In

Did you enjoy this post explaining how to build your own workbench? Let us know in the comment section below! 

Comments

  1. Don’t forget your PPE (personal protection equipment) next time. Safety glasses and hearing protection are a must.

    • You are absolutely correct! Not that it’s an excuse, but I had all of that packed away and had no idea where it was.

    • Thank you! I am also a dating coach/relationship expert in another life. In my opinion, advice and instructions are useless if your reader/listener can’t follow them. I strive to make everything easily “breakdownable” so others can follow in my footsteps.

      If you build yours, I would love to see it! Thanks for reading!

Leave a Reply

Your email address will not be published. Required fields are marked *

Pin It on Pinterest

Share This
  1. slot
  2. slot88
  3. slot pulsa
  4. slot gacor
  5. slot dana
  6. slot deposit 5000
  7. joker123
  8. slot deposit pulsa
  9. slot pulsa
  10. slot 4d
  11. slot88
  12. slot thailand
  13. slot idn
  14. agen poker
  15. casino
  16. slot dana
  17. joker123
  18. judi bola
  19. nolimit city
  20. poker
  21. pulsa online
  22. rtp slot
  23. slot 4d
  24. slot deposit 5000
  25. slot gacor
  26. slot pragmatic
  27. slot thailand
  28. togel
  29. slot pragmatic
  30. pg soft
  31. slot qris
  32. judi bola
  33. slot deposit 500
  34. nolimit city
  35. live casino
  36. slot pragmatic
  37. slot 4d
  38. nolimit city
  39. joker123
  40. slot deposit 5000
  41. slot online
  42. slot gacor online
  43. slot depo 5000
  44. slot thailand
  45. casino
  46. nolimit city
  47. pg soft
  48. pragmatic
  49. slot 4d
  50. slot joker123
  51. slot thailand
  52. slot88
  53. togel
  54. slot dana
  55. slot thailand
  56. joker123
  57. judi bola
  58. live casino
  59. nolimit city
  60. poker online
  61. slot 4d
  62. slot dana
  63. slot deposit 5000
  64. slot deposit dana
  65. slot maxwin
  66. slot thailand
  67. slot gacor
  68. pragmatic
  69. thailand
  70. deposit 5000
  71. slot gacor
  72. slot gacor
  73. slot gacor
  74. slot gacor
  75. raja slot
  76. slot deposit 5000
  77. slot88
  78. raja slot
  79. slot deposit 5000
  80. slot gacor
  81. slot gacor
  82. akun thailand
  83. nolimit city
  84. sbobet
  85. slot 4d
  86. slot deposit 5000
  87. slot pragmatic
  88. sweet bonanza
  89. slot mpo
  90. slot nexus
  91. pg soft
  92. 4d
  93. 5000
  94. city
  95. slot88
  96. qris
  97. idn
  98. mpo
  99. nexus
  100. gacor
  101. thailand
  102. dana
  103. bola
  104. casino
  105. singapore
  106. hongkong
  107. sydney
  108. macau
  109. prediksi
  110. demo
  111. slot demo
  112. slot gacor
  113. slot thailand
  114. nolimit city
  115. slot deposit 5000
  116. slot thailand
  117. slot demo
  118. slot gacor
  119. thailand
  120. gacor
  121. thai
  122. demo
  123. Slot Gacor
  124. Slot Maxwin
  125. Slot Maxwin
  126. Slot Pulsa 5000
  127. Agen Slot Online
  128. Slot5000
  129. Slot Thailand
  130. Slot Thailand
  131. Slot Gacor Deposit 5000
  132. Agen MPO Slot
  133. Slot 5000
  134. Slot Gacor
  135. Slot Dana
  136. Slot Deposit 5000
  137. Slot Deposit Pulsa 5000
  138. Slot Deposit Pulsa
  139. Slot Pulsa 5000
  140. Slot Gacor Anti Rungkad
  141. Slot Gacor 4d
  142. Live Casino Online
  143. Slot Bca
  144. Slot Deposit 5000
  145. Slot Maxwin
  146. Slot Gacor 5000
  147. Slot Gacor
  148. Slot 5000
  149. Slot Deposit 5000
  150. Slot 4d
  151. Slot Pulsa
  152. Slot Gacor
  153. Slot Pulsa 5000
  154. Slot88
  155. Slot88
  156. Slot Playson
  157. Slot Deposit 5000
  158. Slot Pulsa
  159. Slot Deposit 5000
  160. Slot Thailand
  161. Slot Pulsa
  162. Slot Deposit 5000
  163. Slot Bca
  164. Slot Thailand
  165. Slot Pulsa
  166. Slot Deposit 5000
  167. Slot Gacor
  168. Slot Pragmatic Play
  169. Slot PG Soft
  170. Slot Deposit Pulsa 10000
  171. Slot Gacor
  172. Slot Pulsa
  173. Slot Qris
  174. Slot Pragmatic
  175. Slot Gacor
  176. Slot Deposit Pulsa
  177. Slot Thailand
  178. Slot Demo
  179. Slot Deposit 5000
  180. Slot Deposit Pulsa
  181. Slot Bca
  182. Slot Deposit 5000
  183. Slot Thailand
  184. Slot Deposit 5000
  185. Slot Dana
  186. Slot Bca
  187. Slot Deposit 5000
  188. Slot Deposit Pulsa
  189. Slot Gacor 5000
  190. Slot Pulsa
  191. Slot Qris
  192. Slot Server Luar
  193. Slot 5000
  194. Slot Dana
  195. Slot Bca
  196. Slot Deposit Pulsa
  197. Slot Gacor
  198. Slot Gacor 5000
  199. Slot Qris
  200. Slot Thailand
  201. Slot5000
  202. Slot Demo
  203. Slot Deposit Pulsa
  204. Slot4D
  205. Agen Casino
  206. Agen Sbobet
  207. Slot Bca
  208. Slot Demo
  209. Slot Deposit 5000
  210. Slot Deposit 10000
  211. Slot Gacor 5000
  212. Slot Qris
  213. Slot Server Thailand
  214. Slot Thailand
  215. Slot Gacor 5000
  216. Slot Maxwin
  217. Slot Deposit 5000
  218. slot dana
  219. slot88
  220. slot zeus
  221. slot88
  222. slot deposit 5000
  223. live casino
  224. judi online
  225. slot dana
  226. slot deposit 5000
  227. slot thailand
  228. slot 4d
  229. slot idn
  230. slot mpo
  231. slot nexus
  232. slot 88
  233. slot pragmatic
  234. slot pg soft
  235. slot deposit 5000
  236. slot 10k
  237. slot anti rungkad
  238. rtp slot
  239. slot garansi kekalahan
  240. slot bonus terbesar
  241. slot 24 jam
  242. slot maxwin
  243. slot demo
  244. slot gacor
  245. akun pro slot
  246. slot habanero
  247. slot mahjong
  248. slot joker123
  249. slot nolimit city
  250. slot bonanza
  251. slot zeus
  252. slot playstar
  253. slot mahjong ways 3
  254. spac eman
  255. spade gaming
  256. slot starlight princess
  257. petir merah pecah
  258. kakek zeus x500
  259. poker online
  260. judi bola
  261. sbob et
  262. bandar bola
  263. toge l
  264. raja slot
  265. ratu slot
  266. slot pulsa
  267. slot dana
  268. slot ovo
  269. slot gopay
  270. slot linkaja
  271. slot bca
  272. slot bri
  273. slot mandiri
  274. pg soft
  275. 4d
  276. pragmatic
  277. idn
  278. joker123
  279. dana
  280. nolimit
  281. pulsa
  282. slot qris
  283. slot server china
  284. slot server jepang
  285. slot server russia
  286. slot server luar negeri
  287. slot online
  288. slot thailand
  289. rtp slot
  290. slot 5k
  291. slot 5000
  292. slot online
  293. judi slot
  294. nolimit city
  295. slot online
  296. slot online
  297. slot online
  298. slot online
  299. slot online
  300. slot online
  301. slot online
  302. slot online
  303. slot online
  304. slot online
  305. slot online
  306. slot online
  307. slot online
  308. slot online
  309. slot online
  310. slot online
  311. slot online
  312. slot online
  313. slot online
  314. slot online
  315. slot online
  316. slot online
  317. https://www.pittsburghxplosion.com/
  318. https://www.henrycountybattlefield.com/
  319. https://www.belarusdocs.com/
  320. https://www.karma-dance.net/
  321. https://www.familysquarerestaurant.com/
  322. https://www.edgefieldfarm.com/
  323. https://www.12goal.com/
  324. https://elitechineserestaurant.com/
  325. https://syracuseguru.com/
  326. https://thesedgwickstop.com/
  327. https://www.yoopix.org/
  328. https://www.boundbyflesh.com/
  329. https://freddysam.com/
  330. https://backtothelandnaturalfoods.com/
  331. https://thenewamericana.com/
  332. https://cliftonroberts.org/
  333. https://www.micrighteous.com/
  334. https://www.naturalgaschina.com/
  335. https://www.orangesenqurak.com/
  336. https://salonbellagio.com/
  337. https://dkszone.net/
  338. https://palestinehistory.com/
  339. https://www.theurbanelitist.com
  340. https://www.customizabooks.com
  341. https://www.thewombat.org
  342. https://www.bangrakthaicuisine.com
  343. https://zenhabitsradio.com
  344. https://chasidisk.com
  345. https://compassxstrategy.com/
  346. https://www.weknowchicagorealestate.com/
  347. https://www.romeuejulieta.net/
  348. https://craftastrophe.net/
diy-projects-logo-425

Join DIY PROJECTS Today

You'll get our daily email newsletter and be entered into our monthly contests.