


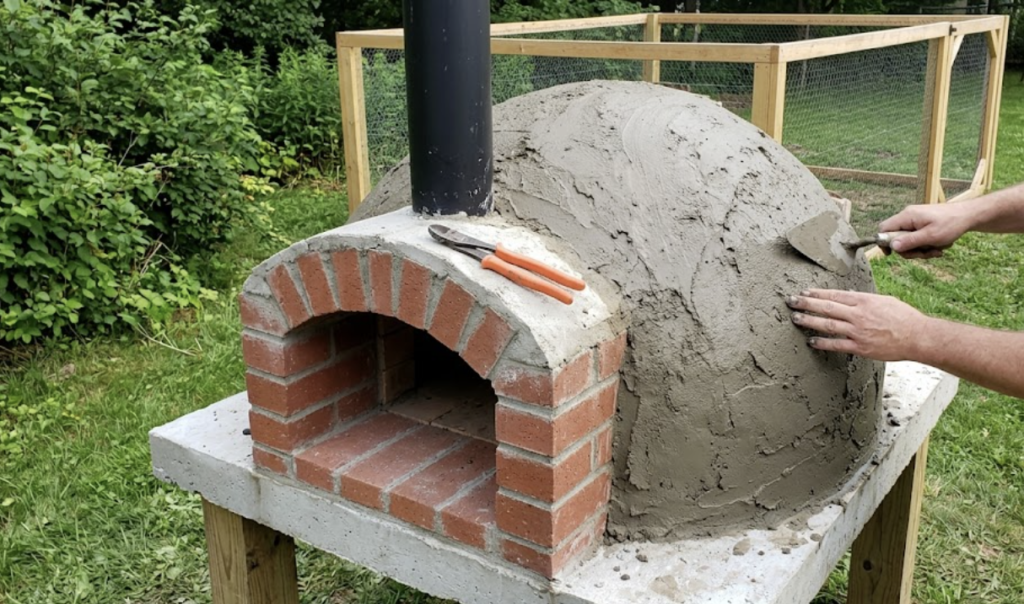

At a Glance: DIY Outdoor Pizza Oven Build
- You can build a working wood-fired outdoor pizza oven from fire bricks and high-temp mortar for $200–$400 .
- The build takes two weekends: one to construct, one to cure. Rushing the cure is the number one reason first-time builds crack.
- This guide covers every step from base to first fire, including the curing process most tutorials skip entirely.
Want a real wood-fired outdoor pizza oven in your backyard? A brick dome that hits 800°F and cooks pizza in 90 seconds? It usually costs around $3,500 or more to install one. Today, we’ll show you how to build the same thing for way less.
What Materials and Tools Do You Need to Build a Backyard Pizza Oven?
You only need a handful of materials and one rented tool. Here’s the complete list before you spend a dollar.
Materials:
- Fire brick (100–150 standard bricks for a mid-size dome)
- High-temp refractory mortar (Rutland or equivalent. Don’t use standard mortar)
- Cinder block or CMU block for the base platform
- Coarse sand (for the dome form mold)
- Fireclay or castable refractory cement for the scratch coat
- Optional: ceramic fiber insulating blanket for the dome exterior
Tools:
- Angle grinder with a masonry blade (rent this. You’ll use it for one weekend; see our [tool rental guide] for what to ask for)
- Level (4 ft minimum)
- Rubber mallet
- Margin trowel and notched trowel
- Measuring tape
- Straight wooden rod (mark your brick course heights on this before you lay a single brick)
- Infrared thermometer (for first fire and cooking)
Site requirements:
Per the International Residential Code (IRC R1006), outdoor masonry fireplaces require a minimum 10 ft clearance from any combustible structure, fence, or overhang. Check your local amendment as some jurisdictions require more. Overhead clearance for the flue or vent gap is also required; confirm before you set your footprint.
How Do You Build a Wood-Fired Outdoor Pizza Oven Step by Step?
The build splits cleanly into two weekends: base and hearth first, dome and flue second with a hard stop between them.
Plan for two weekends with a hard stop between them. Weekend one is the base and hearth. Weekend two is for the dome and flue. The cure fires happen in week three, as the mortar needs time to set between phases or the dome will crack.
Weekend 1: Base and Hearth
Step 1: Mark your footprint and excavate. Mark a square or rectangular footprint sized to your oven. Dig down 4 inches across the full area.
Step 2: Lay the gravel drainage bed. Fill the excavated area with 4 inches of compacted gravel. This is the step most beginners skip. In any climate with cold winters, water under a masonry base will heave and crack everything above it. The gravel layer is what prevents that.
Step 3: Build the base platform. Stack CMU blocks or pour a concrete slab to your working height typically 36 to 40 inches. Check level across the full top surface. You need to be within 1/8 inch. Every brick course above it inherits whatever error is in the base.
Step 4: Lay the hearth floor. Set your fire brick on the platform surface in a dry stack (no mortar). The hearth floor needs to expand and contract freely under heat. Mortar it down and it will crack. Lay it tight and flat and leave it alone.
Let the base sit for 48 hours minimum before you touch it again.
Weekend 2: Dome and Flue
Step 5: Build your sand form. Mound damp sand in a dome shape on top of the hearth floor. This is the mold you’ll build around. Shape it to your target dome height typically 75 percent of the dome diameter for good heat retention.
Step 6: Mix your refractory mortar. Follow the package ratio exactly. Don’t add extra water to make it easier to spread. Soupy mortar shrinks and cracks. Mix small batches so nothing sets before you use it.
Step 7: Lay the first dome course. Back-butter each brick face before you set it and press mortar onto the face that contacts the next brick and not just the bed. This fills the joint completely and eliminates voids that crack under heat.
Step 8: Work up the dome using your story pole. Use your marked rod on every course. This keeps the dome rising evenly and prevents the lopsided arch that causes structural problems near the top.
Step 9: Close the dome with the key brick. The last brick at the apex locks the arch. Take your time fitting it. This brick is under compression from all sides if the joint is uneven, the whole crown is uneven.
Step 10: Set the chimney or vent gap. Position your chimney flue or vent opening at the front of the dome, just above the opening. Per standard masonry practice, the flue area should be approximately 10 to 12 percent of the total oven opening area to produce proper draft. This is the ratio that pulls smoke out reliably without starving the fire of oxygen.
Step 11: Apply the scratch coat. Trowel a 1 to 2 inch layer of fireclay or castable refractory cement over the entire dome exterior. Score the surface lightly before it dries so the finish coat bonds.
Let the dome sit 5 to 7 days before any fire. Do not rush this.
How Do You Cure and Season a New Outdoor Pizza Oven Without It Cracking?
The cure sequence takes five days and is the single most common reason first-time pizza oven builds fail.
Moisture is trapped inside the mortar, the brick, and the scratch coat right now. Build a hot fire immediately and that moisture turns to steam, expands faster than the masonry can handle, and blows cracks through the dome. The cure sequence drives that moisture out slowly.
Day 1 and 2: Small kindling fires only. Hold temperature around 200 to 250°F for one to two hours each day. You are drying, not cooking.
Day 3 and 4: Medium fires with small splits. Build to 400 to 500°F. Hold for two hours. Let it cool completely between sessions.
Day 5: Full fire. Push it to 700 to 900°F. Check the hearth floor temperature with your infrared thermometer.
If you see hairline cracks during the cure: Fine surface cracks in the scratch coat are normal thermal expansion. Pack them with refractory mortar while the dome is still warm, not cold. Keep going.
If it rains before Day 3: Restart the cure sequence from Day 1. The dome reabsorbed moisture. Starting hot now will crack it.
By Day 5, your oven will be seasoned. Target 750 to 900°F at the hearth floor for Neapolitan-style pizza. At that temperature, cook time should 60 to 90 seconds.
Do You Need a Permit to Build an Outdoor Pizza Oven in Your Backyard?
Most counties don’t require a permit for a freestanding masonry structure but setback rules are enforced, and skipping the check can mean tearing down a finished oven.
Search your county name plus “outdoor fireplace permit” or call your local building department before you break ground. It’s a five-minute call. The setback distance from structures and property lines varies widely by jurisdiction, so confirm your number before you set your footprint. See our [outdoor kitchen build guide] for a broader look at what permits typically apply to backyard cooking structures.
What’s the Fastest and Cheapest Way to Build a DIY Outdoor Pizza Oven?
Short on space or budget? A clay and sand oven on a cinder block platform costs under $150 and uses the same build and cure process.
If your yard can’t fit a full brick dome, a clay and sand oven built directly on a cinderblock platform takes up less footprint and costs under $150 in materials. The build process is the same. The curing sequence is the same. You trade some heat retention for a faster, cheaper build. It’s a real oven. It works.
Two weekends. Under $400. The build is straightforward when you don’t rush the foundation and don’t skip the cure. Do both right and you’re running 800-degree fires before the end of the month.
Built one? We want to see it. Share your finished oven on Facebook, tag us on Pinterest, or drop a photo on Instagram. Show us the first pizza.
FAQs
How much does a DIY outdoor pizza oven cost to build? A budget build with reclaimed fire brick runs $200–$250. A mid-range build with new brick and high-temp refractory mortar lands at $300–$400. Add $30–$50 for angle grinder rental if you don’t own one.
What temperature does a wood-fired outdoor pizza oven need to reach? Target 750 to 900°F at the hearth floor, measured with an infrared thermometer. Neapolitan-style pizza cooks in 60 to 90 seconds at that range. Below 600°F you’re baking, not firing.
How long does it take to build a backyard pizza oven? Two weekends of active build time plus 5 to 7 days of cure. Plan 2 to 3 weeks from first brick to first pizza.
Why did my pizza oven dome crack? Hairline surface cracks during curing are normal thermal expansion. Pack with refractory mortar while warm. Widening cracks usually mean a rushed cure or an unlevel base, but both are patchable.
Do you need a permit for an outdoor pizza oven? Most counties don’t require one for a freestanding masonry structure, but setback distance is commonly enforced. Check with your local building department before you break ground.
Quick Poll: Is building a DIY outdoor pizza oven a legit weekend project or a Pinterest fantasy?
Vote below and tell us what tipped you one way or the other.









