


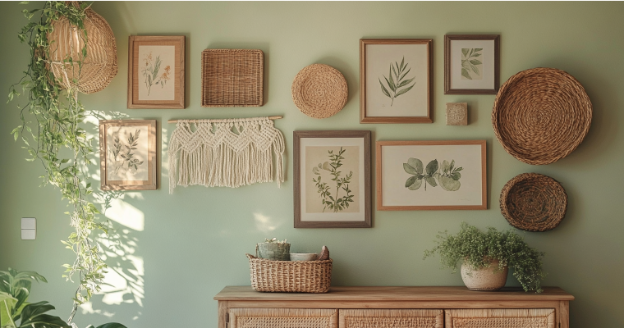
Blank walls don’t just need a splash of color—they crave personality, meaning, and charm! A gallery wall is among the most popular forms of DIY wall art. It allows you to showcase your creativity and fills your home with unique pieces that reflect your story.
A gallery wall improves the aesthetics of your home and also preserves your memories, highlights your passions, and mirrors your style. You can transform any wall into a striking visual narrative by using family photos, beautiful prints, or unusual objects. Let’s dive into the process step by step!
Why DIY Wall Art Is Perfect for Every Home
Does an empty wall make the room feel lifeless? If yes, a gallery wall can change that. It doesn’t just fill the space; it creates a curated display that captures your personality, invites admiration, and sparks conversations.
Here are four great reasons to add a gallery wall to your home:
- It tells a story: Every piece on your wall narrates your memories, experiences, and interests.
- It’s budget-friendly: You can use thrifted finds, handmade items, or digital prints to create a stunning display.
- It adds character: A thoughtfully arranged gallery wall can turn a plain wall into a bold and engaging focal point.
- It matches any style: Whether you adore minimalism, vintage vibes, or eclectic charm, your gallery wall can suit your preferences.
Create a Gallery Wall That’s Uniquely You
The right mix of items plus a little planning can create a stunning gallery wall that’s both visually captivating and deeply meaningful. Whether you’re a seasoned DIYer or a total beginner, these easy-to-follow steps will guide you toward designing a gallery wall that feels perfectly you. Ready to start? Let’s get inspired!
Step 1: Gather Wall-Worthy Pieces
The first step in creating your gallery wall is to collect the items you want to display. Although framed artwork is a classic choice, don’t limit yourself—use items that represent your personality and style.
What to Include in Your Collection
- Memorable Photos: Frame family portraits, candid shots, or vintage photographs that hold sentimental value.
- Favorite Artwork: Use affordable prints from Etsy, custom illustrations, or even your own creations.
- Inspiring Quotes: Display motivational phrases, song lyrics, or humorous sayings that resonate with you.
- Textured Objects: Add dimension with woven baskets, small mirrors, macramé hangings, or sculptural pieces.
- Travel Mementos: Frame postcards, maps, or tickets from memorable trips.
- DIY Projects: Get creative by pressing flowers, making collages, or painting abstract art.
Using a mix of sizes, shapes, and textures will help you achieve a balanced and interesting design. Experiment with colors, but be intentional—too many contrasting elements can feel chaotic.
Step 2: Plan Your Layout Thoughtfully
Once you’ve gathered your collection, it’s time to map out your gallery wall. Thoughtful planning ensures your wall design feels cohesive and visually appealing. It also prevents frustration from having to patch unnecessary holes.
How to Plan Your Gallery Wall
- Arrange on the Floor: Lay your pieces out on the floor to experiment with different layouts.
- Use Paper Templates: Trace each frame or object onto paper, cut them out, and tape the templates to the wall.
- Mix Shapes and Sizes: Alternate between larger and smaller pieces for visual balance and harmony.
Popular Layout Ideas
- Symmetrical Grid: Ideal for clean, modern designs, this uses frames of equal sizes in a neat, grid-like pattern.
- Eclectic Freeform: Perfect for creative souls, this layout mixes shapes and sizes in a more relaxed, artistic arrangement.
- Focal Point Design: Start with one large centerpiece and build around it with smaller, complementary pieces.
- Picture Shelf: A floating ledge allows for easy layering and swapping of items over time.
For additional layout ideas, visit Artfully Walls, where you’ll find plenty of creative options.
Step 3: Hang Your Pieces with Precision
Hanging your gallery wall is the most exciting step, but it can feel a little intimidating. Break it down into smaller tasks, and you’ll have your display up in no time!
What You’ll Need
- Measuring tape
- Level
- Painter’s tape
- Nails, hooks, or adhesive strips
How to Hang Your Gallery Wall
- Start with the Focal Piece: Hang the largest or most prominent piece first to anchor your layout.
- Work Outward: Add items around your centerpiece, following your planned design.
- Keep It Straight: Use a level to ensure each frame hangs evenly.
- Mind the Spacing: Leave 2-3 inches between items to create a clean, cohesive look.
- Step Back Frequently: Take a step back to view the entire wall and make adjustments as needed.
Step 4: Add Finishing Touches
Your gallery wall is almost complete! Now, enhance the overall design with finishing touches that tie everything together.
- Incorporate Lighting: Use sconces or picture lights to highlight your pieces and add depth.
- Add Greenery: Place a hanging plant, potted fern, or fresh flowers nearby to introduce natural elements.
- Ground the Display: Position a bench, console table, or decorative chair beneath the wall for added style.
Additionally, you can keep your gallery wall dynamic by swapping out seasonal decorations, such as wreaths or holiday-themed artwork.
DIY Wall Art That Speaks to You
DIY wall art is about more than decoration—it’s a reflection of your identity. A gallery wall can tell your story, highlight your favorite memories, and showcase your artistic side. With a little effort, you can turn any blank wall into a curated masterpiece that’s entirely unique.
So, what are you waiting for? Gather your treasures, map out your design, and let your walls shine with creativity and charm.
Let’s Hear From You!
What would you include in your gallery wall? Have you created one before? Share your ideas, tips, or even questions in the comments below!
FAQs
Q: Can I mix frame colors and styles?
A: Absolutely! Mixing frame styles and colors adds character. Just use a unifying theme, such as similar tones or a consistent subject.
Q: How high should I hang my gallery wall?
A: Position the center of your gallery wall at eye level, roughly 57–60 inches from the floor. For walls above furniture, leave 6–8 inches of space between the lowest frame and the top of the furniture.
Q: Can I create a gallery wall in a small room?
A: Yes! In tighter spaces, focus on fewer pieces and opt for a vertical layout to draw the eye upward.
Q: How can I hang my gallery wall without damaging the walls?
A: Use adhesive strips or removable hooks. They’re renter-friendly, easy to reposition, and leave no marks.
Q: What if I don’t have enough pieces to fill a wall?
A: Start small and let your gallery wall grow over time. Use mirrors, empty frames, or shelves to fill the space temporarily.









