

Want to spice up your house plant collection? These lovely suspended gravity jellyfish air plants blend art and horticulture and will brighten up any space!

These jellyfish-like air plant designs are living art to parade in your home instead of the typical house plants. For this tutorial, I used this fun and easy kit that allows you to make these versatile, organic creations, but you can also gather the materials on your own.
Because air plants don’t need to embed their roots in the soil to grow, they can literally live suspended in air (hence the name air plant). They have specialized leaves that absorb all the nutrients they need, and only use their roots to anchor themselves to rocks and other surfaces.
In addition to their ethereal ability to “float,” air plant care is super simple — for the most part, you just need to shower them with light and keep them hydrated. Plus, the plants are so lightweight that they can be displayed in chic and unique ways, giving new life to your room or wherever you decide to place them. I love my hanging air plants so much, I’ve started gifting this kit to all my crafty friends — as well as ones I want to convert to the DIY lifestyle 🙂
How to Make DIY Jellyfish Air Plants

I’ll walk you through a step-by-step tutorial to show you exactly how to make this trio of gorgeous jellyfish air plants.
Materials (included in the kit)
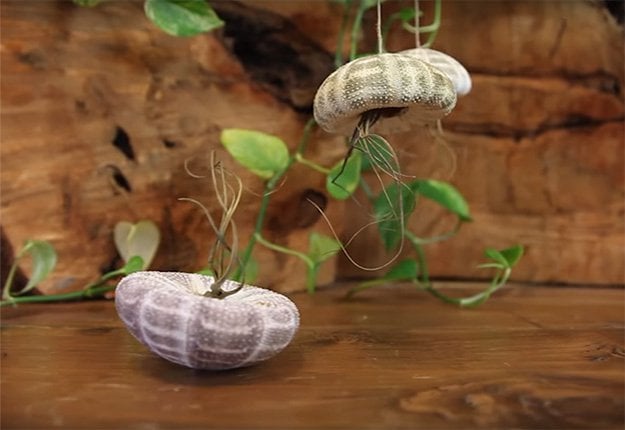
- 3 Sea Urchin Shells, 3-4″ across
- 3 Live Air Plants
- Hanging Twine
- Air Plant Food
Step 1: Take out the contents of the package.

Step 2: Measure out desired length of twine and tie in a loop knot.

At this point, it’s good to think about where you ultimately want to place your finished jellyfish air plants. If you want one or more to hang from the ceiling, you will need a long piece of twine! If you want them to sit on your desk, you will not need a long piece of twine.
Step 3: Thread twine through seashell and attach air plant to loop.

The air plant is so small and light, it can fit right in the loop!
Step 4: Spray it with the air plant food (included in the kit) or water.

Keep your air plant moist so it doesn’t dry up and die!
Step 5: Repeat steps 2 & 3 with the other two shells.

Hint: If you want the finished plant designs to hang at different lengths, switch up the twine lengths so that some are longer and some are shorter.
Step 6: Hang or flip and insert air plants upright.

Th result of this step is completely up to you! Do you want your plants to hang like jellyfish or do you want them as desk or countertop decorations?
Step 7: Remember, keep them moist!

Don’t forget to spray your two new air plants with the air plant food in the kit or with water.
Step 8: Hang or place.

Your lovely jellyfish air plant creations are now complete! Hang/place them artfully to enhance any space.
See the steps in action!
Click to read more about the DIY Jellyfish Suspended Gravity Air Plant Trio kit.

Even more DIY fun with hanging air plants!


