
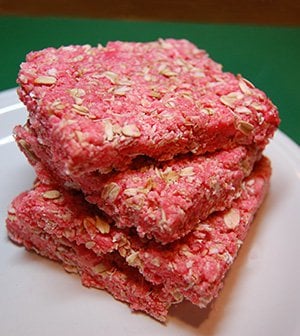
Want to Know How to Make Homemade Survival Bars?
So did I. Over the past few months, I decided to try a few varieties, and this is my favorite so far. The texture is right, the flavor is right, especially is you are a fan of fruity cereal. These taste a lot like Crunch Berries! You can also try lemon and orange flavored Jello in these easy to make bars. I guess together, they taste like Trix or Fruity Pebbles. Something like that, anyway. I promised I would try these, and I just had not one, but two for a snack before I could put them down. Going to admit something here- I am a bit of a food critic. If I say these are good, they are good. Otherwise, I am going to call them edible. These are actually good. They are not like bricks, and they are not dry and bland.
That being said, I am going to try chocolate chia ones next, a little recipe I have in my head. I think it will be good to also have an option that is not fruity, and chia is super good for you, an excellent survival food that has super nutrition and can pretty much be stored forever. I also plan to make a sugar free version, one with more protein, and some other fun and exciting flavors. Be sure to check back for that post of follow us on Facebook to get my latest projects and recipes.
UPDATE: The Chocolate Chia Survival Bar Recipe is finished. Thank you all for your patience! Let me know what you think.
These bars will also store pretty much forever. I did a little research today on the shelf life of Jello, and am happy to say that even though there is an expiration date on the box, the shelf life is actually “indefinite.” Goes for dry Jello pudding mix as well, so I am excited to try the chocolate ones next. I researched all the other ingredients as well. Based on their shelf lives, these bars should be good for at least 20 years. I don't think they will last a month around here, but it is good to know. I will keep you posted, though. I am going to keep them around for more than a few months and let you know. Hopeful, as I've heard this recipe truly stays good for years.
Why would you want to make homemade survival bars, anyway?
Easy to make, quick, and they taste great. Yes, they should have a very long shelf life. There is no oil or any ingredient that goes rancid or spoils quickly. They do not contain moisture, as you dry them in the oven, but they stay moist due to the Jello. Pretty cool, right? These homemade survival bars will stay intact without crumbling, pack well, and are great for camping, hunting, hiking, and are also great to have on hand for emergency preparedness.
Here's How to Make Survival Bars:
Ingredients for Homemade Survival Bars:
- 2 cups oats (regular or the quick variety)
- 2 1/2 cups powdered milk
- 1 cup sugar
- one (1) 3 oz package jello (strawberry, cherry, orange and lemon are our favorite flavors, but you can use whatever you like)
- 3 Tablespoons water
- 3 Tablespoons honey

Step 1:
Mix the oats, powdered milk, and sugar together.
Nothing fancy required here. Just put the ingredients in a bowl and stir them. Make sure your bowl is big enough to hold 2 more cups of ingredients, as you will be adding Jello mix next.

Step 2:
In a medium pan saucepan, mix the jello mix, water and honey. Boil.
Add one 3 ounce pack of Jello, the flavor is up to you. Add 3 Tablespoons of water and 3 Tablespoons of honey (Note: You are only going to use 3 tablespoons of water, not the amount called for in the jello recipe on the box. ) Stirring as you go, bring this mixture to a rolling boil. (A rolling boil is where the water keeps boiling when you stir it, it does not stop. )
Step 3:
Add jello mixture to your dry ingredients and mix well.
We recommend you use a mixer here, as it is much faster. If you are mixing by hand, use your hands to combine the ingredients. Using a spoon is too tedious.
Step 4:
Check the consistency and add water, if needed
If the dough is too dry, add a small amount of water a teaspoon at a time. We usually end up adding 1-5 teaspoons of water at this point. Test the consistency of your dough by trying to press it together. Ultimately, your dough should be crumbly, but it should stick together when you press it. Add water until you get this desired result.

Step 5:
Press dough into a large rectangular pan (9×13 is ideal) lined with parchment paper.


Step 6:
Cut the dough into bars.

Step 7:
Bake them for 1 1/2 to 2 hours in an oven set at 200 degrees.
Unless your bars are still pretty moist, they should only take an hour and a half. You are not really going to mess them up if they stay in a little long, though. Your oven is not very hot, and you do want your bars to dry out. When they are finished, remove them from the oven. Let them sit 10 minutes, then pick them up from your pan, just by holding the edges of the parchment paper, and let them cool out of the pan.
Note: You can dehydrate bars with this recipe, but the baked ones turn out nicer.
Step 8:
Pack your bars in an airtight container.
When your bars have cooled and are completely dry, pack them into a Ziploc bag, Plastic Tupperware type container, or wrao them in foil
Like this post?
Check out Survival Bar Recipe & Instructions: Chocolate Chia
Be sure to like us on Facebook (button below) so you can be the first to know about latest project updates as well as great DIY articles.
Pin It so you can come back to it and follow us on Pinterest to get latest project pins.
Want more awesome DIY projects?
Join our mailing list and be the first to know about our newest ones.
(link is on the top right of the page for desktop users and on the bottom for mobile)
Let us know in the comments below! Your feedback matters. The more interest we get in posts, the more likely we are to do more like that.
Want to be ready with food for a crisis?
Check out this complete guide to Food Storage in A Crisis. Super stuff:
When the Food Runs Out
What is When the Food Runs Out? The complete “When the Food Runs Out” guide to food storage in a crisis – 46 compact pages of proven survival savvy detailing what you SPECIFICALLY must have (and in what amounts) to protect your loved ones’ food supply in a crisis situation.Essential non-food supplies that can make or break your survival plans that everyone seems to forget about until it’s too late. Detailed (and affordable) supplies list and where to get the essentials without breaking the bank in these tough times.Four incredible bonus reports: Vertical Gardening, Canning Secrets, How to Cook and Store Food Outside, and 170 Gallons a Day….FREE! (normally $37 each).
Want to buy the best premade Survival Food Bars?
These are our favorites, and we are not just saying that. Our friend “Above Average Joe”, the executive editor of Survival Life, has tried every bar out there, and these are his picks. Personally, I think the Mayday bars rock. Taste like apple cinnamon pie crust.
Mayday Bars
A single one
Mayday Food Bar – 400 Calories
The 24 Pack
Mayday Food Bar – 400 Calories – Pack of Twenty Four
The Big Pack
Mayday 2400 Calorie Food Bars (24 per case) MRE, Camping, Hiking, Survival
Millennium Bars
Millennium Bars Assorted 24-Pack
What is the shelf life for the survival bars.
I have a nasty allergy to all kinds of nuts. It’s been next to impossible (at least for me) to find energy, survival, and so forth recipes with out nuts. I love this and would like to find more for people with allergies.please keep them coming up:-)
So glad you like it! I am working on the chocolate chia ones now. Will be posted this week. Please check back or follow DIYready on Facebook for project updates. Thanks!
Yay! You must have found my modified survival bar recipe on my site. Looks like it worked great for you. It’s definitely the best way I’ve found to make them. Looking forward to seeing how the chocolate ones turn out.
If stored in an airtight container, what’s the shelf life?
If properly stored, at least ten years, but likely twice that. I added more info just now in another reply to the same question. Please let me know if you need more info. Thanks!
I saw these have a long shelf life. If I put these in Mylar bags with 02 absorbers how long should they keep?
Well, I have done research on all of the products in the bar. I found a lot of good information at eatbydate.com, based on standards. Although all these products have an expiration date printed on them, it is really just the date at which the company feels the product will deteriorate. The flavor might change a bit. Jello/Gelatin has an indefinite shelf left. Based on what I found in regard to the shelf lives of the ingredients, this recipe will make bars that should be good for at least ten years, but likely more far than that.
Do you know what the calorie count would be on each bar if you make them just like the you specified?
Working on that. Will get back to you soon with more info
Y’all need to get away from refined sugars. Basic survival requires food, water, shelter. Ingesting Refined sugar forces your body to utilize its calcium stores to digest the sugar. The refined sugars also keep your body from retaining/utilizing Water properly.
I’m sure this recipe can be modified to exclude the refined sugar and it won’t damage the shelf life. Maybe, just add a bit more honey?
I actually agree completely. I am wanting to use less sugar in a few of the new recipes I am trying. Please check back for more recipes or follow me on Facebook for updates. Thank you so much for pointing this out. It is important to know. Curious to know if anyone has ever tried a bar with Stevia
I have used Stevia in several things, I would think it should work well, it is a natural sweet leaf if you get the natural 100% Stevia, no knock-offs.
Thanks SO much for answering my question. I am hoping it does not change the texture. I have ideas, though. Stay tuned for more homemade survival bar recipes
Hi Stephanie,
for those of us who don’t do Facebook, would you post the Chocolate/Chia recipe here?
Thanks,
Dan
certainly.
Do you know an approximate calorie count so that we know if we are getting enough during a day solely off these bars?
Working on that. Will get back to you soon with more info
I’m not sure about shelf life on these we eat too fast but they are great.
No Bake Energy Bites
1 cup (dry) oatmeal
1/2 cup chocolate chips (or dry cranberries)
1/2 cup peanut butter
1/2 cup ground flaxseed
1/3 cup honey
1 tsp. vanilla
Mix ingredients together in a large bowl. Roll into bite size balls. Refrigerate to set. Enjoy!!
Love it! Must try next. Thanks.
Just wondering if anyone has tried this usng a dehydrator instead of baking them. Obviously baking them is easier but I would be concerned about residual water left in the bars that may promote bacteria if not completely removed.
More on that very soon. Thank you.
Just tried these and was really impressed.
Would say that you shouldn’t use instant pudding though. Will try again and expect it to be great.
Thanks
I am using your recipe but I altered it just a little. I took vanilla flavored protein powder and added it to the dry mix. It required about 2 extra tablespoons of water to make the dough stay together. The result was a strawberry’s and cream flavor. I wanted to have the protein because in a survival situation, protein would be an added benefit. I can not wait to get my hands on your Chocolate recipe!!
Oh! I had the thought to try protein powder in them as well. I really like adding it to things. I can not tell you how happy I am to know that. Chocolate Chia post coming soon.I promise. Will post on FB when it is out and also in email newsletter.
Any recipes for pemmican? those use meat and berries.
Not yet, but will definitely consider. Thank you for the suggestion!
These look great but sugar and honey plus what’s in the jello – a diabetics nightmare!! If anyone has replace the sugar with a friendlier sweetener pleas post the ratio of exchange from the 1 cup of sugar. Thanks!
Will most certainly get one in the works soon. thanks
Replace sugar with xylitol (birch sugar) absolutely 0 sugars – and use sugar free jello…?
I like your article and I’m curious about adding a package of powdered vitamins like Emergen-C or protein powder. Maybe 75/25 mix of powdered milk and protein powder
I followed all the directions to the “T”…. baked it at 200 degrees for 1 1/2 hours…. and they came out burnt!?!?!?! I checked on them roughly an hour into baking and they still felt soft (moist?)… They were already turning slightly brown at that point too…. I trusted the 1 1/2 hour baking instruction… They still came out soft but not the pretty pink like in your picture and definitely a burnt cherry taste…
quite disappointed 🙁 Was hoping to send these with boyfriend on his camping trip.
any tips for making these not fail??
is the temperature in farenheit or celcius?
Joe… my stove is in Fahrenheit temp
I hope someone answers my question soon… I’d like to attempt to have them not burnt but I don’t plan on wasting all those ingredients over and over and over again.
Fahrenheit
Just a thought, but did you use one of those dark colored non-stick pan? Often times, those require a shorter bake time than regular old silver pans. Maybe that was the difference?
Using a non-stick bake pan does indeed make a difference! We highly recommend using that over the traditional silver bake pans.
The first thing you should try is an oven thermometer. Many ovens are wildly off at low temperatures. I keep one in my oven at all times. Once I was (luckily) just pre-heating it, and the thermostat must’ve stuck, ’cause when I checked, it was at 500! It’s hard to imagine anything burning at 200, as you stated.
I made two batches and found them extremely too sweet. Anyone cut the sugar completely out and just use the sweetness from the jello ? Or use a small amount of honey ? Want to make again but hate to waste so much ingredients on limited budget. Costly mistake.
Opps! I messed up! I didn’t add enough water. I ended up with a bag full of crumbs. Not wanting to waste it I decided to try again. I put the whole bag of crumbs in the blender. I ended up with a fine powder. NOW WHAT?! My daughter had a wonderful idea to add water to it and drink it. It tasted wonderful! lemony. creamy. smooth. I am thinking of adding some protein drink to it. maybe even some kale powder. Ill keep you informed!
Oh no!
Please do let us know how this turns out! We’re interested!
Thanks,
Renee
Disappointed it has chemical laden jello in it. Kind of defeats the purpose of survival foods when it contributes to body toxicity.
We liked these so much that I made a double batch today and instead of using a flat pan and pressing and cutting, I simply squished them into two silicone cupcake pans. No cutting, crumbling, and all UNIFORM. Thanks for the recipe. Adding these to our prep and bugout bags. Love em!!!
Does anyone know how many calories this whole batch makes?
My husband has been making these for years. I am allergic to so many food ingredients. When he found this recipe, I was very excited to try them. Now, I make them because I eat to many for him to keep up with. They help my nausea better than the nausea medicine I have to take. At the same time, I have a different way to eat the jello I practically live on.