

Thanksgiving Day isn’t just about food, this holiday also has a room for children to make one of a kind Thanksgiving kids craft! My kids love to get involved and would like to volunteer in making Thanksgiving decoration. Aside from wreaths, Thankful tree, and painted pumpkins, kids can make centerpieces for their table. They can stamp their table napkin and make their own table treasure! Yes! You heard it right, table treasure! If you want to know how to make one, then keep on reading and be amazed!
In addition, if you’re looking to expand your reach – learn to sell this craft and other homemade projects on Etsy!
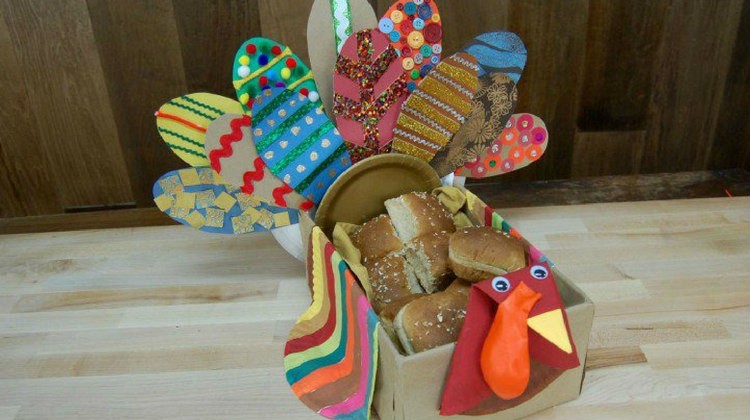
Thanksgiving Kids Craft: Turkey Table Treasure
Build Lasting Memories With Your Kids By Making Thanksgiving Crafts Together
This is one of my favorite holiday craft projects, and considering the number we do at Christmas, that says a lot. This great Thanksgiving kids’ craft is made from only a paper bag, a shoebox and some paper plates! This special table decoration will be treasured for many years due to the special memories it evokes. Both children and adults can take part in the creation of this addition to your Thanksgiving table. The feathers on the bird are each decorated separately, and can be done by even the smallest child. You can personalize them with names, add decor as simple or as fancy as you like. You likely have everything you need to make this on hand, or can find it inexpensively and easily.
We made one years ago, and each year before Thanksgiving, we get it out and admire the feathers from past years. My kids like to find the ones with their names on them. We always make a few more each year, adding to the special sentimental value of this project.
Supplies you’ll need to make Thanksgiving kids craft:

- Large brown paper bag
- Cardboard Shoe Box(as large as the bottom rectangle of bag)
- 5 Paper plates
- Colored paper
- Glue gun
- 2 googly eyes
- Orange or red balloon
- Acrylic craft paint in red, yellow, brown, green, blue, orange (only small amounts of each are needed)
- Ribbon, sequins, pompoms, stickers, buttons, or other notions
- Tacky glue
- Small craft clothespins (optional)
Step 1. Place the Box

Place the box on top of the bag and fold it around to cover the sides of the box.
Tip: Trimming the bag is important to make the sheet flat. Do this by starting at the top on one corner, cut down to the bottom, then across the bottom.
Step 2. Glue The Paper

Glue in place with tacky glue or glue gun. Cut a rectangle the size of the box out of the paper bag and place it inside the box.
Step 3 Glue The Outer Tail

For the outer tail, glue the paper plate to the box’s outside with the bottom of the plate touching the box.
Step 4. Attach The Wings


For the turkey’s wings, fold two paper plates 2 inches from top and 2 inches from bottom, then use a glue gun to attach to sides of the box, sandwiching the box between the two sides.
Step 5. Add The Inner Tail

Next, place a paper plate inside the box, bending the sides a little, if you need to, so that it will fit. Tuck approximately one inch of the plate under the paper rectangle and use glue gun to secure the plate in place.
Step 6. Make Turkey’s Head and Neck


Fold one more paper plate so that the two sides come in to overlap a little in the center. Fold the top down so that it forms a triangle for the turkey’s head. Glue it to the front of the box, as shown, to make the turkey’s neck and head.
Step 7. Paint The Wings

Using acrylic craft paint, paint the wings and the head. For colored paper torn to bits, use glue to stick them together.
Step 8. Add Details For The Head

Attach the balloon wattle to the turkey’s head, over the beak, and also the googly eyes.
Step 9. Make Feathers


Cut feathers our of paper plates. Have all your crafting notions set out for them to decorate. Decorate yourself or let your kids glue the colored paper cut into different shapes on paper plates, layering different prints or creating bold patterns as you like. Adults and children all enjoy this activity. We love it, because everyone gets to add their own personal creative touch to the table. Add a special touch and memory to each feather by allowing each person to add their name to the feather they decorate.
Step 10. Attach The Feathers


When the feathers are dry, use a craft clothespin to stick the feathers to the paper plates, aside from putting glue at the back of the feather. Alternately, just glue gun the feathers in place. However, it is much easier to store this craft when the feathers are later detachable.
And You’re Done!

Your turkey is ready to be a fabulous table decoration that can hold dinner rolls, silverware, or napkins on the table.
If you like this project and make it, be sure to send us pictures. We want to see them and share them on the site!
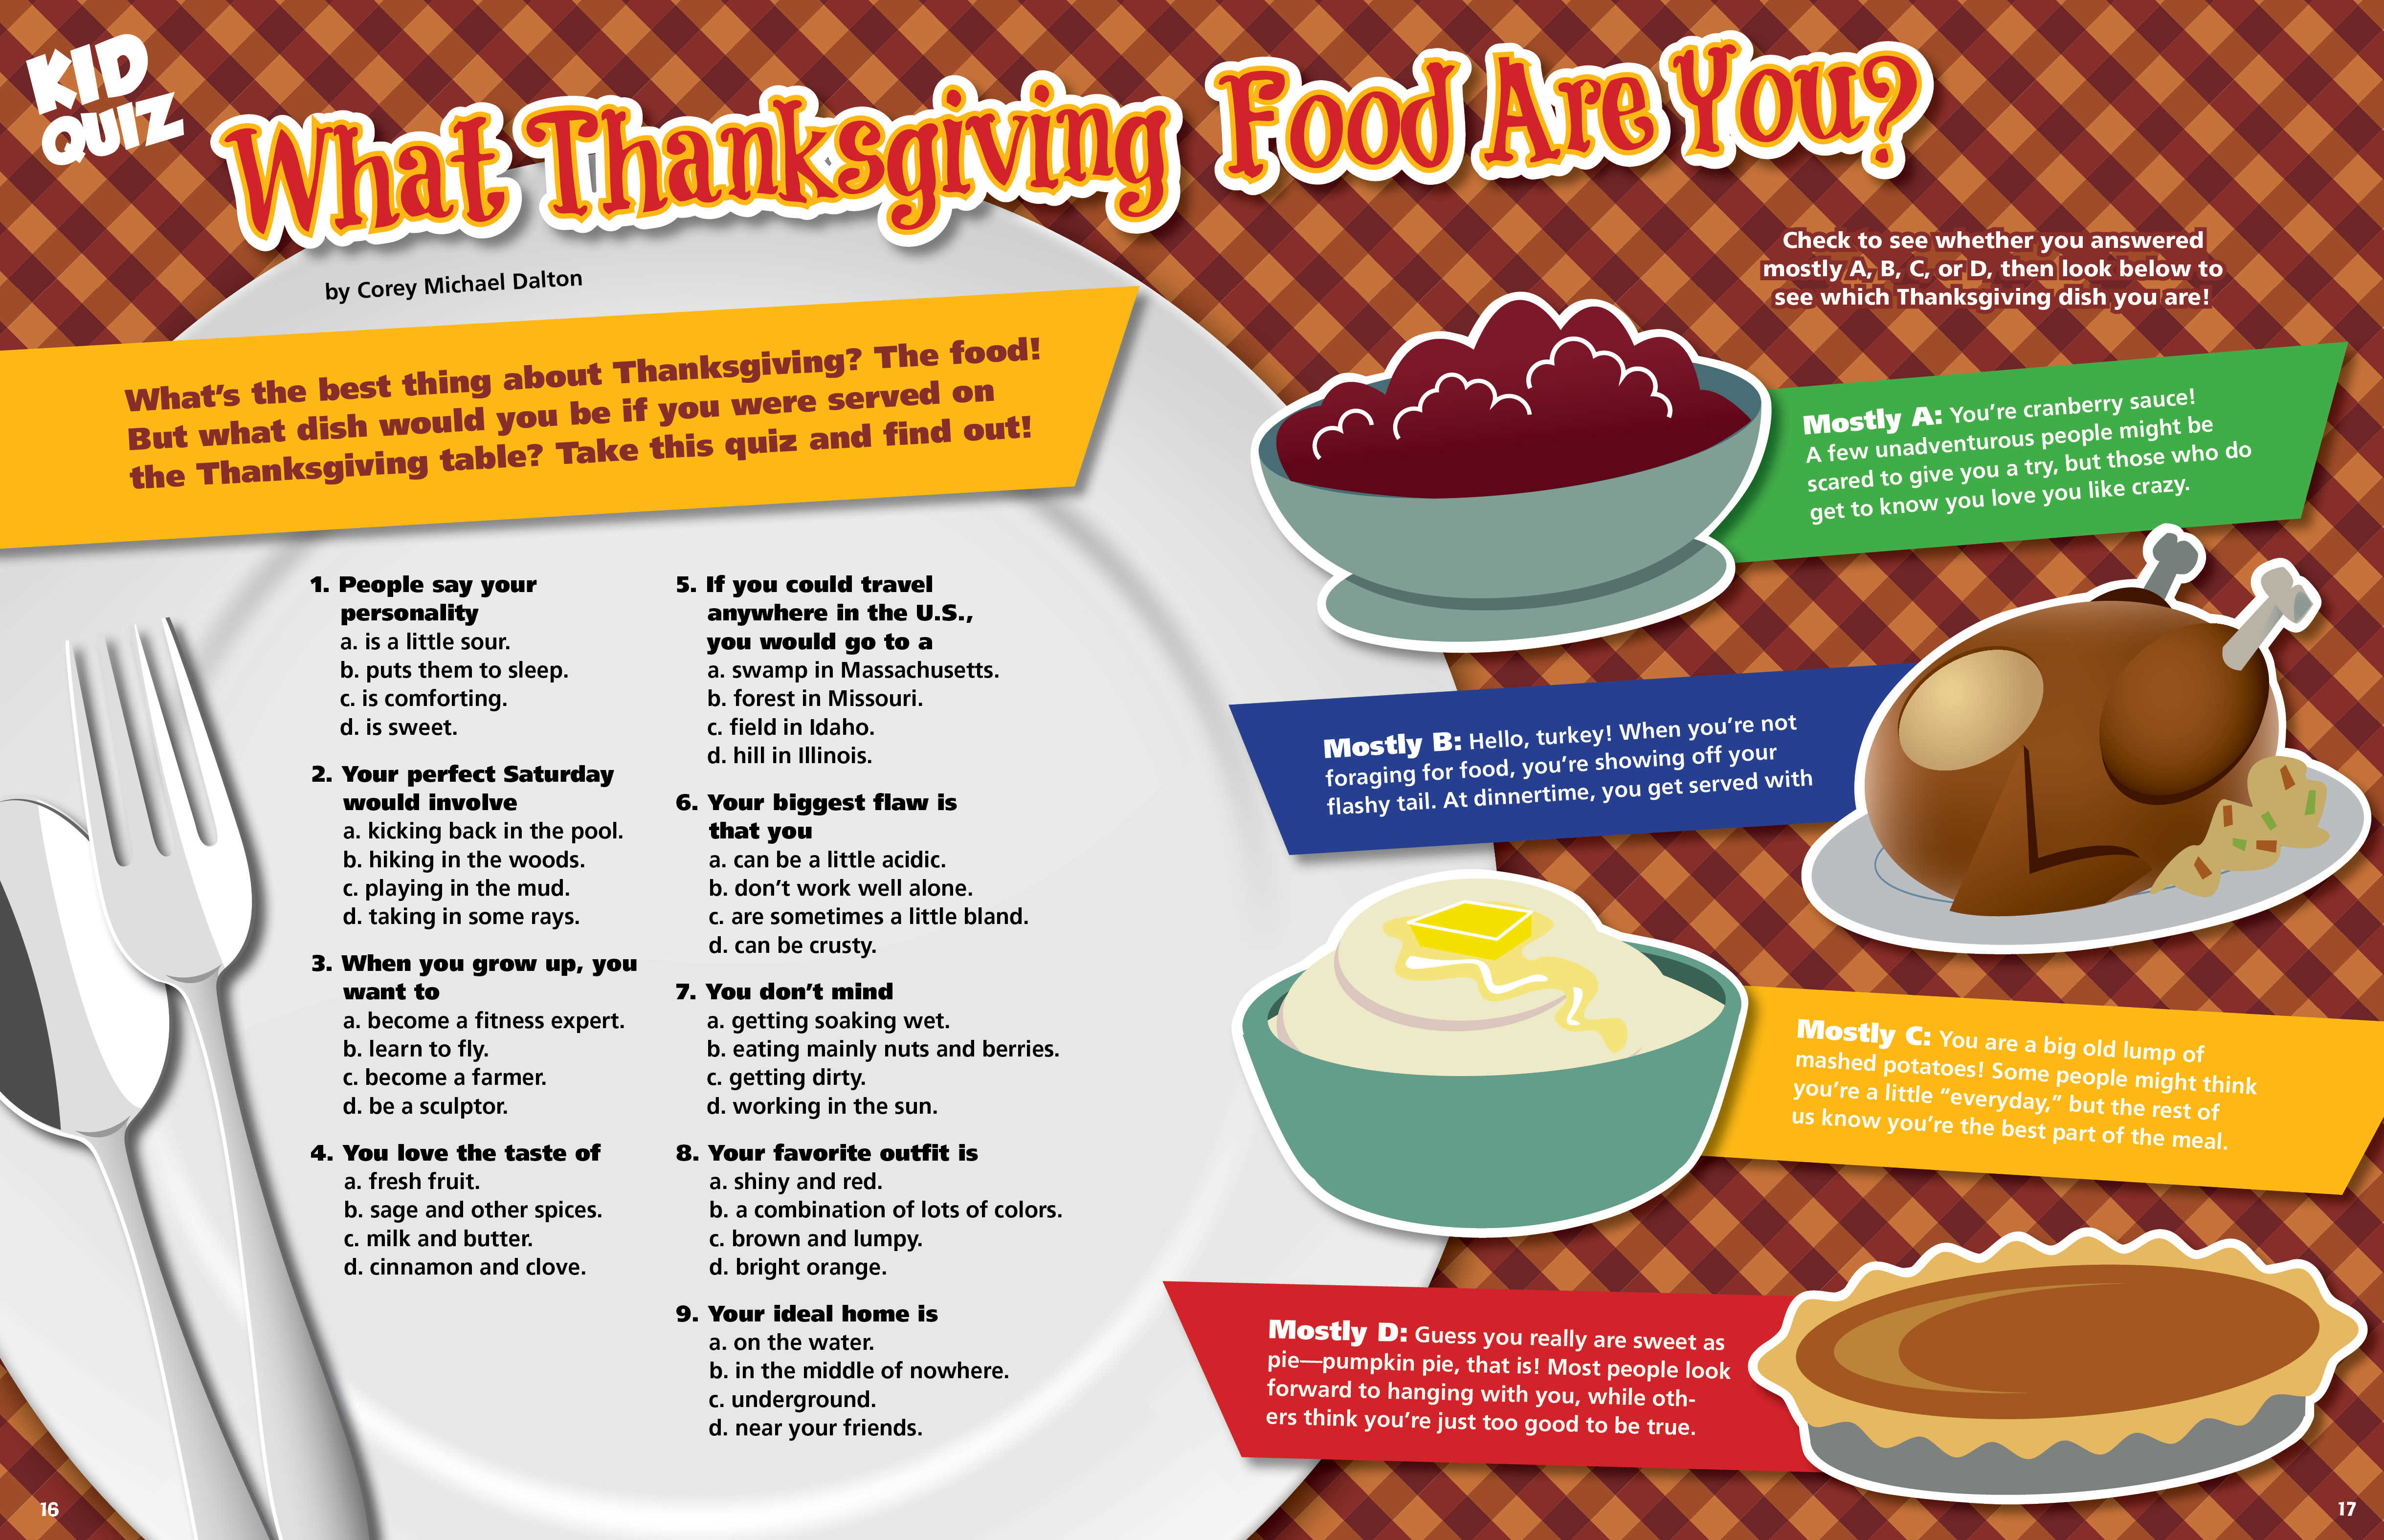
Looking for more kiddo-friendly fun?? Then check out this awesome free printable kid’s quiz by Amanda Dolson!
(Hint: Use it as a placemat for a fun pre-dinner activity.)
Still looking for last minute Thanksgiving Decor? Try these homemade Thanksgiving decorations.
![]()
Stay connected with me on Facebook, Twitter, Pinterest and Instagram!


