Decor enthusiasts, welcome! If you’ve ever stared at your leftover holiday ornaments and wondered what to do with them, you’re not alone. We all experience the post-holiday blues when festive décor feels out of place yet too beautiful to throw away. Instead of storing them for next year, let’s repurpose them into something nice and practical—such as a DIY holiday lantern that guarantees to light up any room.
Excited to learn how? Let’s dive in and get started!
Materials Needed:
- Four packs of silver ornament balls (15 per pack)
- Scissors
- Safety glasses
- Hot glue gun and glue sticks
- Empty cardboard paper towel roll
- Silver beaded necklace
- Wood pieces (for the base and top)
- Pencil
- Level
- Small paintbrush
- White or metallic paint
- Mini mirror tiles
- Silver napkin rings
- Silver rhinestone ribbon
- Clear acrylic gems
- Tacky glue
- 4×4 inch mirrors
- 5-inch long cabinet handle
Step 1: Prepare the Ornament Balls for Your DIY Holiday Lantern
To begin, let’s give those ornament balls a fresh start. First, twist off the caps from each of the 52 ornament balls. After removing the caps, use scissors to snip off the ends where the caps were attached. By the way,, make sure you’re wearing safety glasses to protect your eyes from any small pieces that might break and fly off during this step. After snipping the ends, carefully smooth them by trimming any rough edges with the scissors.
Step 2: Assemble the Lantern Legs for Your DIY Holiday Lantern
With the ornament balls prepared, let’s move on to assembling the legs of the lantern. Insert the ornament balls into an empty cardboard paper towel roll to ensure they fit snugly. This clever trick helps align the balls while you glue them together. After that, apply hot glue to the snipped ends of each ornament ball and stack them inside the cardboard roll. Once you’ve glued 13 ornament balls into a straight line, repeat this process to create four sets of legs.
Are you wondering what comes next? Keep reading to find out!
Step 3: Cover the Glue with Beads
After assembling the legs, it’s important to hide any visible glue. To do this, cover the glued areas with a string of silver beaded necklaces. Doing s not only conceals the glue but also enhances the look of your DIY holiday lantern with a reflective, chrome-like finish. If you’d like more eco-friendly tips on reusing holiday décor, be sure to check out these ideas.
Step 4: Prepare the Base and Top of Your DIY Holiday Lantern
Now that the legs are ready, let’s focus on the base and top of the lantern. First, mark where each set of legs will attach to the wood base using a pencil to help guide you during the painting process. Next, apply white or metallic paint to the wood base, leaving the marked spots unpainted for better adhesion. Once the paint dries, attach mini mirror tiles to the sides of the base and top pieces. These mirror tiles are self-adhesive, making them easy to trim and apply as needed.
Step 5: Create the Lantern Legs
After preparing the base, let’s add some more flair by attaching silver napkin rings as legs. Flip the base upside down and use hot glue to secure the napkin rings in place. For an extra sparkle, wrap the napkin rings with self-adhesive silver rhinestone ribbon. This flexible bow can easily be cut to size and molded to fit the round shape of the napkin rings.
Step 6: Attach the Ornament Ball Legs to the DIY Holiday Lantern
Now that both the base and legs are ready, it’s time to assemble your DIY holiday lantern. First, use a combination of fix-all glue and hot glue to attach each set of ornament ball legs to the base. After that, check with a level to make sure the legs are straight and evenly balanced. If you notice any gaps, simply fill them with hot glue to stabilize the structure.
Eager to see what’s next? Let’s keep going!
Step 7: Embellish the Base and Top
With the legs attached, it’s time to move on to the embellishments. Start by covering any exposed wood along the inner sides of the base with the same silver rhinestone ribbon used earlier. Next, place a 4×4 inch mirror tile in the center of the base and surround it with mini mirror tiles to cover any remaining unpainted wood. Attach another 4×4 inch mirror tile for the top and a 5-inch long cabinet handle in the center. You can secure the handle with either glue or screws, depending on your preference. If you need additional tips on working with hot glue for this project, visit Family Handyman for advice.
Step 8: Final Touches on Your DIY Holiday Lantern
Next, it’s time to add some final touches. Apply clear acrylic gems to the top edges of the lantern using tacky glue. These gems will give your DIY holiday lantern a polished, elegant look. Then, wrap the cabinet handle with silver rhinestone ribbon to help it match with the overall design.
Step 9: Assemble the DIY Holiday Lantern
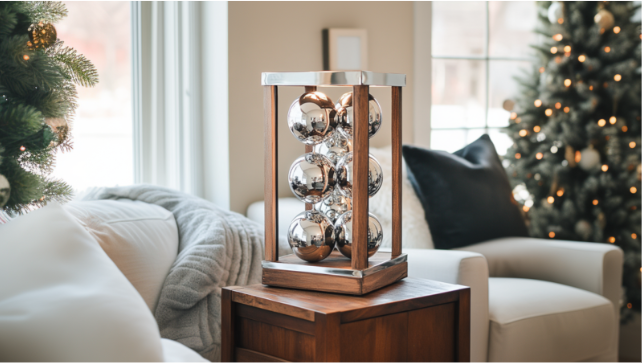
Finally, it’s time to assemble the entire lantern. Use hot glue to attach the top piece to the ornament ball legs. Once the glue has fully set, your 2-foot-tall DIY holiday lantern will be ready to light your space and serve as a beautiful centerpiece.
Illuminate Your Space with Your New DIY Holiday Lantern!
This festive DIY holiday lantern, with its mirrored and chrome finishes, will surely become the highlight of any room. It not only gives new life to your leftover holiday ornaments but also transforms them into a functional and stylish decoration.
Looking for more DIY ideas? Don’t forget to explore our DIY Craft Ideas for more fun and inspiring projects to bring elegance and style to your home!