

Want to know what to do with reclaimed wood? If you think you can no longer use reclaimed wood, think again. You can definitely reuse it in your next DIY reclaimed wood home improvement projects. Reclaimed wood is inexpensive, easy to find material that will sure give you lots of room for improvements. So, roll up your sleeves and plan your next reclaimed wood project.
Home Improvement Projects Using Reclaimed Wood
I never thought making things with reclaimed wood would be so much fun and easy. Plus the fact it’s a trend, so no one can really ignore it. I have a couple of pallets in my backyard, so I think it’s high time for me to join in and give these tired pieces of wood a new life. I am not an expert when it comes to my building skills, but fortunately, there are a few tutorials out there can definitely help me figure it out. If you’ve always wanted to do something with reclaimed would this impressive infographic from fix.com will guide you to the right project perfect for home improvements. Read on and see which one would be perfect to have for your home.
A special shout out to Fix.com for the amazing infographic.
Click here to view.
Home Improvements You Can Do With Reclaimed Wood
Sort It Out
Divide wood into damaged and unusable; some visible damage, and minor damage.
- Minor Damage
- Damaged
- Destroyed
Prep, Prep, Prep!
![Prep, Prep, Prep! | Reclaimed Wood Home Improvement Projects | [Infographic]](https://diyprojects.com/wp-content/uploads/2016/05/Prep-Prep-Prep.jpg "Prep, Prep, Prep! | Reclaimed Wood Home Improvement Projects | [Infographic]")
Remove nails, staples, and screws from useable wood.
Get To Sanding
![Get To Sanding | Reclaimed Wood Home Improvement Projects | [Infographic]](https://diyprojects.com/wp-content/uploads/2016/05/Get-To-Sanding.jpg "Get To Sanding | Reclaimed Wood Home Improvement Projects | [Infographic]")
Sand with medium-grit sandpaper.
One-of-a-Kind Repurposed Mirror
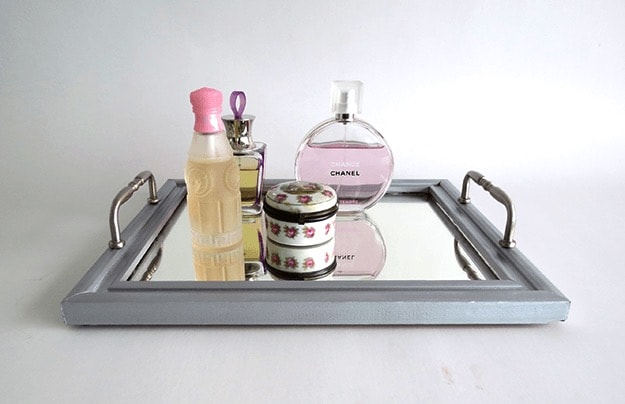
Step 1: Carefully remove the plastic frame from the mirror.
Step 2: Using a miter saw, cut your reclaimed boards 1 inch shorter than your mirror in both length and width.
Step 3: Using a Kreg jig and basic wood screws, assemble the frame.
Step 4: Attach mirror to the back of the frame using mirror clips.
DIY Ceiling Fixture
Step 1
:
Use strapping and/or screws with a Kreg Jig to attach a handful of boards together. It will resemble a mini-pallet or platform.
Step 2:
Trace a circle on your mini-pallet and cut it out with a jig saw. You should now have a circular pallet. Discard the edge pieces or save them for another project. Loose boards can be secured with wood glue.
Step 3:
Make a small circular hole in the center of your large pallet circle so that your ceiling fixture has a place to hang down. Measure and trace and cut it out with your jig saw.
Step 4:
Affix to the ceiling at the light junction box using construction adhesive or dry wall screws with the small inner circle as the opening for your light to come down from the ceiling.
This is just a few ideas for what you can do with reclaimed wood you can find in your own yard or a friend’s yard. Remember rustic decor is today’s trend, so reclaimed wood projects are something you can get hooked on.
Brag about your DIY adventures with our FREE shirt just for you, get it right here.
Did you find this helpful and interesting? Let me know below in the comments.
Want DIY projects to repurpose old stuff? Then check these 9 DIY projects to repurpose old stuff!
![]()
Stay connected with me on Facebook, Twitter, Pinterest and Instagram!
Featured Image Via Todd Manring Designs


