

If you’re on a strict Halloween budget or you’re whipping up a few last minute party decorations, these ten dollar store Halloween decor ideas are perfect for you.
10 Halloween Decor Ideas That Are Easy & Affordable
1. Skeleton Ice Cubes

Wicked ice cubes you can make for your next Halloween party.
Supplies:

- Skeleton garland
- Ice cube tray
Instructions:
- Break up the little skeletons into pieces (it’s handy to have scissors on hand to snip the legs and arms apart).
- Soak your little bone pieces in a bowl of hot water for a few minutes to make the black paint flake off (it floats right away in the water). Give them a quick rinse to make sure they are clean.
- Put the little bones in the ice tray and fill each cube halfway with water. The little plastic bones float, so we need to freeze the ice in two stages.
- When the half-full cubes freeze, fill the cubes to the top with water. Now the bones will be trapped in the middle.
- When the tray is frozen, pop the ice cubes out and spookify your Halloween beverages!
2. Specimen Jars

Wouldn’t it be cool to have these on your living room this Halloween? This project is easy as can be!
Supplies:

- Colorful soap
- Plastic creatures
- Interesting containers
Instructions:
- Simply pour the colorful soap into the various containers.
- Sink the creature “specimens” into the soap.
When wandering the Dollar Tree, I noticed those mesh-topped “Moisture Eliminators.” I just used the lids to create interesting mesh-textures behind the creatures. Look for interesting textures and containers and you can’t go wrong!
3. Eyes in the Dark

Make anyone feel like something’s watching them with this Halloween craft idea.
Supplies:

- Glow sticks
- Cardboard paper towel rolls
- Scissors
Instructions:
- Cut eye shapes into your paper towel rolls.
- Snap-and-shake your glow sticks to activate them.
- Put them into the paper towel rolls, and you’re done.
4. Halloween Sharpie Mug

Draw a bat or a pumpkin, anything Halloween-themed.
Supplies:

- Mug
- Sharpies
Instructions:
- Google some Halloween clip art images and find one that you like.
- Freehand-draw the image onto your mug (I picked a simple bat to make the freehanding easier).
- Bake your mug in the oven at 350 degrees for 30 minutes to set your permanent marker onto the porcelain.
5. Ghostly Ice Hand

Need a hand?
Supplies:

- Vinyl gloves
- Rubber band/hair tie
Instructions:
- Pick a vinyl glove from the bag and make sure it doesn’t have any rips or tears.
- Give it a thorough rinse in hot water to clean off any particles. The Dollar Tree vinyl gloves don’t have that nasty powder inside, so you won’t have to worry about that.
- Fill your glove with water and tie it securely with a rubber band or a small hair tie.
- Once the ghostly hand is completely frozen, snip away the glove.
- You are left with a frozen hand that looks ghostly and fascinating when you float it in your Halloween punch bowl!
6. Vase of Skulls

This will creep anyone out, don’t you think?
Supplies:

- Small skeletons (about a foot tall)
- Tall glass vase
- Spanish moss
Instructions:
- Pop the heads off your skeletons.
- Arrange them with the Spanish moss inside of your tall glass vase. That’s it! Doesn’t get much easier than that, and it looks striking.
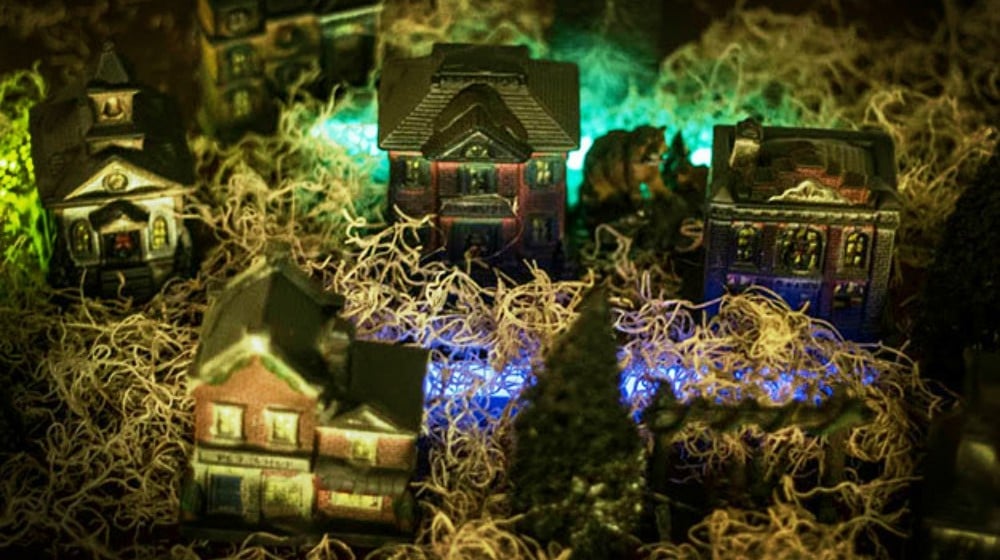
7. Burned Out Village

Just like a village of the damned.
Supplies:

- Little Christmas village houses, trees, and figures
- Can of flat black spray paint (you will need to get this item from a hardware store)
- Spanish moss
- Glowsticks (optional)
Instructions:
- Spray paint the whole village, but not too heavily! You don’t want everything to be jet black and lose all of its definition. Instead, if you spray sparingly, you’ll get a charred, fire-burned village look. It makes the whole town look gutted and abandoned.
- Spread some Spanish moss on your display table and nestle the abandoned village amongst the moss.
- If you want, you can bury some glow sticks under the moss for an eerie, glowing effect.
8. Body Bag

You don’t need a real body to wrap in this bag 😀
Supplies:

- White garbage bags
- Rope
- Towels and sheets from around the house (they won’t be damaged, so you can just pull them out after Halloween)
Instructions:
- Lay a sheet on the ground and spread some towels and other linens on it (in a line about 5-6 ft. long).
- Now plump and shape all the linens (except for the big sheet that they are all laid on), so that they are: narrowest at one end (the “feet”), widest about a foot from the top (the “shoulders”), and round and head-shaped (for well…the “head”, of course ; ).
- Now we’re going to wrap up our handiwork in the big sheet that we put underneath it all. Carefully wrap the sides of the sheet around the “body” of linens that you have just formed.
- Once done, open up some garbage bag and layer them around the “body.” Hold them in place with your rope, cinching it around everything tightly for a creepy effect. You can use the rope to accentuate the form of the body even more (look how much definition is given to the head, for example, by tightening the rope around the neck area).
- And you’re done – creeeepy! I shut mine away in our storage closet until Halloween, because it was giving me the shivers every time I looked at it!
9. Bathroom Fright

Scare unsuspecting victims that need to go to the bathroom.
Supplies:

- Plastic hand
Instructions:
- This is the easiest one on the list! Just grab a fake plastic hand from the Dollar Store and attach it to the lid of your toilet. You can just use clear packing tape to fix it to the lid underneath, and your guests will get quite a shock when they enter the bathroom!
If you’re grossed out at the thought of attaching it to the lid so close to the toilet water, you can always move it up to the toilet tank and wedge it under the porcelain lid – still eerie!
10. Spell Book

Oh, this doesn’t prove you’re a witch.
Supplies:

- Old book (textbooks works wonderfully!)
- Elmers glue
- Paper towels
- Plastic animals (snakes, insects, spiders) that can sit flat against the book
- Disposable bowl + sponge/paintbrush
- Hot glue gun
- Earthy brown paints (cheap Dollar Store paints/spray paints from the hardware store/acrylic paints from Michael’s Crafts – you can make anything work!)
Instructions:
- Pour your Elmer’s Glue into a disposable bowl and mix in some water until it is runny but still slimy and gooey.
- Rip off some paper towel patches and arrange them on the cover of your book.
- Apply your Elmer’s Glue mixture all over the paper towels until they form a textured surface on the book. If your paper towel gets crinkled and messy in some places, that’s great! That will only add to the weathered texture that we’re aiming for.
- Once your paper towel layer dries, glue your animals, stickers, or interesting plastic pieces onto the book with straight Elmer’s Glue. Apply some glue over the creatures so that the edges look like they meld with the book. Let all of that dry.
- When all is dry, you can apply some lettering! To do that, take a hot glue gun and write your words with it.
- When everything is completely bone-dry, it’s time to paint! Start with your dark brown undercoat, then apply messy coats of lighter brown on top of it once it’s dried. You can apply the paint and rub patches off with a rag/paper towel to get a time-weathered look.
- Once it’s dry, you’re ready to display it at your Halloween bash!
Watch this video by Pennies into Pearls for some cute and fun Dollar Store Halloween costume ideas:
There you have it, crafters! Easy and quick ideas to make your Halloween more fun and exciting! Aside from easy and quick, these Halloween decorations are budget-friendly! Try any of these fun and easy Halloween decorations this year for a spooktacular party.
Did you enjoy this list of easy Halloween decorations? Let us know in the comments section below!
Up Next: 15 DIY Ways to Carve a Pumpkin This Halloween | DIY Projects
![]()
Stay connected with us on Facebook, Twitter, Pinterest, and Instagram!

Editor’s Note: This post was originally published on October 30, 2014, and has been updated for quality and relevancy.


