

Spring is here, and it’s the perfect time to prepare your garden. Instead of buying expensive plants from the nursery, why not grow your garden from scratch? DIY seed-starting is not only cost-effective but also allows you to experiment with unique and heirloom varieties. On top of that, starting your seeds at home can be a fun and satisfying experience.
Don’t worry if you’re new to gardening. Starting seeds is simple when you use a few smart tricks. Let’s dive into these easy hacks that will help you grow healthy, thriving seedlings—just in time for spring!
Why DIY Seed-Starting is a Gardener’s Best Friend 🌿
Starting seeds at home offers benefits that go beyond just saving money. First, you have complete control over the growing process. You can choose nutrient-rich soil, avoid harmful chemicals, and ensure your plants get the right care.
Second, it gives you access to an exciting range of plant varieties. For example, nurseries might only carry a few options, but growing from seed opens the door to unique flowers, rare herbs, or heirloom vegetables.
Finally, this method is both sustainable and rewarding. You can repurpose items around the house, reducing waste while giving new life to common materials. Plus, watching a seed sprout and grow into a healthy plant is one of the simplest joys in life.
Simple Hacks for DIY Seed-Starting Success
You don’t need fancy tools or a green thumb to start seeds at home. These straightforward hacks will set your seedlings up for success!
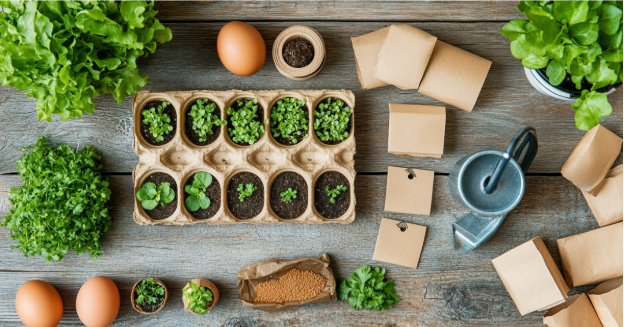
Repurpose Household Items for Seed Trays
Skip the store-bought seed trays. Everyday items around your home can be transformed into functional, eco-friendly seed-starters.
For example, egg cartons work perfectly for small seeds like lettuce or basil. These cartons are biodegradable, so you can plant them directly into the soil. Toilet paper rolls are another great option. Cut them in half, fold one end to create a base, and fill them with soil.
Plastic containers, such as yogurt cups or berry clamshells, also make excellent seed trays. They retain moisture and can act as mini greenhouses when covered with plastic wrap. Just remember to poke drainage holes at the bottom of these containers to avoid waterlogging.
Looking for more ideas? The National Gardening Association offers creative suggestions for repurposing materials as seed trays.
Create the Perfect Seed-Starting Soil
Seeds need light and fluffy soil to germinate and grow strong. Garden soil is too dense and heavy, but you can easily make a seed-starting mix at home.
Combine these three ingredients:
- 1 part peat moss or coconut coir for moisture retention.
- 1 part perlite or vermiculite for improved drainage.
- 1 part compost to provide essential nutrients.
This balanced mix helps seeds sprout in a healthy environment. For more tips on making your own mix, visit The Spruce.
Label Your Seeds for Easy Identification
Seedlings often look identical during the early stages. Without labels, it’s easy to mix up your plants. Avoid confusion by labeling everything as soon as you plant the seeds.
Use popsicle sticks, strips of old plastic containers, or even wine corks as markers. Write the plant names with waterproof markers to ensure the labels stay legible, even after watering. Clear labels will save you from guessing games later!
Create a Healthy Environment
Seeds need warmth and moisture to germinate properly. To create this environment, cover your seed trays with plastic wrap or use clear lids to trap humidity.
Place the trays in a sunny spot, like a windowsill that gets 6-8 hours of light daily. If sunlight is limited, grow lights are a great alternative. For an added touch of warmth, place trays on top of your refrigerator, where the heat from the motor can help encourage sprouting.
This cozy setup will give your seeds the best possible start.
Water Carefully and Consistently
Proper watering is key to healthy seedlings. Seeds require consistent moisture, but overwatering can quickly harm them.
Mist the soil lightly with a spray bottle to prevent displacing seeds. For a more hands-off approach, try bottom watering. Place your trays in a shallow pan filled with water so the soil can absorb moisture from below. Check the soil daily to ensure it stays damp—not soggy.
By managing moisture levels carefully, you’ll help your seedlings grow strong and healthy.
Harden Off Seedlings Before Transplanting
Once your seedlings are several inches tall, they’re almost ready for the garden. However, moving them outdoors too soon can shock the plants. To avoid this, you need to “harden off” your seedlings.
Start by placing the seedlings outside in a shady spot for 1-2 hours a day. Gradually increase their time outdoors and their exposure to sunlight over the course of a week. By the end of this process, your plants will be ready to thrive in their permanent home.
Build a Thriving Garden with DIY Seed-Starting 🌻
DIY seed-starting is a budget-friendly, creative, and fulfilling way to grow your garden. By repurposing household items, mixing your own soil, and following these simple hacks, you’ll cultivate healthy plants that are ready to bloom.
In addition to saving money, you’ll experience the joy of nurturing seeds into thriving flowers, vegetables, or herbs. Whether you’re growing colorful marigolds or juicy tomatoes, your garden will reflect the care and effort you’ve put into it.
Have you tried starting seeds at home? Or do you have a favorite gardening tip? Leave a comment below—I’d love to hear your thoughts!
FAQs
Q: What are the easiest seeds for beginners?
A: Lettuce, radishes, marigolds, and zinnias are great options. They sprout quickly and are low-maintenance.
Q: Do I need special lights for seed-starting?
A: Not necessarily. A sunny windowsill works, but grow lights help if natural light is limited.
Q: Can I reuse containers for seed-starting?
A: Yes! Just make sure to clean them thoroughly to prevent spreading pests or diseases.
Q: How often should I water my seeds?
A: Check the soil daily. Mist it lightly or use bottom watering to keep it damp but not soaked.
Q: When should I start seeds indoors?
A: Start seeds about 6-8 weeks before your area’s last frost date.
Q: How can I prevent seedlings from becoming leggy?
A: Provide consistent light. Keep grow lights 2-3 inches above the seedlings for optimal growth.
Q: Can I use regular garden soil to start seeds?
A: No, garden soil is too heavy. Use a light, fluffy seed-starting mix for best results.
Q: How do I know when seedlings are ready to transplant?
A: When they have 2-3 sets of true leaves and are hardened off, they’re ready for the garden.
Q: What’s the best temperature for germinating seeds?
A: Most seeds germinate well in temperatures between 65°F and 75°F.
Q: Can I start seeds in a cold climate?
A: Yes! Use grow lights, warm trays, and plastic covers to create a cozy indoor environment.


