




At a Glance: New Homeowner DIY Essentials
- 9 damage-prevention tasks ranked by what saves the most money first
- One essential tool per task, with budget, mid, and quality picks
- Clear “hire a pro” lines so you know when to stop and call someone
You just got the keys. Congratulations. Now the real work starts.
If you bought your house anywhere from 2023 to 2025, you’re right in the sweet spot where small problems start showing up. The new house smell wears off, the first weird stain appears on a ceiling, and suddenly you’re Googling “what does mold smell like” at 11 p.m.
This guide closes that gap. We’ve ranked 9 essential DIY tasks by how much they save you and matched the tools to three budget tiers. Use this checklist to get the right gear, handle your own maintenance, and protect your investment from day one.
RELATED: The Spring Home Exterior Checklist: Inspect Gutters, Roofs, and More
1. Find and Label Every Main Shutoff (Water, Gas, Electric)
This is the single most important new homeowner DIY task to tick off the list. Walk around your house. Find the water main shutoff (usually in the basement, garage, or near the front foundation wall). Find the gas shutoff at the meter. Find the main breaker in your electrical panel. Now label all three so anyone in the house can find them in the dark.
Why it matters: a burst pipe at 2 a.m. is a flood until somebody turns off the water. Every minute you spend looking is gallons of water hitting your floor. People who know their shutoff turn a $40,000 disaster into a $400 repair.
Essential tool: Use high-visibility labels and a permanent marker to clearly mark your utility shutoffs so anyone can quickly find them in the dark to prevent a major flood.
2. Install Water Leak Detectors at High-Risk Spots
Leak detectors are the cheapest insurance you’ll ever buy. They sit on the floor and alarm when they get wet. The smart ones text your phone. Put one under every sink. Put one behind the washing machine. Put one near the water heater and one by each toilet. That’s your starter set.
Why it matters: 35% of homeowners surveyed in 2025 said they had to hire a pro to fix a DIY mistake. Many of those mistakes were slow leaks nobody caught for months. A $35 detector pays for itself the first time it goes off.
Essential tool: Place smart water leak detectors near sinks, toilets, and water heaters to receive instant alarms or texts, saving you from the expensive damage of unnoticed slow leaks.
3. Clean Gutters Twice a Year
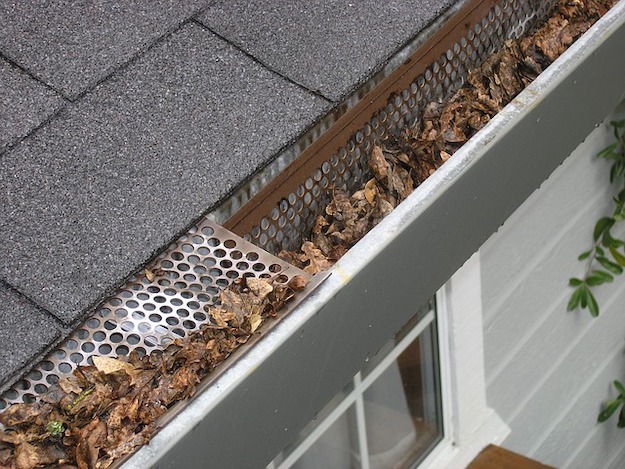
When gutters clog, water backs up under the shingles, soaks the fascia, runs down the siding, and pools at your foundation. That’s how basements flood. Run a wand or a hose through them every spring after pollen season and every fall after the leaves drop. If you have oak or pine trees nearby, do it three times.
Why it matters: Gutter failure is one of the top three causes of foundation damage in older homes. A clean gutter system costs you a Saturday morning. A wet basement costs you $15,000, and a dehumidifier you have to run forever.
Essential tool: heavy-duty 50-foot hose with a wand and a sturdy step stool are necessary to flush out debris and prevent clogged gutters from causing foundation damage or basement flooding.
4. Clear the HVAC Condensate Drip Pan and Line
Your air conditioner pulls moisture out of the air. That moisture has to go somewhere, so it drips into a pan and runs out through a small PVC line. Over time, that line grows a slimy biofilm that clogs it. The pan overflows. The water finds your ceiling, your closet, or your finished basement.
Why it matters: HVAC drip pan overflows are one of the most common ceiling-damage claims in summer. Twenty minutes with a shop vac twice a year prevents it. Suck the line out from the outdoor end. Pour a cup of distilled vinegar down the line every few months to keep the biofilm from coming back.
Essential tool: Keep a wet/dry shop vac and distilled vinegar on hand to clear out the slimy biofilm in your condensate line, preventing the drip pan from overflowing and destroying your ceiling
5. Replace HVAC Filters on a Schedule
This is the easiest task on the entire new homeowner DIY checklist. It’s also the one most people forget.
A dirty filter chokes your system. The blower works harder, your bills go up, and the coils can freeze. Frozen coils on a hot July day means an emergency service call at holiday-weekend rates.
Why it matters: a $15 filter prevents a $400 service call. Set a recurring phone reminder right now. Most homes need a new filter every 1 to 3 months depending on pets, dust, and filter rating.
Essential tool: Buy the correct-size pleated filter and a marker to routinely swap out dirty filters so your HVAC system doesn’t overwork, inflate your energy bills, or freeze its coils
6. Caulk Wet Zones (Tub, Shower, Sinks, Kitchen Counter)
Caulk is the rubbery line that seals the gap between your tub and the wall, your sink and the counter, your shower door and the floor. It’s the only thing keeping water out of your subfloor. When caulk cracks, water sneaks behind it for months before you see anything. Then the tile loosens, the drywall puffs, and the floor under the tub feels spongy.
Why it matters: caulk failure under a tub or shower is the most common reason for soft bathroom floors. Strip and replace caulk every 2 to 3 years. The whole job takes one afternoon. Use 100% silicone (not “tub and tile” acrylic latex), and let it cure 24 hours before getting it wet.
Essential tool: Use a dripless caulk gun and 100% silicone caulk to seal gaps around tubs and sinks, which is the only barrier keeping water from rotting out your subfloor
7. Inspect the Attic Twice a Year
Most new homeowners have never been in their own attic. Go up there. Bring a flashlight. Then look for five things: water stains on the wood, daylight where there should not be any, animal droppings, compressed or wet insulation, and frost on nails in winter (that is a ventilation problem).
Why it matters: roofs leak from the inside out. By the time water shows up on a bedroom ceiling, it has been wet up there for months. Twice-a-year attic checks catch problems while they are still cheap. Do this once in spring and once after the first hard freeze.
Essential tool: Grab a rechargeable headlamp or flashlight twice a year to inspect your attic for early signs of roof leaks, daylight, or pest droppings before they turn into major structural issues.
8. Flush the Water Heater Once a Year
Sediment from your water supply settles at the bottom of your water heater tank. Over years it builds up like sand at the bottom of a pool. That sediment insulates the heating element from the water, makes the heater work harder, and shortens its life. Most water heaters are rated for 12 years. Skip the flush and you’ll likely only get 6.
Why it matters: a new water heater installed costs $1,500 to $2,500. An hour of your time once a year doubles the lifespan. Hook a hose to the drain valve at the bottom of the tank, run it to a floor drain or outside, and let it rip until the water runs clear.
Essential tool: Connect a heavy-duty 50-foot hose and use an adjustable wrench to flush sediment out of your water heater’s drain valve, an easy maintenance task that doubles the unit’s lifespan
9. Test Smoke and Carbon Monoxide Detectors Every Month
Press the test button. If it beeps, it works. If it doesn’t, change the battery. If it still doesn’t, replace the whole unit. Check the date printed on the back. Smoke detectors expire after 10 years. CO detectors expire after 5 to 7. Most people never look.
Why it matters: dead batteries are the number one reason detectors fail during a fire. The number two reason is the unit is just too old. Both are fixable in 10 minutes. This is the cheapest, fastest, most life-saving task on the entire homeowner tool kit list.
Essential tool: Stock up on replacement batteries and fresh CO detector units to ensure your alarms work, because dead batteries or expired devices are the leading causes of failure during a fire
Final Verdict
These 9 tasks aren’t glamorous. Nobody is posting their HVAC filter swap on Instagram. But this is the mundane routine that separates homeowners who get blindsided by huge repair bills from homeowners who don’t. Run the list in order. Start with shutoffs and leak detectors today. Knock out gutters, drip pans, and the attic, check on the next free Saturday. Set phone reminders for the rest. Bookmark this page and come back every spring and fall.
FAQs: New Homeowner DIY
1. What DIY tasks should every new homeowner know how to do? Start with the damage-prevention basics: locate your shutoffs, install leak detectors, clean gutters, change HVAC filters, clear the drip pan, recaulk wet zones, check the attic, flush the water heater, and test detectors. These nine tasks cover roughly 80% of the issues that send first-time owners into a panic.
2. What tools should every homeowner have before their first New Homeowner DIY emergency? Eight tools handle most of this New Homeowner DIY checklist: a cordless drill, a wet/dry shop vac, a dripless caulk gun, an adjustable wrench, a rechargeable headlamp, a non-contact voltage tester, a heavy-duty 50-foot hose, and a sturdy step stool. Build the kit one task at a time instead of buying a giant pre-packed set.
3. How often should new homeowners clean their gutters? Twice a year minimum: once in spring after the pollen drop and once in fall after the leaves are down. Bump it to three times a year if you have oaks, pines, or maples hanging over the roof. Clogged gutters are one of the fastest paths to foundation damage and basement flooding.
4. Is New Homeowner DIY safe without prior experience? Most tasks on this New Homeowner DIY list are beginner-safe and require zero experience. Anything involving load-bearing walls, gas lines, main electrical panels, or roof work above the second story isn’t. The rule is simple: if a mistake could flood, electrocute, or burn down the house, hire a licensed pro.
5. What’s the most expensive mistake new homeowners make? Ignoring slow water leaks. A drip under the kitchen sink for six months destroys the cabinet, the subfloor, and sometimes the floor joists below. The full repair runs $5,000 to $20,000. A $35 leak detector pays for itself the first time it catches a drip you would have missed.









