If you’re looking for a fun and easy way to add a boo-tiful touch to your Halloween decorations, DIY ghosts made from cheesecloth are the answer. Crafting your floating ghosts is a simple, hands-on way to get your space ready for Halloween. As a bonus, you and your loved ones can easily customize your DIY ghosts.
Wondering how to create these ghastly decorations? Keep reading to learn the step-by-step instructions on how to make your very own DIY ghosts! After all, no Halloween setup is complete without them!
A whimsical DIY ghost made of cheesecloth, floating above a table decorated for Halloween. The ghost’s fabric billows softly, giving it an ethereal, eerie presence. The scene is lit by glowing pumpkins, with craft supplies scattered around, enhancing the festive vibe
What You’ll Need
Here’s what you’ll need:
- Cheesecloth
- Liquid starch
- Small balloons or styrofoam balls
- Mason jars (or another round base)
- Pipe cleaners
- Craft googly eyes or black felt
- Scissors
- Black and white baker’s twine
Create Your Own Haunting Decor with DIY Ghosts
Crafting DIY ghosts is a fun and simple way to add a spooky touch to your Halloween setup. You can bring these ethereal figures to life by follow the steps below!
1. Create the Ghost’s Frame
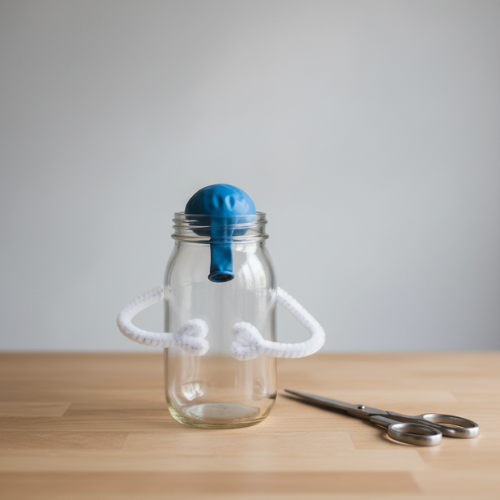
Blow up a small balloon and place it on top of a mason jar to shape the ghost’s head. Then, attach two pipe cleaners for the arms, bending them slightly forward for a natural appearance. Don’t worry too much about perfecting it—part of the charm comes from the ghost’s whimsical, handmade appearance.
2. Drape the Cheesecloth

Cut a piece of cheesecloth large enough to cover the balloon and pipe cleaners. Let the fabric pool at the base to create the illusion of floating. This helps give your DIY ghost a haunted and ethereal look once completed.
3. Soak the Cheesecloth
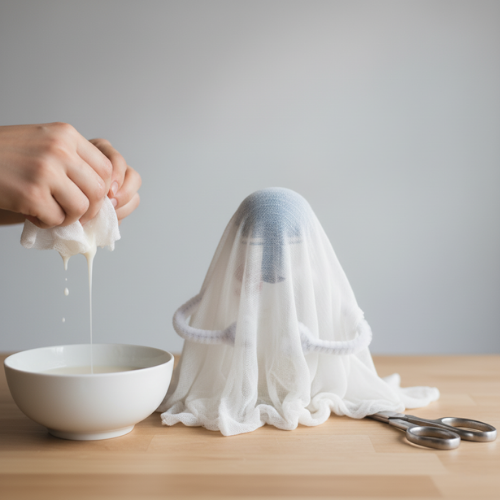
Now, for the fun part! Dip the cheesecloth into a bowl of liquid starch and make sure it’s fully soaked. Afterward, gently wring out any excess liquids and drape the cheesecloth over your ghost’s frame. Then, shape the folds to create movement, making the ghost appear as if it’s floating mid-air. Additionally, you can adjust the fabric for a unique shape that gives your ghost extra character.
4. Let It Dry
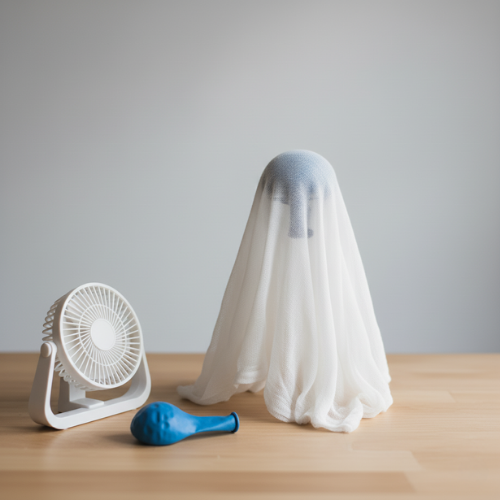
After arranging the cheesecloth, let your DIY ghost dry completely—this typically takes about 24 hours. Once dry, pop the balloon and remove the mason jar and pipe cleaners. You’ll be left with a sturdy, ghostly figure that’s ready to be displayed!
5. Add the Final Details

Finally, it’s time to give your DIY ghost some personality! Attach googly eyes or cut circles from black felt to create a spooky face. If you want to add a playful twist, consider making a small Halloween banner using baker’s twine and cardstock. Then, drape the banner across your ghost’s arms for a festive touch. In addition, you could experiment with glow-in-the-dark paint to make your ghost even more eye-catching.
Display Your DIY Ghosts with a Haunting Effect
Now that your DIY ghosts are complete, it’s time to decide where they will haunt! You can hang them from the ceiling, drape them over a mantel, or create a spooky scene by grouping multiple ghosts together. If you want an even more chilling effect, place battery-operated lights underneath for a glowing finish that enhances the eerie atmosphere. Try experimenting with different display techniques to make the most of your Halloween décor.
Not only is this project fun to make, but it’s also a great way to showcase your creativity. Whether crafting alone or with friends, there’s something magical about watching your DIY ghost materialize. Plus, you can store them for future Halloweens. Thankfully, these decorations hold their shape year after year.
Share Your DIY Ghost Creations!
After crafting your spooky DIY ghosts, why not share your masterpiece with others? Get creative by experimenting with different designs, sizes, or effects. Whether you’ve made one ghost or a whole haunted crew, these DIY decorations will surely make an impression on everyone who sees them.
For even more Halloween inspiration, be sure to visit Better Homes & Gardens for additional DIY Halloween décor ideas that are sure to wow your guests!