

Ever wondered how to make a drawstring bag?
This is one of our favorite DIY sewing projects, and it is perfect for the novice, but a great DIY project for all. Drawstring bags are incredibly versatile for everyday use. It’s a great tool for organizing the vast and secret contents of a women’s purse. It’s an eco-friendly, re-useable alternative to wrapping paper. Need to find a way to utilize scrap fabric? No problem. The modest little (or large) drawstring bag can hold it all.
Want to make one yourself?
While the drawstring bag holds many qualities, the best thing is how easy they are to make to scratch. Here’s a guide along with sewing diagrams on how to make them yourself!
How to Make a DIY Drawstring Bag:
Time Required:
- 10~20 minutes depending on the size of the bag
Materials You Need to Make A Drawstring Bag:
- Rectangular piece of woven cotton fabric…ANY SIZE!You can certainly opt to use knit fabric. That’s the beauty of this bag, it works with anything
- Coordinating or contrasting thread
- ½” – ¾” width coordinating or contrasting ribbon
Tools:
- Marking pen
- Safety Pin
- Ruler
- Iron
- Pinking Sheers (optional)
- Sewing Machine
Step 1:
Fold your rectangular piece of fabric, right sides together, in half. This means, if you have printed fabric, fold the printed side; or the “good” side, facing each other.

Step 2:
Using a marking pen and ruler, mark your seams
- Measure ½” from the unfolded edge (seam allowance), draw a line 1” down from the top
- Leave a 1” opening (for the ribbon) unmarked
- Continue the vertical line down and around the corner to the folded edge

Step 3:
Sew the marked edges
- Optional – Cut the edges of the sewn bag with pinking sheers to prevent the fabric from fraying .
Step 4:
Fold
and Iron the top edge of the bag down 1”.

Step 5:
Then fold another 1” and iron again. The opening that you left should be at the very top corner.

Step 6:
Open the bag up, and edge stich around the opening. If you have a free arm sewing machine, utilize this!
- TIP: Make sure you don’t sew the opening together! I’ve done this by accident many times when I make these bags late in the night…

Step 7:
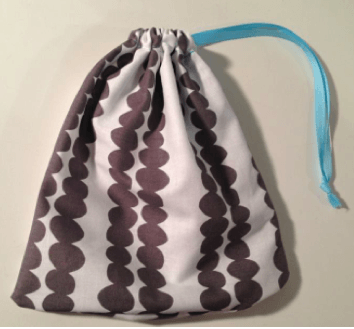
Turn the bag right side out and loop the ribbon through the opening
- TIP: pin the end of the ribbon with a safety pin and feed it through the opening. Makes it MUCH easier.
Voila! That’s all there is to it!


