

At a Glance: Photograph Junk Journal Products
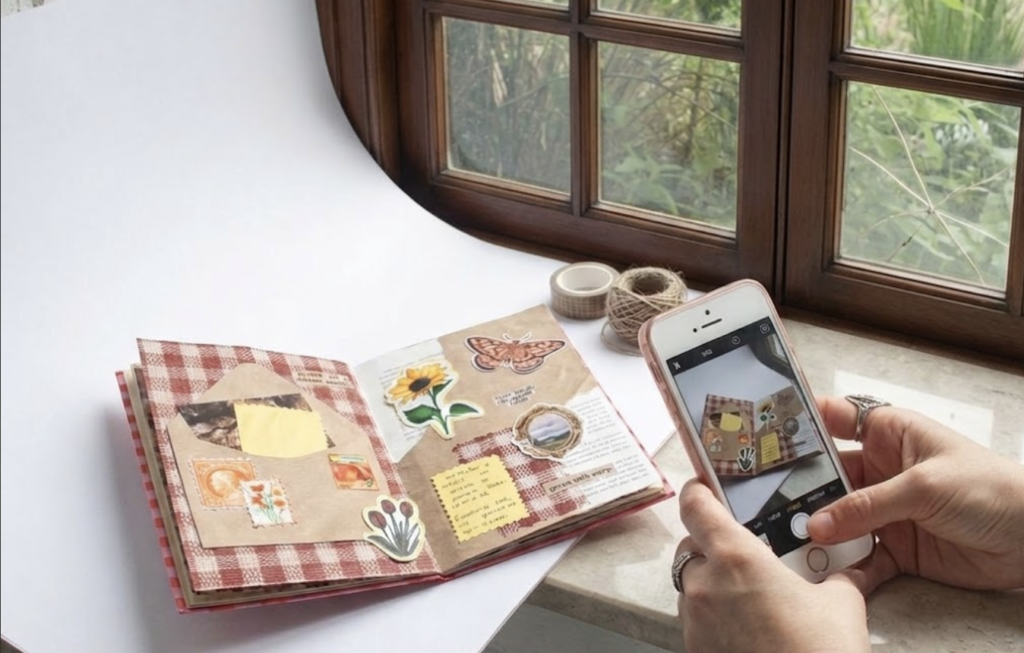
Window light is the best free tool for photographing junk journals at home. North-facing windows provide consistent soft light all day. East and west windows are usable in the right half of the day. Position the journal 2 to 3 feet from the glass, turn overhead lights off, and use a white bounce card on the shadow side.
Photography is the single most common reason junk journal listings don't get clicks. Most sellers who've stalled on listing assume the fix is a ring light or a DSLR or a proper setup they don't have yet. It isn't. The sellers with the best-performing listings in this niche are shooting at home using their phone and natural lighting. This guide walks through exactly how to do that without having to buy professional equipment.
Why Window Light Works for Junk Journal Product Photos
Overhead room lighting flattens surfaces. It comes from directly above and fills in every shadow, which sounds helpful until you realize that shadows are what show texture. The raised paper layers, the aged edges, the stitching on the spine as those are the reasons someone pays $65 for a handmade journal instead of scrolling past it. Overhead light erases them.
Window light comes in at an angle. It rakes across the surface and catches every raised edge, every layer, every material decision you made when you built the journal. That's what stops the scroll in a thumbnail.
Turn the overhead light off before you start. That single change will improve your photos before you've moved anything else.
Which Window Direction Is Best for Photographing Junk Journals?
Window direction and time of day matters when taking a picture of the listing. Here's the breakdown:
North-Facing Windows
Consistent, soft light all day. No direct sun at any time of year. If you have a north-facing window in your craft space, use it. You can shoot at 9am or 3pm and the light behaves the same way. This is the easiest window to build a repeatable setup around.
East and West-Facing Windows
East-facing windows give good diffused light from morning until around 11am, then the angle gets harsh. West-facing is the reverse: rough in the morning, workable from about 2pm onward. Pick the right half of the day for whichever direction you have and the light is usable. Try to shoot in the wrong half and you'll be fighting glare the whole session.
South-Facing Windows
The brightest and most direct. If it's your only option, hang a white sheer curtain across the glass. It diffuses the light enough to work with. Without a curtain, wait for an overcast day. Overcast days are underrated for craft photography because cloud cover acts as a giant natural diffuser across every window in the house.
No Good Window in Your Space
An open doorway facing away from direct sun works. A garage door. Any large opening that lets in outdoor light without letting in direct sun. What you're looking for in any of these is soft shadows and no glare on the journal cover. If you've got that, you've got a shooting space.
How to Test the Light Before You Set Up
1. Hold your hand palm-down about twelve inches above your shooting surface and look at the shadow it casts.
2. Sharp, defined shadow edge: the light is too direct. Hang a sheer curtain, wait for a better time of day, or try a different window.
3. Soft edge or barely-there shadow: you're ready. Set up here.
4. It takes thirty seconds. No equipment required.
How Far From the Window Should Your Journal Be?
Two to three feet is the working range. Start at two feet for brighter, more directional light. Move back toward three feet if the photo looks washed out. The further you go, the softer and dimmer the light gets. Don't go past three feet or you'll start losing the texture that made you choose window light in the first place.
What Surface Should You Shoot Your Junk Journal On?
What to Shoot On
You probably already have something that works. Natural linen or cotton fabric reads warm and organic. A raw wood plank or cutting board adds depth and context. Kraft paper reads neutral and earthy. White foam board reads clean and modern.
Pick based on what you're shooting that day. A cottagecore-style journal with dried florals and aged paper sits right on linen. A cleaner, more minimal journal reads better on white foam board or kraft. The surface should support the journal's look without competing with it.
What to Avoid
Anything glossy or laminated creates glare patches that show up as bright hot spots in the photo. Patterned fabric or paper competes with the journal for the eye's attention. Brightly colored surfaces shift the color of the whole image. If you look at your test shot and the background is the first thing you notice, the surface is wrong. Swap it.
Where to Position the Journal on the Surface
The window should be to the left or right of the product, not behind the camera. Light needs to cross the surface at an angle. That's what reveals texture. If the light is coming straight at the journal from behind you, it'll look flat no matter how good the window is.
How to Fill the Shadow Side Without Buying Anything
One window means light on one side of the journal and shadow on the other. In a product photo, that dark side can read as a flaw in the journal itself rather than a lighting condition. A bounce card fixes it.
Stand something white and matte on the shadow side of the journal, about six to eight inches from the product. Angle it slightly toward the journal rather than straight up. White foam board is the best option because it reflects evenly without adding any color cast. A white hardcover book stood upright works. A piece of white cardstock taped to a cereal box so it stands on its own works too.
Take a test shot. Look at the shadow side of the journal. Move the card closer until the dark area lifts. You're not trying to eliminate all shadow. Some dimension is good. What you're removing is the harsh dark area that makes one side of the cover unreadable.
Two or three test shots to find the right position is normal. Don't skip this step. It's the difference between a photo that looks moody and one that looks professional.
Do You Need a Ring Light for Junk Journal Etsy Photos?
Some spaces don't have a workable window. For example, a basement studio, a north-facing room in a northern climate in December, a rental with one small frosted window. If that's your situation, a small ring light with adjustable color temperature gives you consistent, controllable directional light without depending on natural conditions. It's the right thing to buy when the window genuinely isn't working and you've already tried everything else in this guide. Even when using a ring light, still apply the surface, bounce card, batching, shot sequence.
How Many Photos Should You Take Per Junk Journal Listing?
Why Visual Consistency Across Listings Matters
Every photo taken in the same session has the same light, the same surface, the same bounce setup. That consistency across your listings reads as a deliberate, professional shop. Buyers pick up on it before they read a single word of a listing title. It's not something they consciously clock. It's something they feel as trust when they land on your shop page.
Batching also means photography stops being the task you have to psych yourself up for every time you want to add a listing. Set up once, shoot everything in the queue, put it away. Done until the next batch.
The Shot Sequence for Each Journal
Here's what to shoot for each journal before moving to the next one.
Shot 1: Full cover, overhead flat-lay. Journal centered on the surface, whole cover visible, nothing cropped out.
Shot 2: Cover at a slight angle, shot from just above eye level. This shows the spine, the depth of the pages, the physical weight of the object. It's often the shot that converts browsers who clicked on the thumbnail.
Shot 3: Open pages. Interior texture, ephemera layers, anything that shows what the buyer is actually getting inside.
Shot 4: A detail shot. Close crop on one texture element, a binding detail, a decorative edge. Something that rewards a buyer who clicks through to look more carefully.
Shot 5: A scale shot. The journal beside a familiar object, a pencil, a small cup, to show size in a way that listing dimensions never quite manage.
Shots 6 and 7 if you want options: a second angle, a second detail, one pulled-back shot that shows the journal in simple context. Five shots covers every image slot in a standard Etsy listing. Seven gives you choices when deciding which image goes in the thumbnail position.
How to Run the Session
Set up once. Run every journal in your queue through the same window, the same surface, the same bounce card before moving anything. Don't stop to review photos between journals. Shoot everything first, then sit down and go through them. Resetting the setup between journals breaks the visual consistency you're building, even if the reset looks identical to you.
One session per batch of finished journals. Not one session per listing.
Four Mistakes That Kill Otherwise Good Junk Journal Etsy Photos
Leaving the overhead light on at the same time as the window. Two light sources with different color temperatures produce photos that look simultaneously dark and yellow. Turn the overhead off before you start. Every time.
Shooting in direct sun. Journal covers blow out, shadows go black, and the whole surface reads as harsh. Wait for the light to soften, move to a different window, or hang a curtain.
Moving the setup between journals mid-session. Even a small shift in surface position or bounce card angle changes the light. Do it a few times and your listings look like they came from different shops.
Using a surface with stronger visual texture than the journal. The background should be the last thing the buyer sees. If the surface is winning the photo, replace it with something quieter.
Before Publish Your Junk Journal Etsy Listing
Ask yourself these three questions:
- Is the journal the first thing you see when you look at the photo.
- Does the color match what you'd hold in your hand.
- Is any part of the background pulling your eye away from the product.
Yes, yes, no: list it. It doesn't need to be perfect. It needs to be clear, accurate, and clean. Hold yourself to a higher bar than that and you'll still be sitting on a backlog of unlisted journals six months from now.
The photography setup gets your listings live. What comes next is figuring out how to price them, write titles that actually show up in search, and build a product range that doesn't depend on you making a new journal every time you want to make a sale.
I spent two years working that out the slow way. Mispriced journals. Listings nobody could find. Months where I couldn't tell you why sales were up or down. I wrote the book I wish I'd had at the start. It covers the full system: a four-tier product structure, a listing formula built around how buyers actually search, and a digital layer that adds income without adding production hours.
If you're ready to move past the setup and into the business side of this, it's in here.

A simple, step-by-step business guide for the woman who already knows the craft and is ready to stop giving their work away.
FAQs: How to Shoot Great Junk Journal Etsy Photos
What is the best window direction for junk journal photography at home? North-facing windows are the easiest to work with. They provide consistent, soft, indirect light all day with no direct sun at any time of year. East and west-facing windows are usable in the right half of the day. South-facing windows need a sheer curtain to diffuse the light, or work best on overcast days.
Do I need a ring light for Etsy product photography? Not if you have a workable window. Diffused window light is enough for clean, professional-looking product photos when the surface is set up correctly and you're using a simple bounce card on the shadow side. A ring light becomes useful when your space genuinely doesn't have good natural light, not as a starting purchase, but as a fix for a specific problem.
Can I use my phone camera for junk journal Etsy photos? Yes. Modern smartphone cameras shoot at more than enough resolution for Etsy listings. The limiting factor in most craft photos isn't the camera. It's the light. Get the light right and the phone handles the rest.
What should I put under my journal for product photos? Natural linen fabric, a raw wood plank, kraft paper, or white foam board all work well. The surface should read as neutral and organic without competing with the journal's color palette. Avoid anything glossy, patterned, or brightly colored.
What time of day is best for window light photography? It depends on which direction your window faces. North-facing windows work at any time of day. East-facing windows are best before 11am. West-facing windows are best after 2pm. South-facing windows are most manageable on overcast days or with a sheer curtain. Use the hand-shadow test to confirm the light before you set up.
How many photos do I need per Etsy listing? Five covers every image slot in a standard Etsy listing. Shoot seven per journal so you have options for the thumbnail positions. The five to prioritize: full cover flat, cover at an angle showing spine and depth, open pages, a detail crop, and a scale shot.
What is a bounce card and do I need one? A bounce card is anything white and matte that you stand on the shadow side of your product to reflect light back into the dark area. You need one any time you're shooting with a single window. White foam board works best. A white hardcover book or a piece of cardstock taped to a cereal box works just as well.
What is the best time of day to photograph junk journals indoors? It depends on window direction. North-facing windows work at any hour. East-facing windows are best before 11am, west-facing after 2pm. South-facing windows are most manageable on overcast days or with a sheer curtain diffusing the glass. Run the hand-shadow test before setting up: a soft shadow edge means you're ready to shoot.
Why do my junk journal photos look flat even near a window? Flat photos usually mean the overhead room light is still on. Overhead light fills in shadows from above and erases the texture that makes a handmade journal look valuable. Turn it off before you start. The window light alone will reveal raised layers, aged edges, and spine detail that overhead lighting hides.
Can I photograph junk journals without natural light? Yes. If your space lacks a workable window, a small ring light with adjustable color temperature is the right substitute. Keep the same setup principles: journal 2 to 3 feet from the light source, light positioned to the side rather than behind the camera, and a white bounce card on the shadow side.