

When the holidays end, the festive decorations come down. Suddenly, your home may feel a little starker than usual. Once brimming with seasonal cheer, bare walls now seem cold and empty. However, this situation is the perfect opportunity to bring life back into your space. Winter-themed DIY wall art combines creative expression with cozy decor, helping you reclaim warmth and charm.
Whether you are a seasoned crafter or a curious beginner, these ideas are simple and satisfying. You can embrace winter’s beauty while chasing away the post-holiday blues.
Create Stunning DIY Wall Art for a Winter Refresh
Winter is the perfect time to craft beautiful decor that fills your home with seasonal charm. These DIY projects, from textured fabric pieces to striking snowy landscapes, will brighten your walls and uplift your spirits.
Let’s dive into creative, step-by-step projects to brighten your walls and lift your mood.
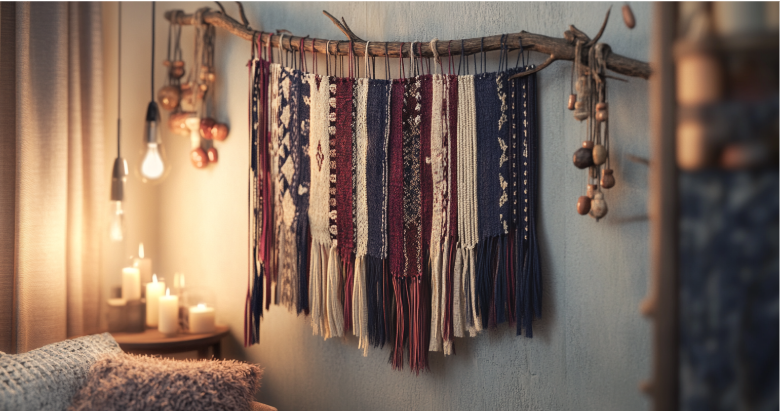
Fabric Wall Hangings for Instant Warmth
Fabric wall hangings add texture, warmth, and rustic charm to any room. They are also easy to make, even for beginners.
What You’ll Need
Gather these materials before starting:
- A natural branch, wooden dowel, or copper rod
- Fabric scraps, old sweaters, or soft felt
- Scissors and fabric glue
- Twine or jute rope
- Decorative items like tassels or wooden beads (optional)
Instructions
- Choose Your Material: Select fabrics in winter tones such as cream, burgundy, or navy blue. Mixing textures like fleece, flannel, and knits adds depth.
- Cut and Arrange: Trim fabric into strips of varying lengths. Uneven cuts create a natural, organic look.
- Attach the Fabric: Loop the fabric strips over the branch or dowel. Use glue to secure them. Add tassels or pom-poms for extra flair.
- Hang It Up: Suspend the branch with twine. Place your hanging in a prominent spot where its soft textures can shine.
Why It Works
Fabric hangings create depth and make a room feel more inviting. They are also easy to change for different seasons, keeping your decor fresh and flexible.
Snowy Landscape Paintings: Serene and Simple
Snowy landscapes bring calm and wonder to your space. You don’t need to be an expert painter to create stunning results.
What You’ll Need
You’ll need the following materials:
- A blank canvas or sturdy poster board
- Acrylic paints in white, blue, gray, and silver
- Paintbrushes in various sizes
- Glitter or metallic accents for shimmer
Step-by-Step Guide
- Prepare Your Canvas: Begin with a soft blue or gray background. Blend the colors with a sponge for a frosty, smooth effect.
- Add Landscape Elements: Paint snowy hills, pine trees, or a rustic cabin. Silhouettes are ideal for beginners.
- Highlight the Snow: Apply glitter or metallic paint to add sparkle, mimicking sunlight reflecting on snow.
- Finish with Details: Add stars, animals, or moonlit skies to personalize your painting.
Inspiration
For ideas, browse winter photography on Smithsonian Magazine. Their galleries offer stunning visuals to spark creativity.
Moreover, painting snowy landscapes can be meditative. You relax while creating something serene and beautiful for your home.
Abstract Art with Winter Hues
Abstract art gives you freedom to explore colors and shapes. This makes it an ideal option for stress-free creativity.
What You’ll Need
Gather these materials:
- A canvas or heavy art paper
- Acrylic paints or watercolors in soft gray, cranberry red, and icy blue
- Painter’s tape or masking tape
- Optional: Palette knives or sponges for texture
How to Create Abstract Art
- Design Your Layout: Use painter’s tape to create geometric shapes or flowing patterns. Arrange lines and angles thoughtfully.
- Choose Your Palette: For a cohesive look, stick to winter colors. For example, combine warm reds with frosty blues.
- Paint and Peel: Paint within the taped areas. Blend shades for gradients or keep bold contrasts. Once dry, remove the tape.
- Add Texture: Use a palette knife to create raised effects or a sponge for soft, blended edges.
Why It Works
Abstract art complements modern spaces while providing a creative outlet. Plus, its adaptability means you can tailor the piece to your room’s aesthetic. Check out Liquitex’s guide for tips on acrylic painting techniques.
Quick DIY Winter Wall Art Ideas
Short on time? These projects are quick, creative, and impactful:
- String Art: Create a snowflake using nails and thread on a wooden board.
- Photo Collages: Print black-and-white photos of snowy landscapes. Arrange them in sleek, simple frames.
- Shadow Boxes: Fill small boxes with faux snow, pinecones, or miniature trees for 3D displays.
These ideas perfectly add winter charm to smaller spaces like entryways or bedrooms.
Transform Your Home with Winter-Themed DIY Wall Art
The post-holiday season offers a chance for renewal and creativity. Winter-themed DIY wall art transforms bare walls into warm, inviting displays. Crafting fabric hangings, snowy landscapes, or abstract designs allows you to celebrate winter while personalizing your space.
Don’t let gray days weigh you down. Instead, turn them into inspiration. Choose your favorite project, gather supplies, and start crafting. Your home—and your heart—will feel brighter and cozier.
Share Your Creations and Connect
Have you tried any of these ideas? Share your creations in the comments! Inspire others by showing how you’ve transformed your space.
FAQs
1. Do I need prior crafting experience for these projects?
No! These ideas are beginner-friendly and require simple materials.
2. What if I lack specific supplies like branches or canvases?
Use substitutes. Try a wooden dowel, curtain rod, or repurpose cardboard.
3. How do I pick the best colors for winter wall art?
Stick to frosty tones like blue, gray, and white. Add cranberry or cream for warmth.
4. Can children help with these projects?
Yes! Kids can help with cutting, painting, or adding glitter to snowy scenes.
5. How can I protect my DIY art from dust?
Use a clear spray sealant for paintings. For fabric, gentle dusting works well.
6. What’s a good alternative to glitter?
Metallic paint or adhesive rhinestones are less messy and add sparkle.
7. How do I arrange multiple pieces on a wall?
Combine different sizes and styles for a gallery wall. Balance colors and textures for harmony.
8. Where can I find inspiration for snowy landscapes?
Check out winter galleries on Smithsonian Magazine.
9. How long will these projects take?
Fabric hangings take about an hour, while detailed paintings may take 2–3 hours.
10. Can I mix different projects on one wall?
Absolutely! Mixing styles adds visual interest and creates a dynamic display.


