

At a Glance: 9 Affordable DIY Patio Makeovers
- Every project here costs under $50 and takes two hours or less to complete.
- No permits, no rented equipment, no post setting.
- From floor upgrades to storage installs, these projects make your patio look and work better fast.
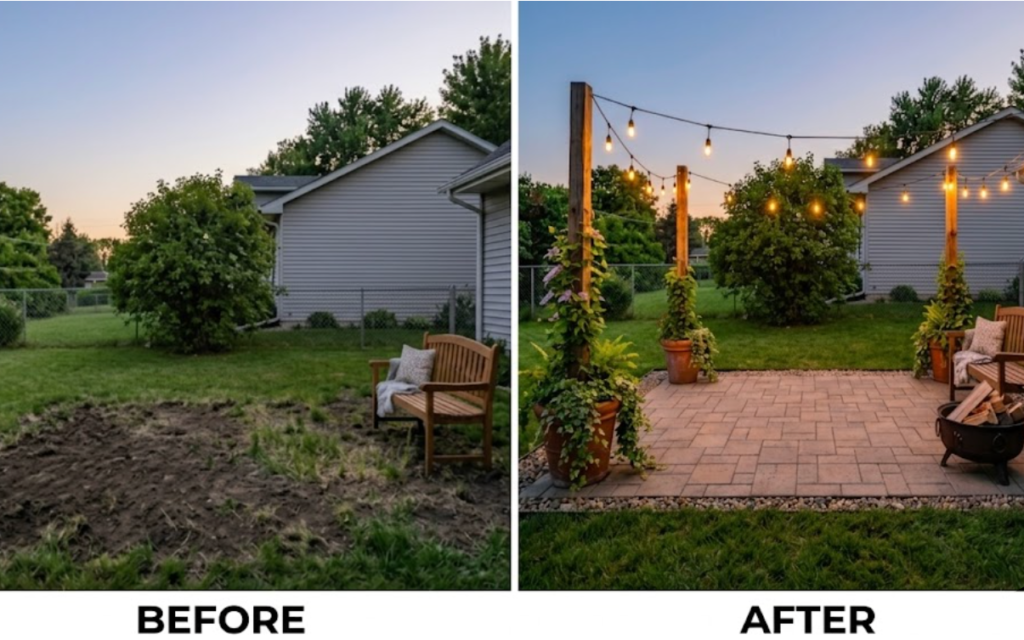
Spring’s warm weather means more time outside, so why not make your outdoor space more inviting? If your patio feels dull or outdated, don’t worry, you don’t need to spend big money to refresh it.
A few budget-friendly patio makeovers can create a stylish and comfortable space for morning coffee, afternoon relaxation, or evening gatherings. Whether you want to update furniture, add greenery, or improve lighting, there’s a simple DIY patio makeover for every budget.
Quick check before you start: walk the patio and look for cracked concrete, loose fence boards, or rusted hardware. Knowing what you’re dealing with before you buy materials saves a wasted trip.
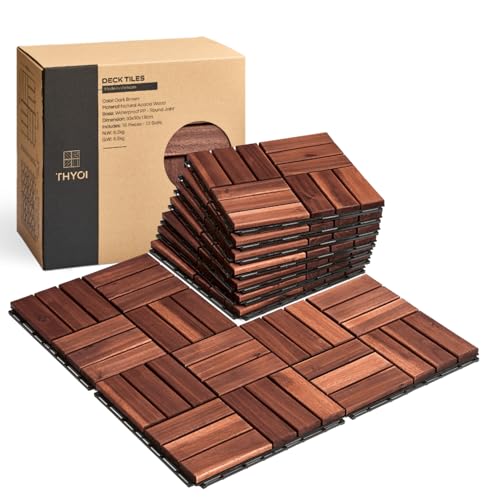
1. Snap-Together Deck Tiles
Snap-together composite or hardwood tiles lay right on top of a flat concrete surface. No mortar, no adhesive, no special tools. Set them down, trim the edges where you need to with a circular saw or jigsaw, and you’re done.
Keep it to one zone. A defined seating area or entry pad around 6×8 feet wraps up in under two hours and uses the tiles without a ton of waste. Trying to cover a full patio in one shot turns this into an all-day project. Start small, see how it looks.
Composite tiles hold up better in wet climates. Wood tiles look warmer but need annual oiling to keep the color.
Time: 1.5–2 hours for a 6×8 zone Cost: $60–$120 depending on tile type and square footage
My patio had that plain concrete look that made the whole space feel half-done. Thankfully, I discovered these snap-on tiles, and they’re one of those upgrades that make you wonder why you didn’t do it sooner. You can get them from here:
2. Solar Post Cap Lights
If you already have fence posts or deck posts, solar cap lights are a straight swap. Pull the old cap off, set the new one on, done. No wiring, no electrician, no permit needed.
A full fence line takes under an hour. It looks like you planned the lighting from the start. Look for caps with at least 6–8 hours of run time and a stainless or powder-coated housing. Plastic caps work but usually don’t make it past a season or two in direct sun.
Time: 30–45 minutes Cost: $8–$20 per cap
My deck looked fine during the day, but at night it just felt kind of dark and unfinished. So I added solar caps, and they’re such a super easy upgrade. If you’re wondering where I got mine, here it is:

- PLASTIC DANCING FLAME SOLAR POST LIGHTS: 8 pack modern post cap lights powered by solar, each with...
- DANCING FLAMES LIGHTS: A safe alternative to the real flame effect - 72 pcs high brightness SMD LEDs...
3. Wall-Mounted Outdoor Shelf
A ledger board and two heavy-duty brackets give you a solid mounted shelf in about an hour. Use pressure-treated lumber for the shelf and exterior lag screws driven into wall framing. For brick or block walls, use masonry anchors.
It looks built-in, holds plants, drinks, a speaker, or tools during a project, and costs a fraction of any outdoor furniture piece that does the same job.
Time: 1–2 hours Cost: $20–$40
4. Concrete Crack Repair and Seal
Cracked concrete makes the whole patio look neglected even if everything else is clean. A tube of concrete crack filler and a can of concrete sealer take care of it in one afternoon. Fill the cracks, give the filler 30 minutes to set up, then roll the sealer across the full slab.
Most people skip the sealer coat. That’s the part that actually matters. It keeps moisture out, slows down future cracking, and gives the whole slab a clean even finish. One gallon covers roughly 200 square feet.
Time: 1–1.5 hours plus cure time Cost: $15–$25
5. Outdoor Storage Hook Rail
Grab a length of pressure-treated 2×6, screw it to the fence or exterior wall with two lag bolts, and add a row of heavy-duty outdoor hooks. Done in an hour.
It’s not the flashiest upgrade on this list but you’ll use it every single day. Garden tools, hoses, extension cords, small equipment — all off the ground and on the wall. Space the hooks evenly and use a level so the board sits straight. It looks intentional that way.
Time: 45–60 minutes Cost: $15–$25 for the board and hooks
I started doing more yard projects and pretty quickly realized my tools were everywhere. So I got this gardening rack and my patio has never looked so organized:

- HEAVY-DUTY GARAGE TOOL ORGANIZER: Revolutionize your garage with this wall-mounted storage hero...
- DE-CLUTTER LIKE A PRO: Transform your chaotic garage into a neat, organized haven with our...
6. Single Cedar Accent Panel on an Existing Fence
Pick one section of your fence and cover it with horizontal cedar boards. No post digging, no concrete, no new framing. Your fence is already there. You’re just putting new boards over it.
Use exterior screws and leave about a 1/4 inch gap between each board so water can drain out. Cedar naturally weathers to a gray if you leave it alone. One coat of exterior oil once a year keeps the warm wood tone if you want it.
Time: 1.5–2 hours for a standard fence section Cost: $30–$50 in cedar boards
7. Small Raised Planter Box
Four sides of 2×10 pressure-treated lumber, four corner brackets, and exterior screws. Cut the sides to length, fasten the corners, add a simple bottom frame with gaps so water drains out, and stain the outside.
One box, one afternoon. Keep it around 3 feet long by 18 inches wide so one person can handle it. Go at least 8 inches deep for flowers and herbs. Go 12 inches if you want to grow vegetables.
Time: 1.5–2 hours Cost: $20–$35
8. Patio Edge Border
A raw concrete slab edge looks unfinished no matter how nice the rest of the patio is. A pressure-treated 2×4 staked around the perimeter cleans it up fast.
Drive landscape spikes through the board into the ground every two feet. Cut the corners at 45 degrees for a clean finish. Stain it to match your deck tiles or fence boards if you want everything to tie together. A standard 12×16 slab perimeter takes about 90 minutes.
Time: 1.5–2 hours Cost: $20–$30
9. Gate and Fence Hardware Upgrade
Old latches, sagging hinges, and bare post tops make a solid fence look beat up. New hardware fixes all of it in under an hour.
Swap the latch and hinges for heavy-duty exterior-rated hardware. Put caps on any bare fence posts. Use stainless or galvanized fasteners — anything else rusts out and stains the wood within a season. Most people ignore the gate until it stops working right or starts looking rough. New hardware takes care of both problems at once.
Time: 45–60 minutes Cost: $20–$40 for latch, hinges, and caps
Show us what you tackled. Share your project onFacebook, pin your favorites onPinterest, or tag us onInstagram. We want to see what you built.
Frequently Asked Questions
What are the most affordable DIY patio upgrades? Concrete crack repair and seal runs $15–$25 and covers the full slab. The outdoor hook rail and patio edge border both come in under $30. These three give you the most visible improvement per dollar on this list.
Which DIY patio upgrades can I finish in under an hour? Solar post cap lights and the gate hardware upgrade both take 45–60 minutes. The outdoor storage hook rail wraps up in under an hour once you have your materials. All three need a drill and basic hand tools.
Do any of these DIY patio upgrades require a permit? None of the nine projects here require a permit in most places. Surface-laid tiles, solar lighting, and fence-mounted builds generally don’t trigger a permit requirement. Check your local code if you’re not sure.
What tools do I need for these DIY patio upgrades? A drill, a circular saw or jigsaw, a level, and a rubber mallet cover most of this list. The concrete project needs a paint roller and a caulk gun. No specialty tools or rentals required.
Which DIY patio upgrade has the best long-term payoff? The concrete seal coat protects your slab from moisture and extends its life by years. The cedar accent panel and the raised planter box both hold up with minimal upkeep. Low effort now, good value later.
Hot Take Poll
Snap-together deck tiles: real upgrade or expensive floor mat?
Drop your take in the comments below.


